


If you 're fed up with Windows and want to try a different operating system, Ubuntu is an excellent place to start. It has excellent hardware compatibility, low requirements, and a vast library of software. Let's see how to install Ubuntu Linux 17.04 alongside Windows, or even replacing Microsoft's OS.
Unblock any international website, browse anonymously, and download movies and Mp3 with complete safety with CyberGhost, just for $2.75 per month:

We have prepared this guide on the latest Ubuntu 17.04. It will also work for most of the previous Ubuntu versions, including the long-term support Ubuntu 16.04 LTS.
Download Ubuntu Linux 17.04
The fastest way to download the latest version of Ubuntu is by visiting the
http://www.ubuntu.com/download/alternative-downloads page.
Halfway down the page, we will find the BitTorrent section.
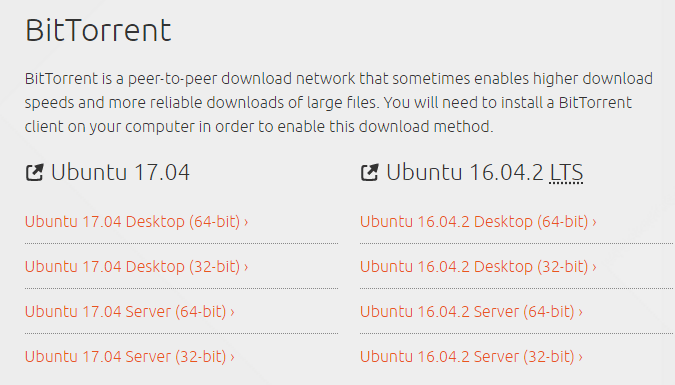
If the PC we intend to install Ubuntu has 2GB of RAM or less, we should select the Desktop (32-bit) version. With 4GB of RAM or more, Desktop (64-bit) is the best choice.
After we download the torrent file, which is just a few kilobytes, we can open it with any Torrent client, such as qBittorrent or BitComet. The client will download the Ubuntu ISO as fast as our connection will allow. The current version's ISO file is just shy of 1,5GB.

Regardless of what some users might think, using a torrent to download Ubuntu or any other type of Linux is entirely legal.
Torrents are illegal only if we use them to download movies protected by copyright, or cracked applications.
How to download Ubuntu Linux without a torrent
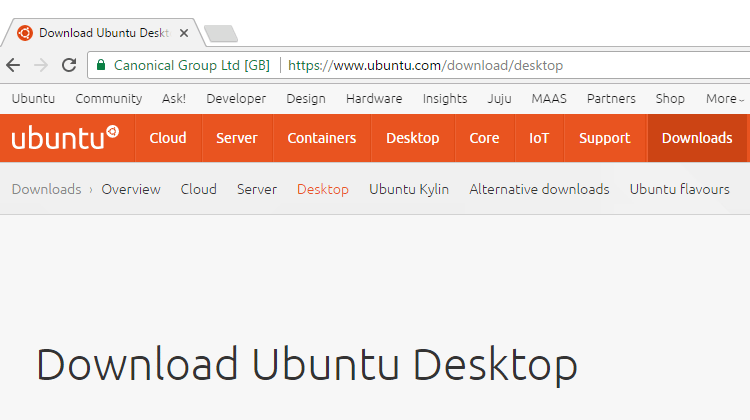
In any case, if you don't have a torrent client and don't intend to install one just for downloading Ubuntu, you can download the ISO straight from the browser. Just visit https://www.ubuntu.com/download/desktop.
At the top of the page, we will find the latest Long-term support (LTS) version, which currently is 16.04.02.
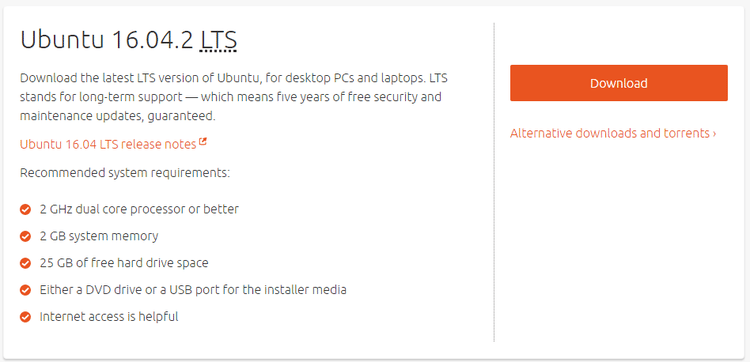
This version of Ubuntu gets five years of official support from Canonical, the company behind Ubuntu, with updates and security fixes.
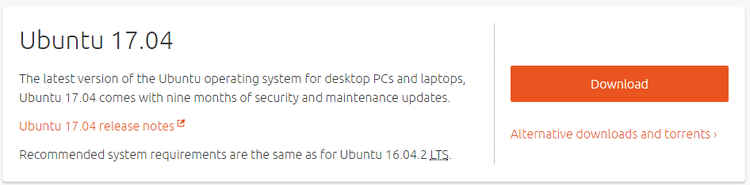
We will find the latest version, currently 17.04, right under the LTS.
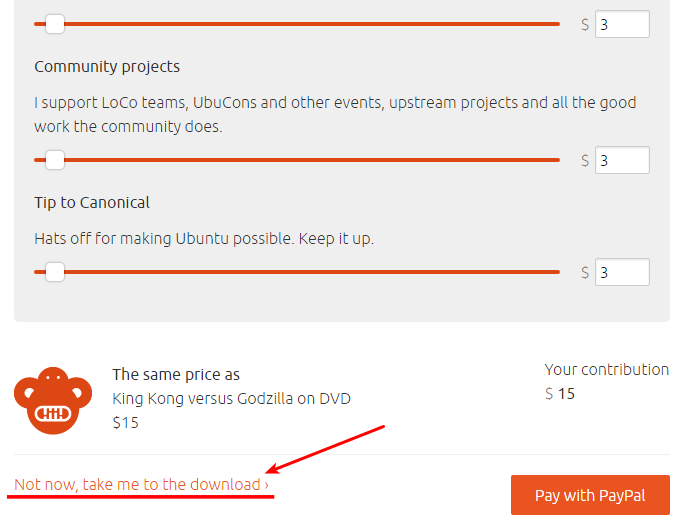
Clicking "Download" on either version, we will get a page where Ubuntu suggests a $15 contribution. This is entirely optional, and we are in no way obligated to pay if we don't want to. We can just click on the "Not now, take me to the download."
On the next page, the download should start automatically. If not, we can click the relevant link.

Create installation media to install Ubuntu
The quickest way to create an installation medium is a DVD Recorder and a blank DVD.
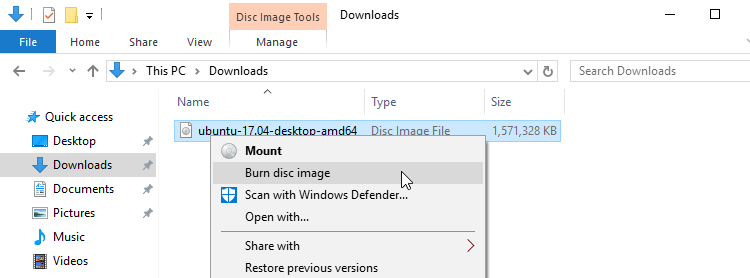
In Windows 7, Windows 8.1, and Windows 10, we just need to right-click on the Disk Image File we downloaded, select "Burn disk image" and follow the simple instructions.
For more methods to create a Linux installation media, including the creation of an installation USB, check out our guide:
Prepare Windows for a Dual Boot Installation
This step is essential if we want to install Ubuntu alongside our Windows installation. If you want to replace Windows with Ubuntu, and only run Linux on your PC, you can skip this step.
The essential preparation checklist before we install Ubuntu includes:
- Check the Windows partitions for errors
- Do a full Windows backup
- Shrink the Windows partitions to make space for Ubuntu
- Disable the "Fast Startup" option in Windows 8.1 and Windows 10
You will find all the above procedures, in detail, in our guide:
Select Boot Device
The first step in installing Ubuntu is to boot from the installation media (DVD or USB) we created.
Usually, our BIOS or UEFI will have the option to press a key on startup and open a boot menu.

It could be any of the F1-F12 keys, or even ESC, as in the above example.
From this menu, we can select our DVD or USB to install Ubuntu.
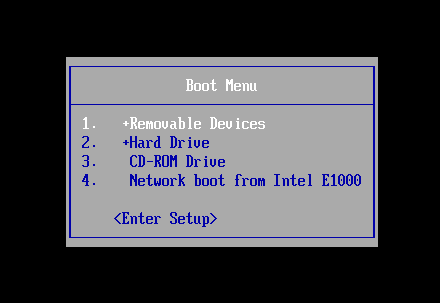
The best thing with the boot menu is that the selection is valid only for this particular boot. Next time we reboot the system, it will boot from the default hard drive.
If you can't find this option on your system, our guide will help:
Change the Boot Order to Boot from USB or DVD on BIOS / UEFI
How to Install Ubuntu 17.04
Before we install Ubuntu, it's a good idea to try it out, to make sure that it is compatible with our hardware, and that we like it as an operating system.
Boot into the live environment
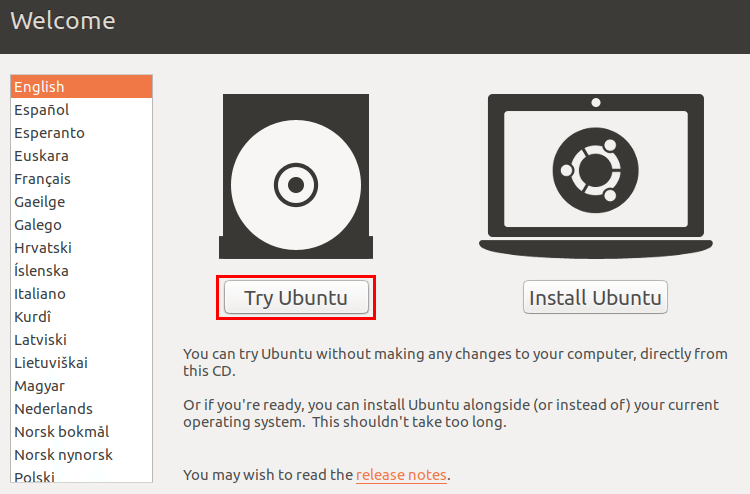
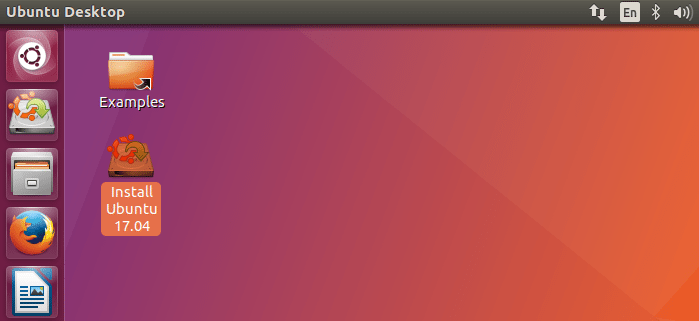
Once we boot from the installation medium, we click on "Try Ubuntu."
In a few seconds, the live environment will load.
If it doesn't load at all on your system, it means there is some severe incompatibility with your hardware, probably with the GPU. In that case, you should consider trying a different Linux distribution.
This environment is fully functional. We can install and run programs, browse the Internet, and use Ubuntu as if we already had it installed.
The key difference is that none of the changes will survive a reboot. Any programs we installed or settings we changed will be gone the next time we load the live environment.
Test network and audio
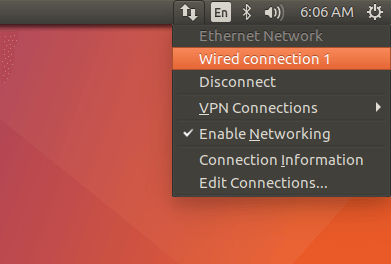
The first check we should do in the live environment is whether the internet connection is working properly. If we use an ethernet cable to connect to the Internet, we should see the two arrows icon in the upper right-hand corner.
In case we are using WiFi to connect to the Internet, we will get a different icon, and the in-range Wireless networks we can select to join.
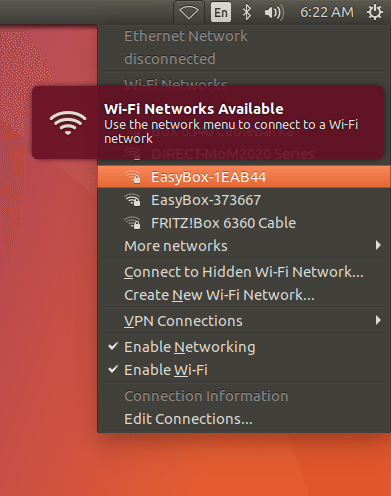
If we don't get any networks, it means that Ubuntu doesn't recognize our network adapter.
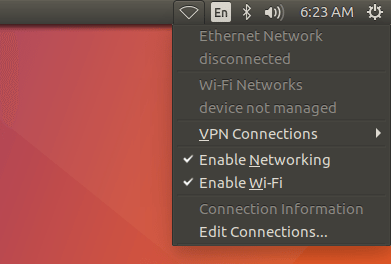
This might be something that we can fix after the Ubuntu installation, but it's usually not as simple as downloading a driver in Windows. There are different methods for different network cards.
In any case, it's important that we have an active internet connection before we begin to install Ubuntu. This way the installation will be able to download some updated software packages.
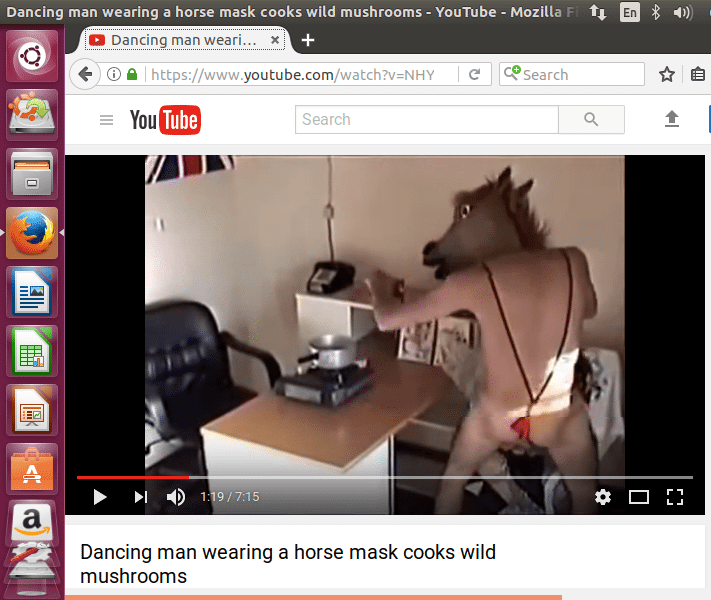
A good way to check our network connection and our sound card at the same time is to load up a YouTube video of our choice on the integrated Mozilla Firefox.
Begin Ubuntu installation
When we are ready to proceed, we double-click the "Install Ubuntu 15.10" icon on the desktop.
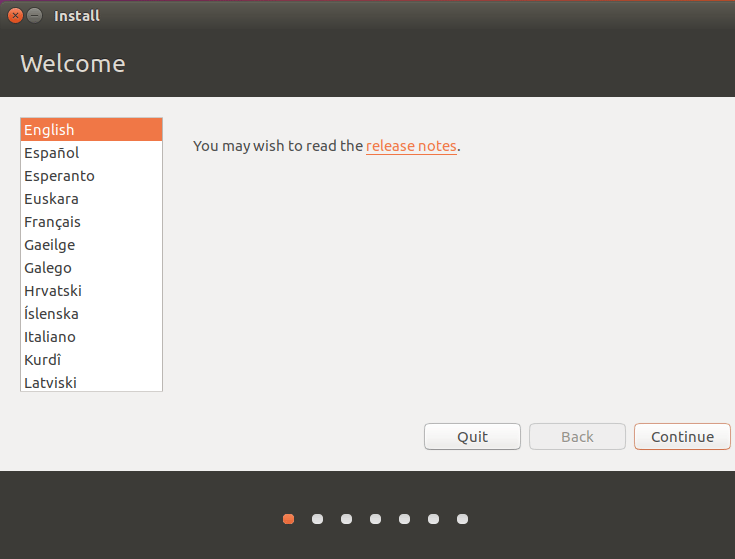
We can select any of the alternative languages available for Ubuntu, or leave the default English. We can change the Ubuntu language after the installation, but it's easier to make this choice while we install Ubuntu.
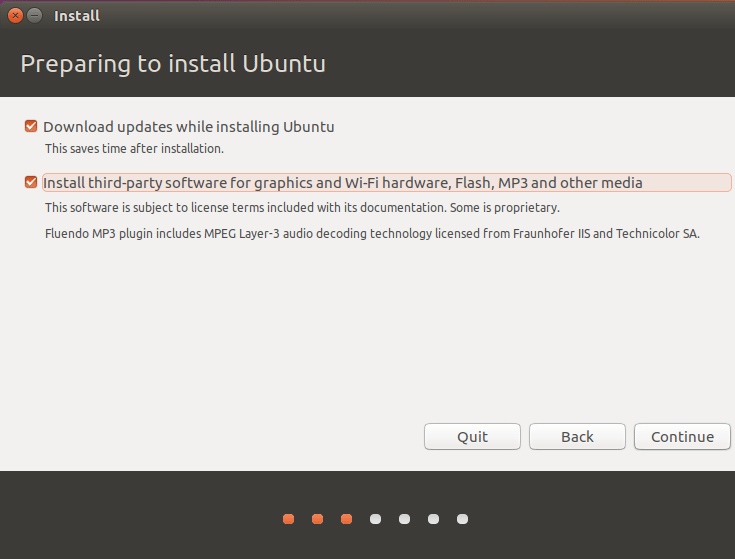
It's a good idea to check both the "Download updates while installing" and "Install this third-party software" checkboxes.
On the "Installation type" screen, if we want Ubuntu to be our sole operating system, we select the "Erase disk and install Ubuntu" option.
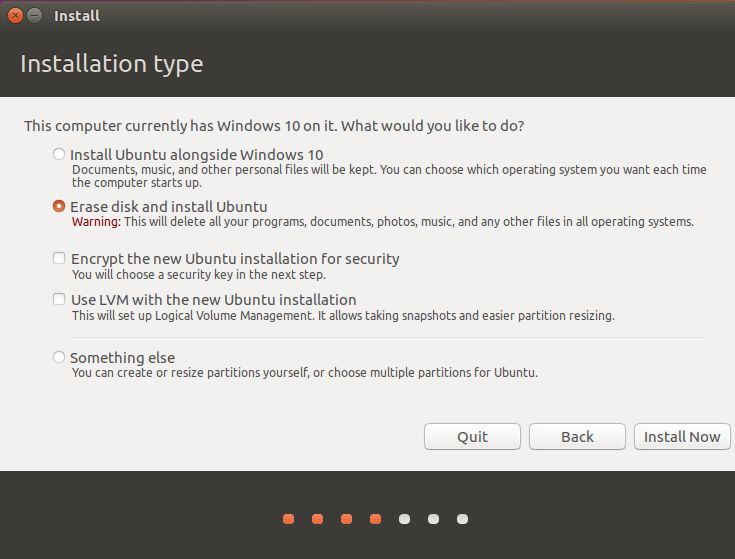
If we want to install Ubuntu in a dual-boot configuration with Windows, we could select the "Install Ubuntu alongside Windows 10", or whichever version of Windows we have installed.
On some systems, however, this option might not be available, or there might lead to some problems with the installation.
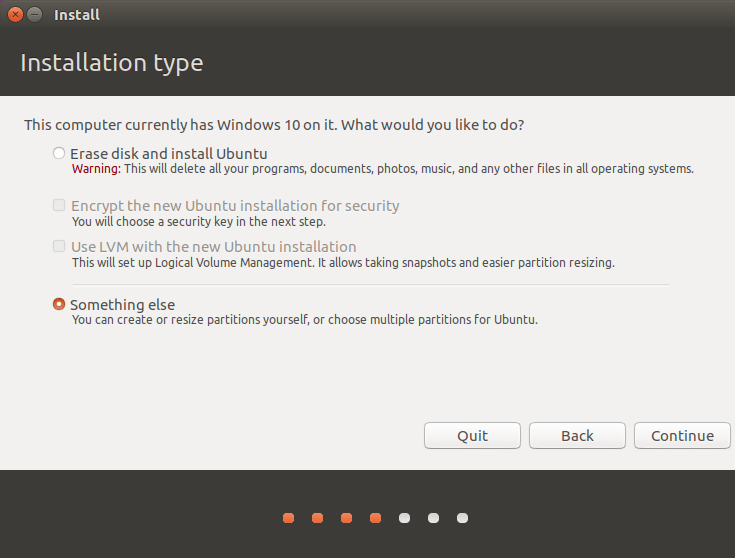
The safest method, which we will cover in this guide, is selecting "Something else," provided we have manually created the proper partitions in Windows.
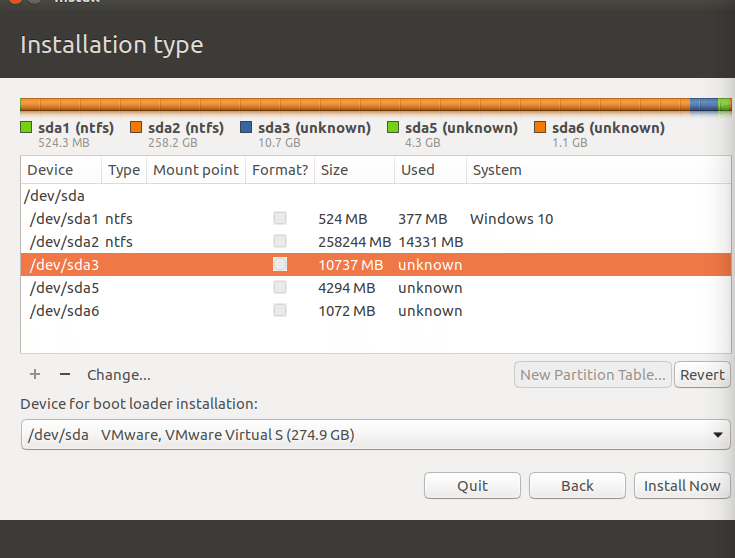
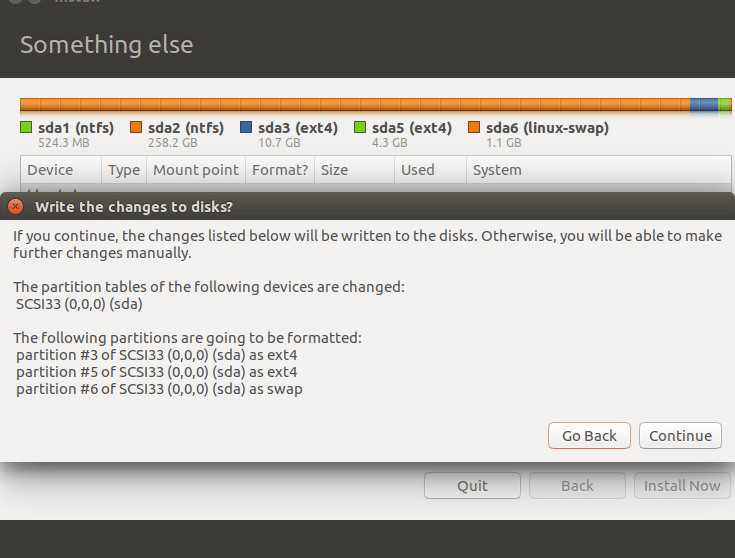
On the next screen of "Something else," we will see the Windows' NTFS partitions, and the three raw partitions we created.
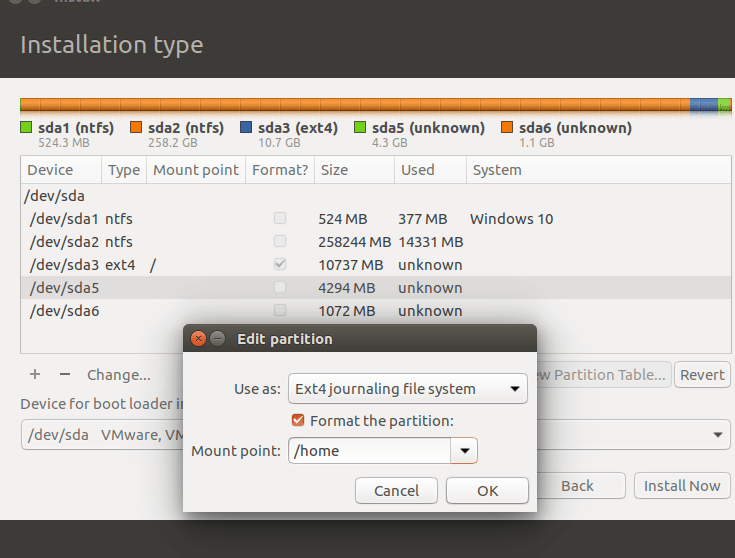
We select the 10GB partition (/dev/sda3 in the example) and click on "Change." On the "Edit Partition" window, we select "Use as: Ext4 journaling file system".
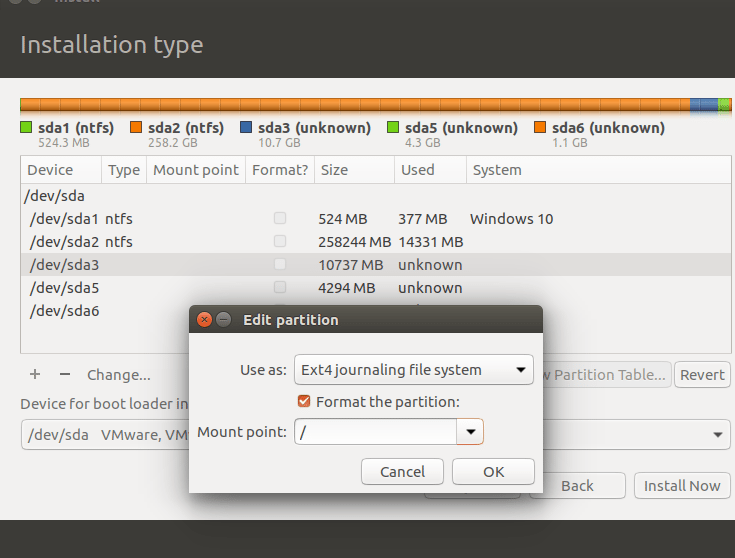
We check to format the partition and select "/" as the mount point.
Next, for the 4GB partition (/dev/sda5 in the example) we choose again "Ext4 journaling", but this time we mount it as "/home."
The final partition will be our swap space.
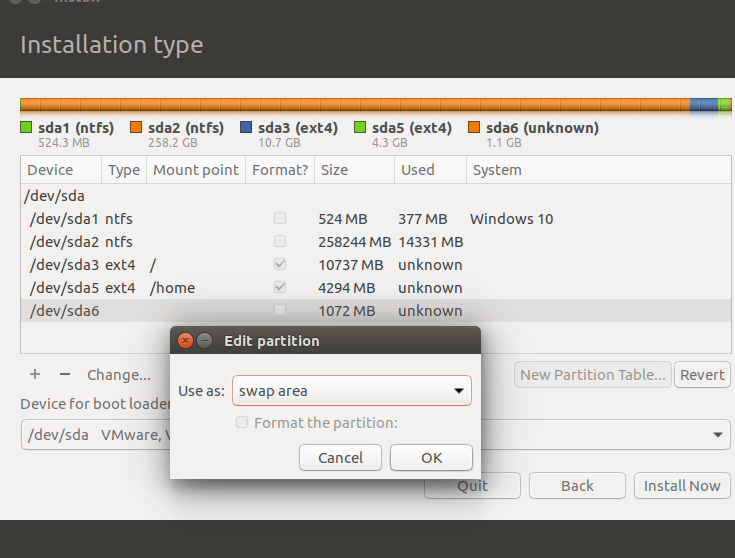
Swap in Linux works exactly like virtual memory in Windows, providing hard drive space as RAM alternative, in case our RAM fills up.
Even the fastest SSD is about the 1/10th of the speed of the average RAM, and with virtual memory, everything runs much slowly. But it surely beats the alternative, of having the computer crash and lock up because it ran out of RAM.
Ubuntu 17.04 is the first Ubuntu version where we can omit creating a swap partition and have a swap file instead. However, we will take the traditional route in this guide, for people who might want to install 16.04 LTS, which doesn't support swap files.
The Ubuntu installation will also allow us to select the device for boot loader installation.
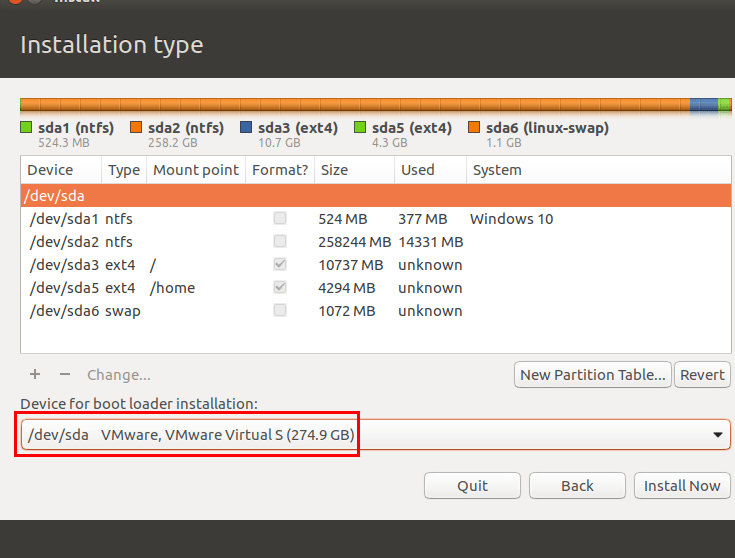
For proper dual-boot, we must choose the Windows boot hard drive, and not a secondary drive, even if we are installing Ubuntu on another disk.
We should note that nothing in the Ubuntu installation has been set in stone yet. If we changed our mind or made a mistake with the partitions, we can shut the installation down right now, and nothing will have changed on our system.
If we are sure we want to proceed, we click the "Install Now" button.
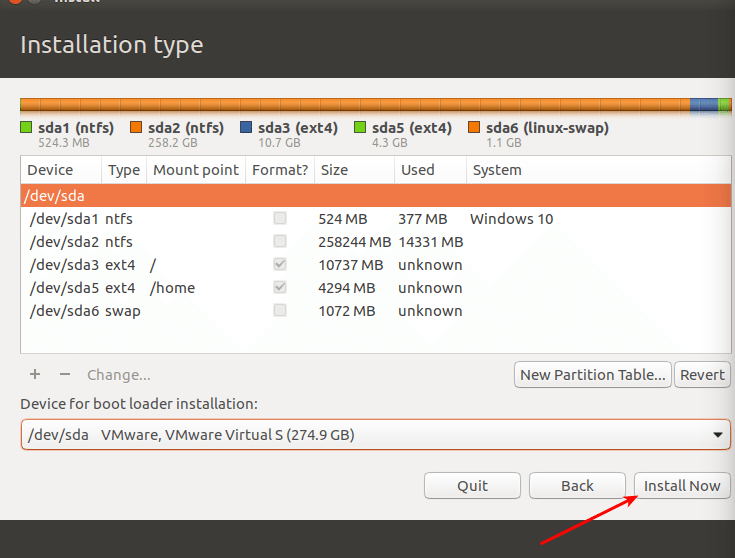
The system will ask for our confirmation with the partition changes before we proceed.
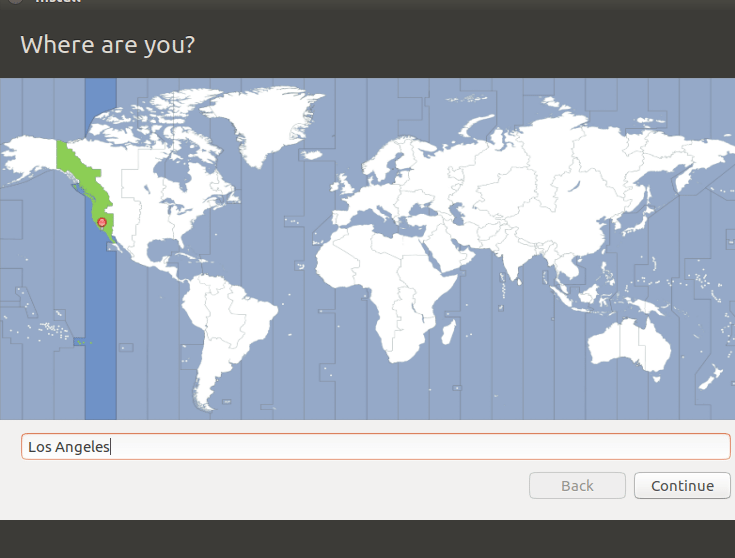
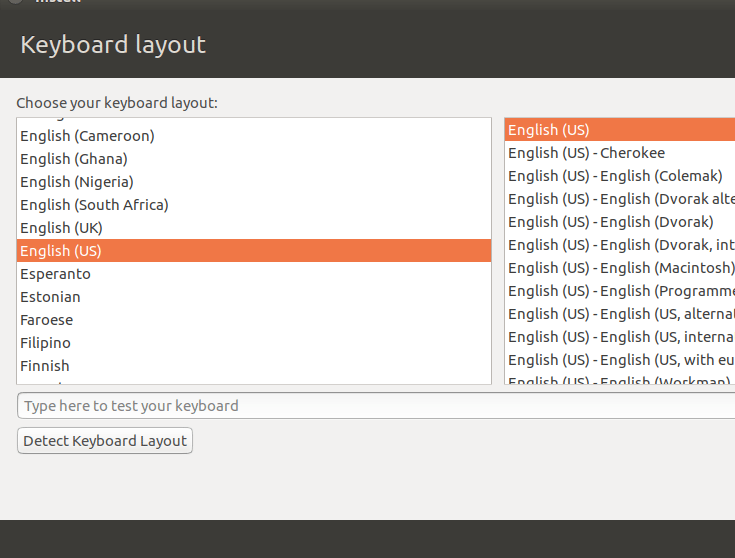
Regional, language, and account settings
On the next few screens, we set up our system and account settings. We must select our time zone on the map...
...choose the keyboard language and layout...
...and fill in the account information. Our name, our username (which must be in lowercase characters with no spaces) and a secure password, with numbers, uppercase and lowercase letters, as well as symbols.
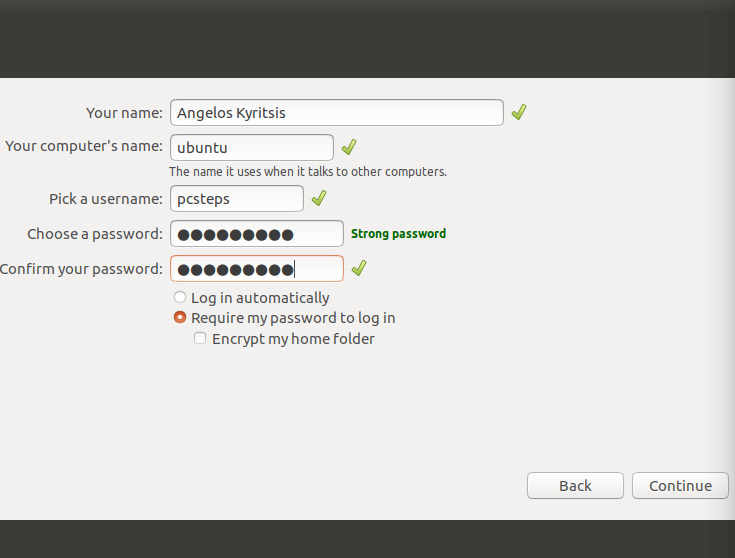
The default setting is for the system to require our password to log in. We can change it, though, so on each Ubuntu startup, our account will log in automatically.
The "Encrypt my home folder" option is not necessary for a home environment, and it could be a challenge if we need to reinstall Ubuntu in the future.
After that, the rest of the installation proceeds without requiring any other input.
If during this time the screen turns black, it's just the power saving setting. Move the mouse, and it will come back to life.
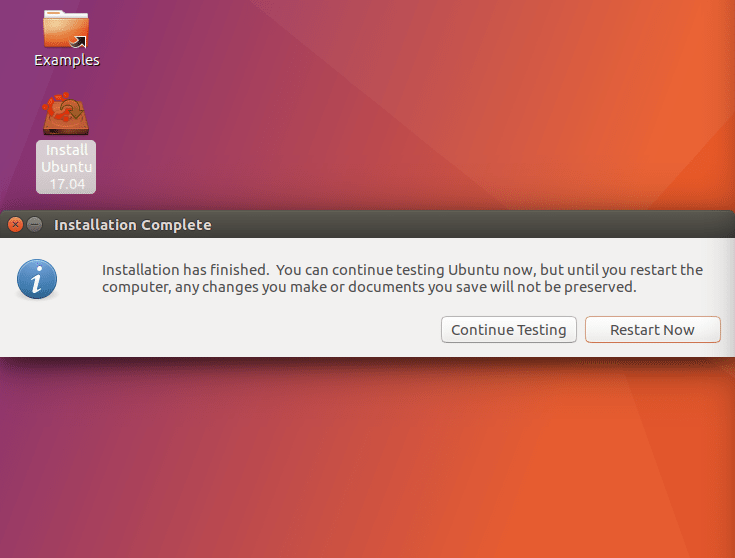
Finally, after the installation, the system gives us a choice to stay in the live environment and keep testing Ubuntu, or restart now and enter the full Ubuntu installation.
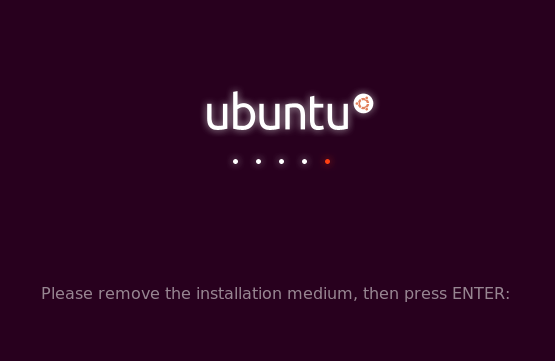
Ubuntu will ask us to remove the installation medium and press Enter, to complete the reboot. It does this to avoid accidentally entering the Ubuntu installation again.
The first Ubuntu boot
Once we reboot, Ubuntu's boot loader, GRUB, will be the first thing we see after the BIOS/UEFI POST screen.
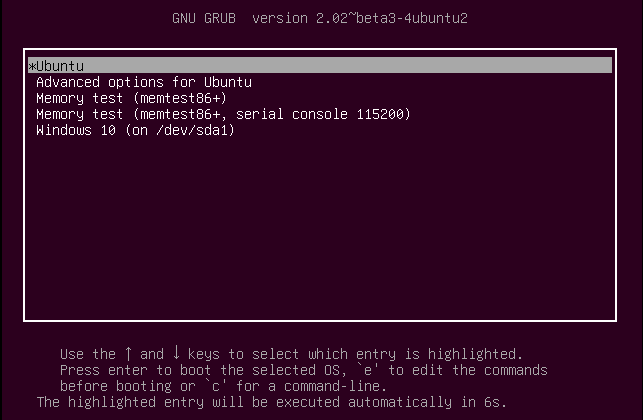
From here we can select to boot Windows or leave the default Ubuntu to load automatically in 10 seconds.
A few seconds later, we are at the log-in screen.
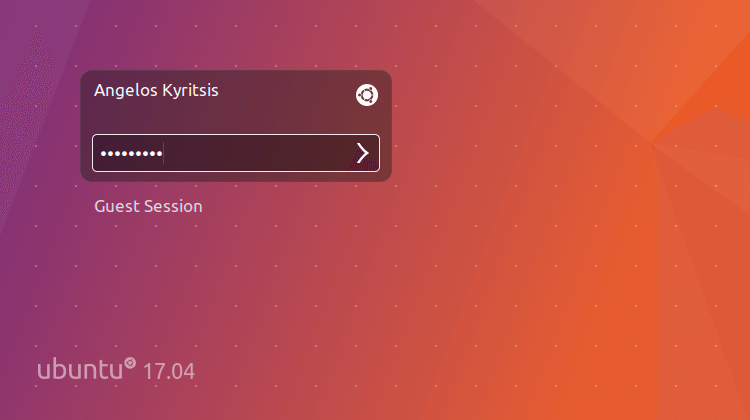
Et voilà! Our very own Ubuntu installation.

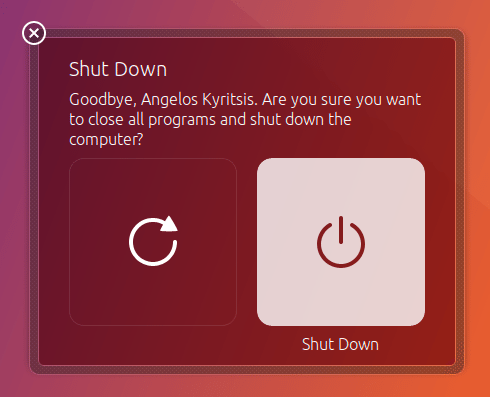
Just like in Windows, shutting down Ubuntu is a procedure. We click on the appropriate icon, select "Shut Down"...
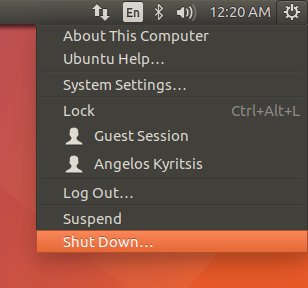
...and choose whether we want to Shut Down or Reboot the system.
What's next: The essential actions after an Ubuntu 17.04 installation
Installing Ubuntu is easy. But, if we're new to Linux, setting up the system to our liking can be challenging.
On an upcoming guide, we will walk you through all the essential actions for a new Ubuntu 17.04 installation.
Stay tuned!
Did you manage to install Ubuntu on your PC?
If anything on the guide didn't work as we described, and you weren't able to install Ubuntu on your PC, or if everything went swimmingly and you are enjoying your new OS, leave us a comment.
Support PCsteps
Do you want to support PCsteps, so we can post high quality articles throughout the week?
You can like our Facebook page, share this post with your friends, and select our affiliate links for your purchases on Amazon.com or Newegg.
If you prefer your purchases from China, we are affiliated with the largest international e-shops:
