Most home networks assign a dynamic IP address on each device. However, if we are interested in port forwarding, it is essential to know a device's LAN IP. Let's see how to set a static IP in Windows 7, Windows 8, and Windows 10 on our local area network.
Unblock any international website, browse anonymously, and download movies and Mp3 with complete safety with CyberGhost, just for $2.75 per month:
We should mention that having a static IP in a Local Area Network is something entirely different than having a static IP on the internet.
To get a static IP on the internet, you must contact your ISP or use a dynamic DNS service such as DynDNS and No-IP.
How to set a static IP address in Windows 7, Windows 8.1, and Windows 10
To setup a static IP address on Windows 7, 8.1, and Windows 10 we need to right-click on the network icon and select "Open Network and Sharing Center".

There, we click on the Local Area Network connection, be it Ethernet or WiFi.
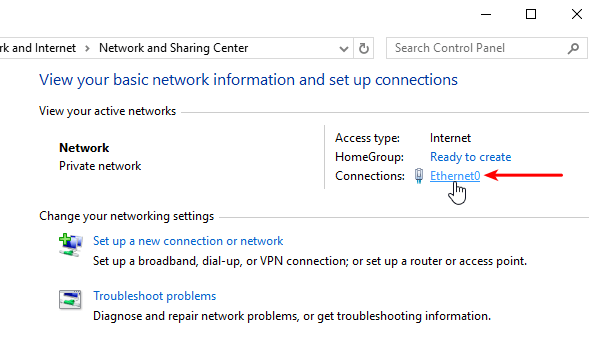
At the connection's status, we click on "Details...".
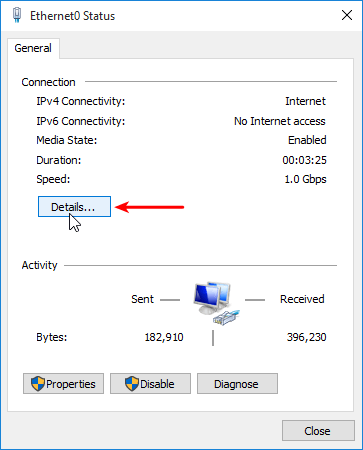
There is a lot of information here, which might seem confusing, but we are only interested in a single line: the Default Gateway IP Address. This is the router's IP address on the LAN.
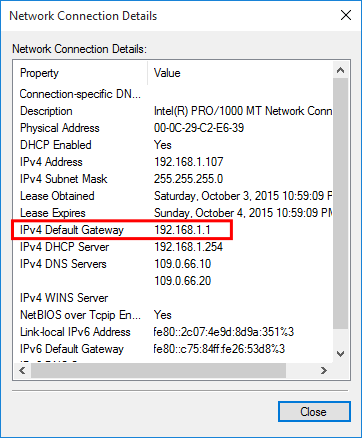
We write the address down and close the Details Window.
Back on the connection window, we click on "Properties".
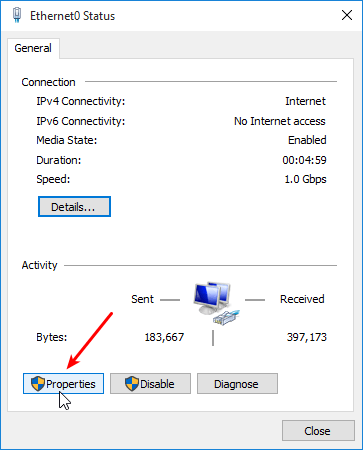
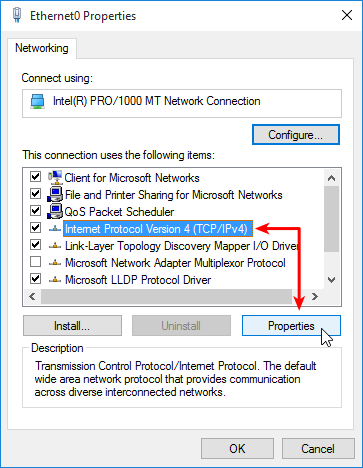
On the properties window, we select the "Internet Protocol Version 4" item and click on Properties.
On this screen, we select "Use the following IP address". For "Subnet mask" we enter 255.255.255.0. Both the default gateway and the preferred DNS server fields get the default gateway IP we wrote down earlier.
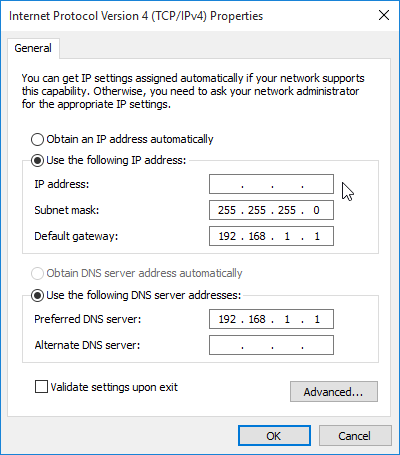
Finally, we must choose the static IP address according to the default gateway address. The first three numbers must be the same (192.168.1.x in the example). The last number must be different from the default gateway's, and less or equal to 254.
It's best if we choose a three-digit number, between 100 and 254, to avoid a possible conflict with the DHCP server on the router, which automatically assigns IP addresses.

Theoretically, we should enter our router's interface, and set up the DHCP so it won't give this particular address. But for a small home LAN, it isn't strictly necessary.
We close the three windows with OK -> OK -> Close, and now our Windows PC will always have the static IP address we assigned to it. It is applied automatically; we don't need to reboot the PC.
We should test that our internet access is working with the new settings.

If we lost internet access after setting up a static IP address, we should revert to obtaining an IP address and DNS server automatically.
Caution: If we set up a static IP address on a laptop's wireless adapter, the setting will remain in any wireless network we will connect. This will cause Internet connectivity problems in networks with a different default gateway address. So remember to revert to the dynamic IP address in that case.
Did you have any problem setting a static IP?
If anything in this guide didn't work as described, and you weren't able to set up a static IP on your PC, leave us a comment.
Support PCsteps
Do you want to support PCsteps, so we can post high quality articles throughout the week?
You can like our Facebook page, share this post with your friends, and select our affiliate links for your purchases on Amazon.com or Newegg.
If you prefer your purchases from China, we are affiliated with the largest international e-shops:


ποιο ειναι το οφελος?
Είναι Αγγλικό το site, από που κι ως που γράφεις στα Ελληνικά?
I use window 8.1. My PC has 3 ipadd: 192.168.100.209, 192.168.11.209, 192.168.13.209.
How do I set default ipadd for my PC is 192.168.100.209 ?
Current it's always default is 192.168.11.209.
Please help.