

If you have ever opened the detailed graphics settings in a game - apart from the general Low-Mid-High-Ultra Presets - you may have realized that you don’t know what most of them are about. Below we will see what the graphics settings represent, from Anisotropic Filtering to Tessellation, as well as demonstrate ways to achieve the best quality possible for a smooth gaming experience, without sacrificing the FPS.
Unblock any international website, browse anonymously, and download movies and Mp3 with complete safety with CyberGhost, just for $2.75 per month:

How important are the graphics settings in gaming?
Graphics do not entirely determine the quality of a game. There are numerous top-quality games with terrible, "8-bit" graphics. On the other hand, we can find games with photorealistic 3D graphics, which are a "watching paint dry" grade of boring.
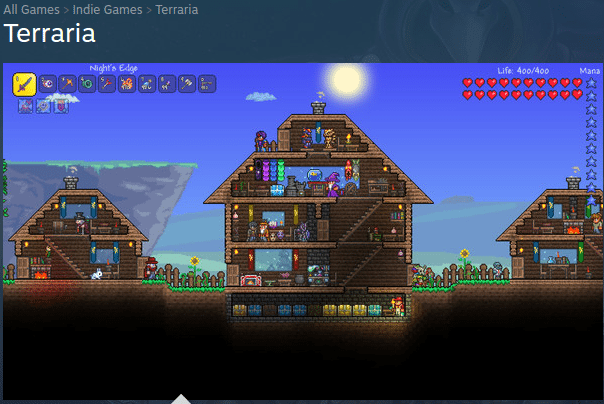
It is not accidental that in a game as Terraria…
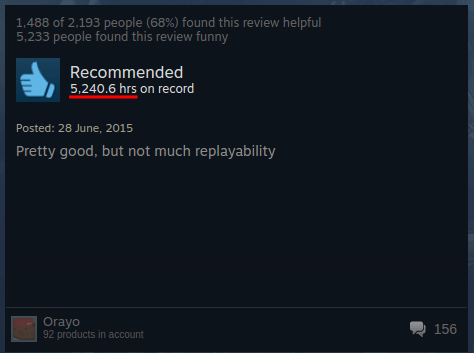
…we will come across multiple Steam comments such as the following.
However, in today’s guide, our goal is not to research the relationship between a game’s graphics and its gameplay.
What we are going to review here is the graphics settings, investigate what the jargon means, and what we should change to obtain the optimal balance between visual quality and performance in any given game.
We all want to run games with the graphics on High or Ultra, but many times, especially in AAA titles, our hardware may not be able to support such advanced settings; the main culprit is - of course - our GPU.
For this reason, it is useful to know which settings we can deactivate or set at a lower level so that we can play the game without any annoying frame drops or stuttering while retaining its good looks as much as possible.
Where can we find the graphics settings?
As far as graphics are concerned, some games can give us pages and pages of choices, while others restrict us to a smaller range of settings. Meanwhile, there are games which do not have a customization option at all.
However, even if there is no setting in the game’s options, we can find ways to improve the visual quality, or at least try.
Therefore, according to each person’s needs, there are three ways to control the graphics settings in the games.
Game settings
As we mentioned, each game offers its own options for customization. The first place we need to search for graphics settings is the classic option “Display Settings,” “Video Settings,” or “Graphics Settings” from within the menu of the game we are interested in.
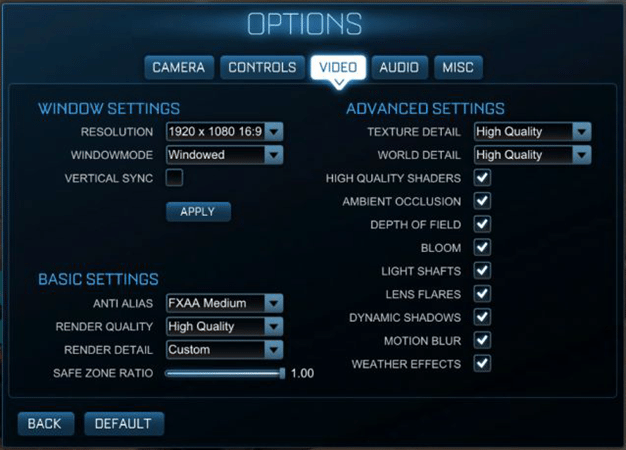
In most of the games, we have access to this option during the game. In others, however, we may need to set the graphics settings before we start playing, and might need to restart the game for the changes to take effect.
Also, many games have a simplified menu for the graphics settings, with low-medium-high options. In this case, we can usually find the advanced settings in a Custom or Advanced options menu.
Control panel of the graphics card
Apart from the individual settings of each game, we will find a series of settings at the control panel of the graphics card, which we can use for all of our games.
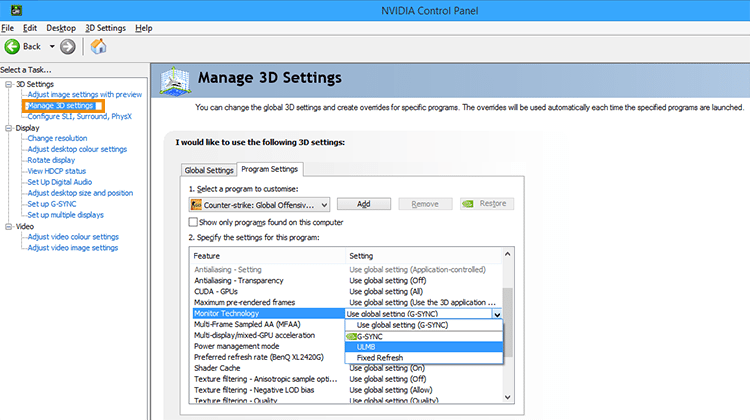
If we have an Nvidia graphics card, we will find the corresponding settings in the ‘Manage 3D Settings’ tab on the Nvidia Control Panel.
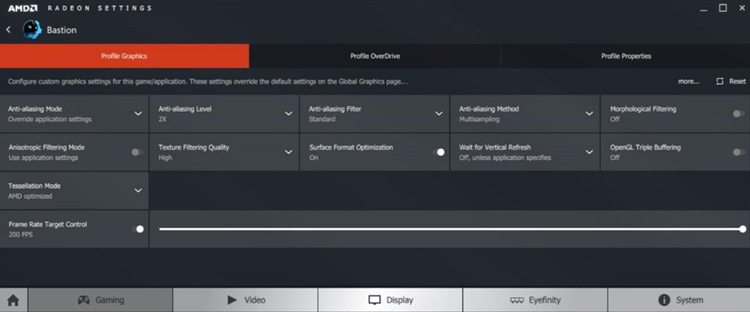
Accordingly, if we have an AMD graphics card, we can have access to the game settings by going to “Radeon Settings” and selecting “Profile Graphics” on the “Games” tab.
Separate applications
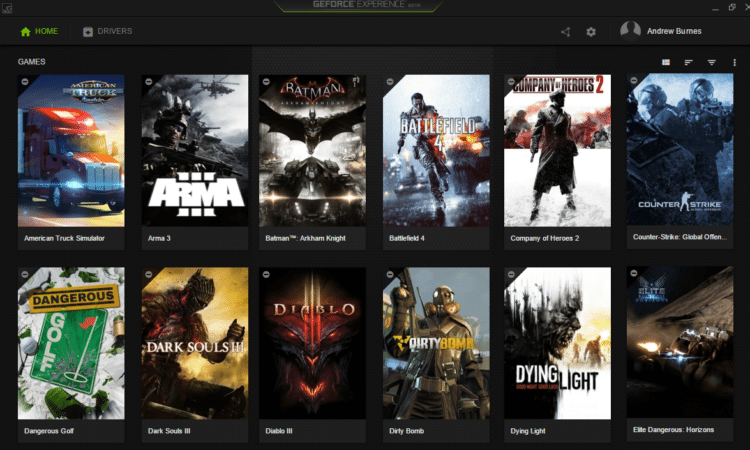
Each one of the two big companies in the field of GPU offers its own software for games’ graphics settings. Nvidia has Geforce Experience…
…while AMD provides Gaming Evolved.
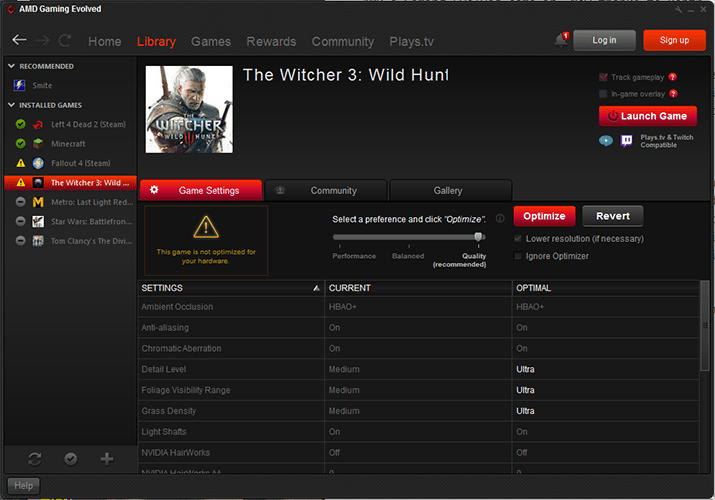
Through these applications, we can set automatically or manually different parameters for all our games simultaneously or each game separately.
Apart from the graphics settings, this kind of applications provides further conveniences, such as recording and streaming our in-game progress.
Besides the above options, third-parties have published relevant applications, with numerous settings to tamper with, so we can improve the image quality of our games.
A few examples are the several programs improving the graphics, such as SweetFX, ReShade, GeDoSaTo, and others. However, we will cover these apps in detail in a separate guide.
How many FPS?
All of us can pretty much figure out when a game stutters and when it has a normal flow. Below we will also learn what the graphics settings mean so that we will be able to start testing.
But how can we measure our FPS in a game, to know precisely how much the altered graphics settings affect the performance? Admittedly, it is not the best solution to use our eyes for an approximate measurement.

Let’s see a few ways of measuring our FPS in-game.
Through the game
Many games have an option such as ‘Show Frame Rate’ incorporated in the graphics settings. Usually, we find this setting as ‘Show FPS’ somewhere in the display settings section of our game. Alternatively, we might find it in the Advanced Settings.
In any case, we can perform a Google search with the name of the game and the ‘show fps’ keyphrase.
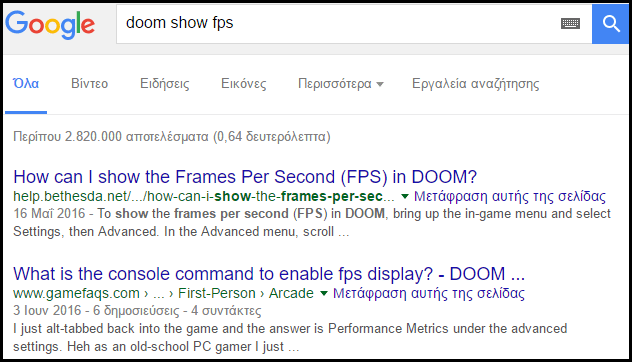
By searching within the first few results, we will find either where this setting is hidden, or a combination of keys which activates it in the game we are interested in.
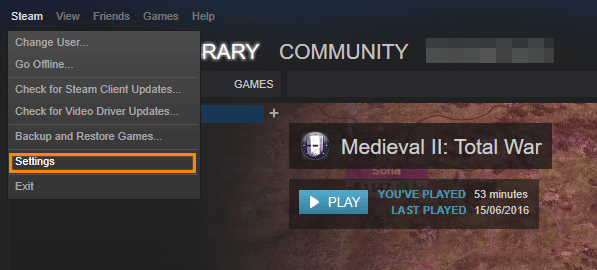
Through Steam
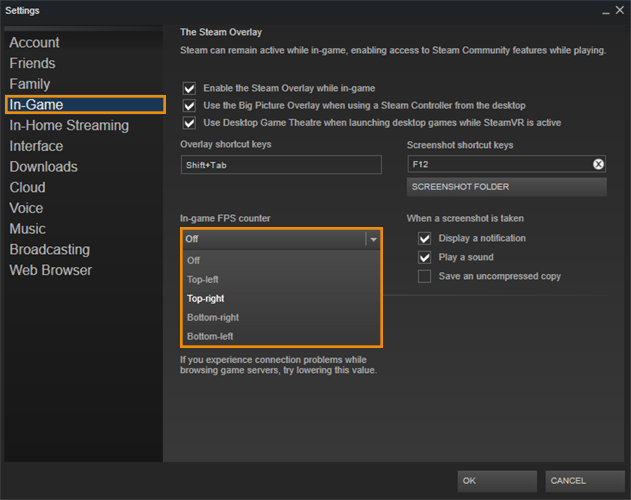
Steam is by far the most popular platform for game distribution. To show our FPS in the games we play through Steam, we go to Settings…
…and from the tab ‘In-Game,’ we select which corner of the screen we want the FPS counter to appear on.
Third-party applications
If we don’t use Steam and our game does not feature a built-in counter, then we need to turn to a third-party solution.
Fraps is one of the oldest and most guaranteed solutions to measuring the FPS. Although the program has not seen any updates since 2013, it still does the job.
To activate the frame rate counter, all we have to do is open Fraps and press F12 while playing the game.
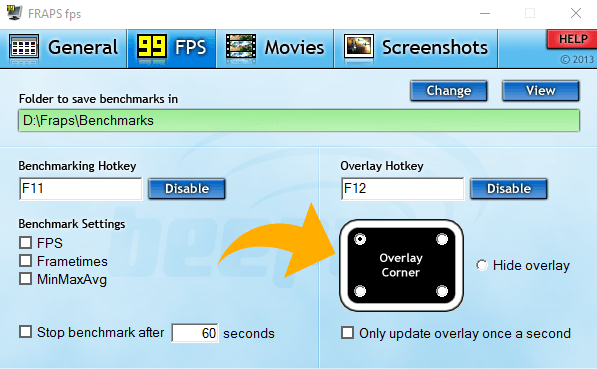
We can also select the corner where the meter appears. To do this, we choose the desirable corner from the black square as shown in the picture above.
The most common settings
Once we open the graphics settings, we might feel a bit lost.
If you are wondering what Anisotropic Filtering, Antialiasing, or Tessellation are, keep reading.
Display resolution
The resolution is one of the most critical settings we can change in a game, and it is associated with the quantity of data that we see on our screen.
In short, the smallest possible graphic illustration is called a pixel, and it is a tiny square with a particular color and brightness.
The Best Tricks to Enlarge Photos With Minimal Loss Of Quality
The number of the horizontal pixels multiplied by the number of the vertical pixels constitutes the screen resolution. The most common is 1920x1080, known as Full HD.
How does display resolution affect the game's performance
As we already know, a high-resolution image is considerably clearer compared to a low-res on, because of the amount of information it incorporates. Gaming is not an exception, since the higher the resolution, the better the visual result.
When we increase the resolution of a game, the more pixels the GPU will have to produce and consequently the more the workload it will have to cope with.
What is the recommended setting for display resolution?
Every LCD or LED screen has a unique ideal resolution, depending on the number of the physical pixels it features in rows and columns across the screen. This is called the native screen resolution.
You two guys out there who are stuck with a CRT screen, what on earth are you thinking? Buy a new monitor if you want to play games.

Therefore, those who own an LCD/LED screen, the best choice they have is to run the games on the native screen resolution. This option will bring about the best visual result.
Gowing lower than the native screen resolution is an option if and only if we have a very old computer and we really want to play a demanding game without upgrading first.
If our screen supports 1920x1080, then, for games we can apply 1680x1050 from the graphics settings.
This way we increase the FPS (Frames Per Second), because the low-end graphics card will have fewer pixels to produce. Simultaneously, the image in the game will become noticeably blurred, giving the sense of the anti-aliasing, which we will review below.
Obviously, the result won’t be as good as if we had used the real anti-aliasing in combination with the native resolution. It is worth a try, however, for older systems which produce lower FPS, mainly as a result of a weak CPU and GPU.
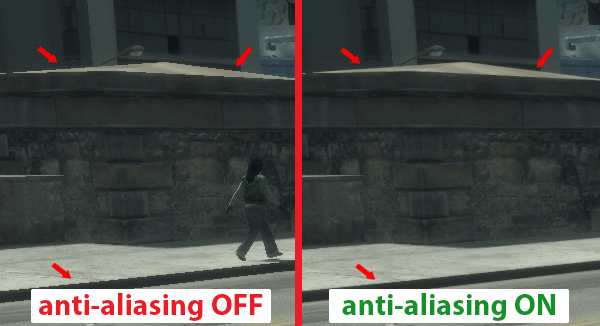
Anti-aliasing
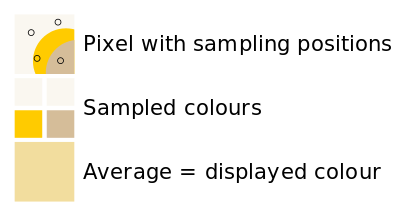
AA, short for Anti-Aliasing, is one of the most popular and controversial graphics settings. The AA is used to smoothen out the ‘pixelization’ which takes place on the edges of the objects.
Pixels are by definition square. When we use a square pixel to draw a non-square object, we get an artifact called aliasing.
To understand what this artifact looks like, we need only imagine a depiction of a diagonal black line, using only squares that cannot rotate - aka pixels.

As it is obvious, we will see “steps” in the picture, instead of a straight line.
If the line were horizontal or vertical, this phenomenon would not appear, because all the squares would be parallel to each other. Therefore, all the lines which are not parallel with the sides of a pixel are affected by aliasing.
The anti-aliasing setting comes to solve the problem, by creating a smoother switch in colors between adjacent pixels. So, if we performed anti-aliasing on the above line, the result would be something like this.

As we see, with anti-aliasing on the line it seems as if we have applied a sort of a blur effect. If we look at the line from a distance, we will see that the steps tend to disappear in the second case.
How does anti-aliasing affect the game's performance?
There are many technologies developed for anti-aliasing. Furthermore, almost each one of them gives us the opportunity to choose the amount of anti-aliasing, usually on a scale from low to high.
These techniques affect the graphics card differently and, naturally, the more we climb up the ladder, the more we push our graphics card.
Anti-Aliasing is a quite demanding process, and it can severely affect the game's performance. In other words, it can reduce our FPS a lot, but it improves the graphics quality to a great extent.
But let’s see which anti-aliasing techniques are the most popular.
Supersampling
The most common AA form in recent AAA titles is Supersampling Anti-Aliasing or SSAA in short.
In a few words, SSAA "commands" the graphics card to produce each frame of the game at a higher resolution than our screen. If we have a Full HD screen, the GPU might produce up to 4K images, depending on the setting.
Then, SSAA uses the extra pixels which the GPU produced as samples and shrinks the frame to the desired resolution. The color of each pixel in the shrunken image is defined as the average of the sample taken from the larger frame.
This method achieves perhaps the best anti-aliasing result for the whole image, but it has a significant impact on the performance.
Since the graphics card is forced to produce each frame at a much higher resolution, it makes sense that it will need more time, therefore giving us fewer FPS.
What is important with SSAA, is that it goes beyond just helping with anti-aliasing. Because of the increased resolution of each frame's production, the whole image seems a lot clearer and with more detail.
With a 4K SSAA, for example, one could say that we get approximately a 4K quality on a Full HD resolution.
MSAA
Multisampling Anti-Aliasing (MSAA) does the same as SSAA, with the difference that it aims at the edges of the objects.
In other words, it requires the graphics card to produce in high resolution only the areas of the image which contain lines, because we usually spot the aliasing on those parts.
This way, it produces a quite good result, with less processing power than SSAA.
CSAA and CFAA
Coverage-Sampled Anti-Aliasing (CSAA) and Custom-Filter Anti-Aliasing (CFAA) are technologies developed by Nvidia (from the series GeForce 8 and on) and AMD accordingly (from the series HD 2000 and on).
These methods use the MSAA, with the difference that they are designed to take advantage of specific features of the respective cards from each company.
Therefore, they achieve an improved result in comparison with the MSAA, while bringing an equal burden to the graphics card.
FXAA and MLAA
From the series HD 6000 and on, AMD developed Morphological Anti-Aliasing (MLAA), which uses post-processing methods to apply anti-aliasing to the whole image.
When we talk about post-processing filters, we mean that they are applied after the card produces the image. For this reason, this kind of filters doesn’t need too much extra processing power and, as a result, it doesn’t significantly burden our card.
MLAA has a similar performance to CFAA for the graphics card, but with better visual results.
The corresponding technology of Nvidia is the Fast Approximate Anti-Aliasing (FXAA), which is admittedly more widespread than MLAA, and it has almost become a synonym to Post-Processing Anti-Aliasing.
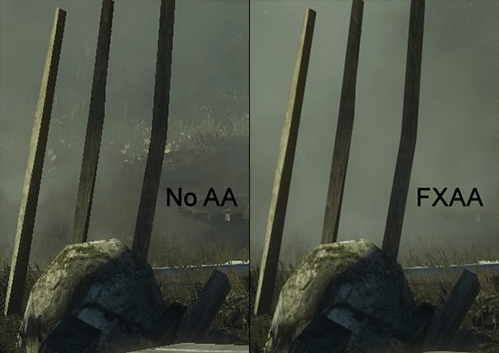
Both technologies achieve a similar result and are available on any card, either Nvidia or AMD.
They constitute relatively fast methods of anti-aliasing, but their main disadvantage is that they produce a perceptible blur on the image.
SMAA
Another method which does not cause blurring to the image, but has as good a result as the above, is the Subpixel Morphological Anti-Aliasing, known as SMAA.
The SMAA is trying to "marry" the quality of Supersampling and Multisampling with the speed of FXAA and MLAA.

TXAA
Temporal Anti-Aliasing or TXAA is an Nvidia creation. It uses the MSAA technique, with one main difference; all the filters we have described above apply to each frame separately. Where TXAA differs is that it uses data from the previous frame to calculate the next frame.
This is why it uses the term “temporal.” It applies the anti-aliasing based on the previous frames, and it does an excellent job of eliminating aliasing phenomena during the movement of an object.
However, it will often produce more blur than the FXAA, so, many users avoid using it.
Which is the recommended setting for anti-aliasing?
In theory, all these sound pretty easy, but when it comes to practice, which one of all these should we use? Is it possible that we get a better result if we add a little bit of everything?

The primary factor which will influence our choice is the hardware that we have at our disposal.
SSAA is ideal if we have a high-end graphics card.
If we are a little bit behind and we don’t have the latest generation GPU, the best choice is FXAA/MLAA or TXAA.
For the users who don’t want the “blur” FXAA/MLAA produce, but don’t have the expensive equipment the SSAA requires, we suggest the MSAA.
Nonetheless, let’s not forget that between different games, some have more demanding graphics and others are more lightweight. The fact that we might high FPS with the SSAA activated on a single game doesn’t mean that we can run it in all our games, or future titles.
Furthermore, a game may not support some of the above methods, and it will automatically limit our choices.
This is why we need to try several graphics settings, and the above instructions are just indicative.
Texture quality
Each game uses certain models for the representation of objects. We can see an example of a model in the picture below.
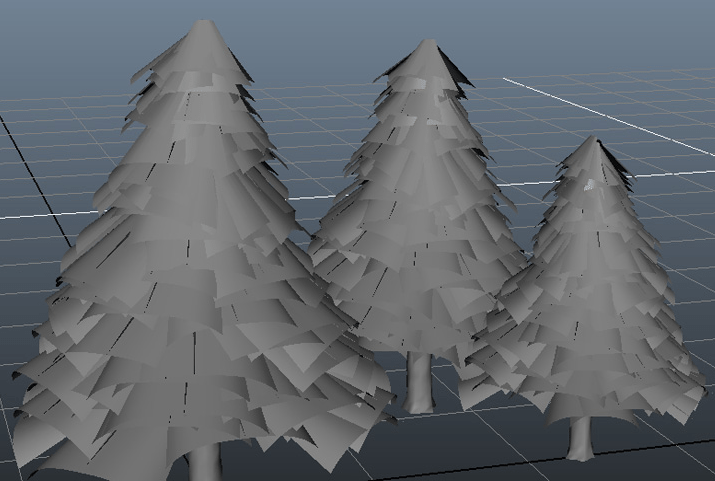
We could say that the texture is the image that “dresses” the models, so they look like real-life objects. In our example, the right texture for the trees would be an image with green leaves.
The Texture Quality refers to the quality of this image which will cover our model. In the graphics settings, there is usually a scale from Low to Ultra for the Texture Quality.
The difference lies in how detailed the texture is going to be. And because an image is worth a thousand words, below we can see how a tree changes from Low to High.
How does texture quality affect the game performance?
The Texture Quality does not add that much of a burden on the graphics card. So, we will not see a significant reduction in the FPS with the highest possible setting.
However, the high Texture Quality takes up enough VRAM, especially on larger resolutions. If the card’s memory is not adequate for high-quality textures, we will face stuttering in our gameplay.
As a rule of thumb, a 3GB GPU will handle high-quality textures in Full HD but will struggle in 1440p or above. For higher resolutions, a 4GB GPU should be the bare minimum, with 6GB being the recommended amount of VRAM.
Which is the recommended setting for texture quality?
Things here are relatively simple. The difference the high Texture Quality can make on the gameplay is enormous. So, when we start a game, the best thing we can do is define the texture to the highest setting possible.
If, while playing, we face stuttering, we go down one step at the graphics settings, and we try again. We repeat the process until the stuttering disappears.
Shadow quality
This setting is pretty much self-explanatory, as it affects the shadows of the three-dimensional objects in the game world.
The majority of the games have a scale from Ultra to Off for the quality of the shadow. However, even if we set Shadow Quality to Off, this doesn’t mean that all the shadows will disappear from the image.
Most of the games have shadows incorporated in the textures, especially in still parts of the image. This kind of shadowing is called static, it does not require any additional processing power, and it is used to give the objects some depth.
The Shadow Quality in the graphics settings is associated with the “moving” shadows, as is the shadow of our character.
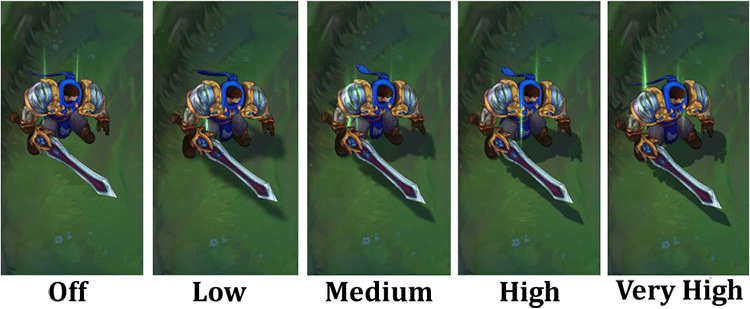
This kind of shadows burdens the graphics card as compared to the static shadows.
How does shadow quality affect the game's performance?
The shadows in the games usually demand complex calculations. The game needs to take into account many variables to calculate the shadow, such as the source or sources of light, the object creating the shadow, and the object upon the shadow is cast.
This whole process requires a lot of processing power; thus, this setting plays a determining role in the performance of the graphics card. Furthermore, the Shadow Quality increases the use of VRAM as well.
Which is the recommended setting for shadow quality?
Even though shadows give a lifelike effect on the sets of the games, they are one of the first things we can sacrifice for the FPS. So, if we have a low frame rate, we can adjust the shadow quality to Low from the graphics settings, or even to Off.
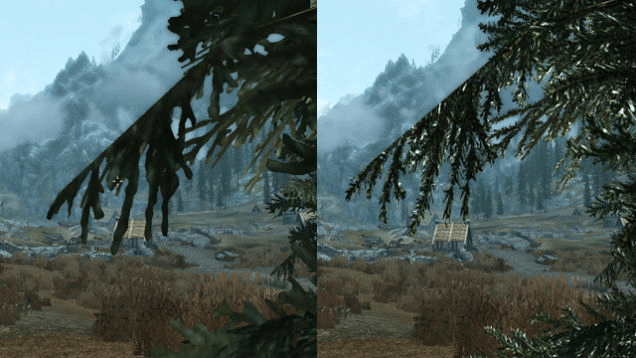
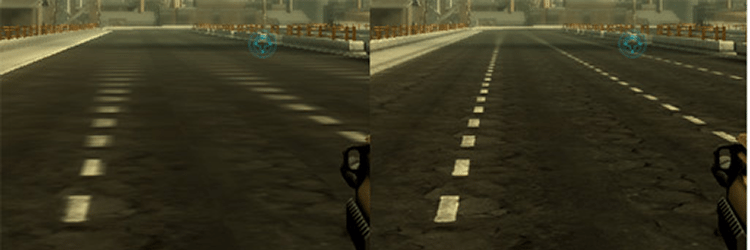
Anisotropic Filtering
Anisotropic Filtering comes to solve another significant problem in the graphics, which is the blur in textures which are remote or angled.
For example, let’s review an asphalt road in a game.
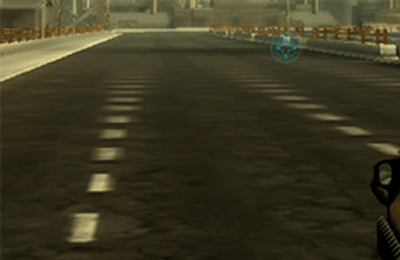
We clearly see that the “further” we look on the screen, the fewer details we can see.
If we activate the Anisotropic Filtering from the graphics settings, we will find out that this phenomenon goes away.
How does anisotropic filtering affect the game performance?
We can select the level of the filter in this setting; usually in the graphics settings we have to choose from Off, 2x, 4x, 8x and 16x.
A modern graphics card will not even sweat by the activation of the Anisotropic Filtering, even at 16x. So, we would not say that it is one of the “heavy” graphics settings.
Which is the recommended setting for anisotropic filtering?
We recommend that you set the Anisotropic Filtering to the maximum. As we saw in the pictures, it makes an enormous difference in our game's visuals, with a very slight price on the performance.
If your system is quite old, leave it at 2x instead of Off.
View Distance and Field of View
As we probably realize by their names, these graphics settings define how “far” we can see in the game.
The View Distance is associated with the distance in the presumable horizon of the game. The more we increase it, the further we can see.
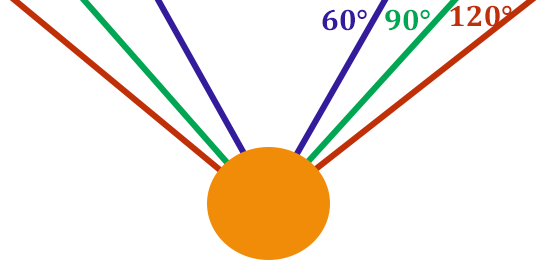
Accordingly, the Field of View refers to the peripheral vision of our character, as far as First Person games are concerned. In other words, we can say that it is the angle we see the environment in front of us.
The bigger the angle, the bigger the visual field.
How do view distance and field of view affect the game's performance?
These graphics settings affect the game performance very slightly. Therefore, even if we increase them to the maximum, the graphics card will not be burdened too much.
Which is the recommended setting for view distance and field of view?
For an average computer, the ideal situation is to set the view distance up to the maximum, to make the world more natural.
If the computer is having a hard time with this setting, especially if we have a low-end CPU, we can lower the view distance, to lighten the system as far as processing is concerned.
The field of view is a personal preference, and it does not affect the graphics performance to the same extent.
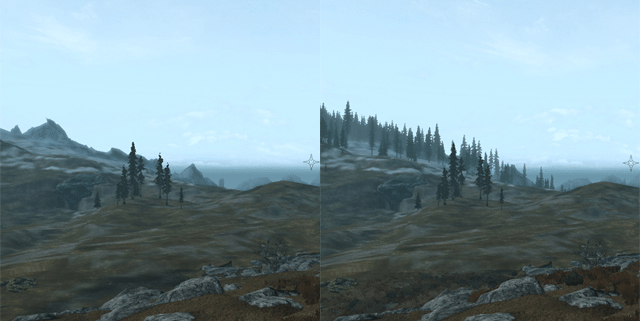
Tessellation
Tessellation adds more details to the models of a game, by using extra polygons for their design. More polygons equate to more realistic lines and therefore improved graphics. In the picture below, the difference with Tessellation On is noticeable.
With tessellation on, the image looks more real, with the objects showing an entirely different texture.
How does tessellation affect the game performance?
Because of the increased polygons in the design of the models, Tessellation adds quite a workload to the graphics card. The good thing though is that it does not increase the VRAM use.
Which is the recommended setting for tessellation?
In Tessellation, the setting is either on or off. There are no scales; therefore, if the graphics card we have is powerful enough, we activate it. Otherwise, we leave it deactivated.
Ambient Occlusion
The Ambient Occlusion option was developed to give more realism to the way different surfaces reflect light. In other words, it adds more shadows to parts of the image which are not directly exposed to the light source.
At the same time, Ambient Occlusion calculates the manner colored surfaces reflect light; it then adds the corresponding colors according to the environment, to make it look realistic.
No matter how extensively we describe it, it is almost impossible for one to imagine the result; thus, let’s just see an example in the picture below.
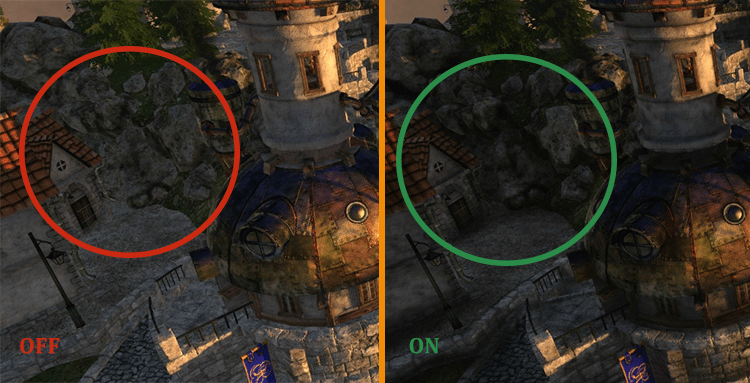
If we look carefully at the image, we will see that with the Ambient Occlusion the illumination and the shadowing are much more realistic.
How does ambient occlusion affect the game performance?
There are two basic methods to achieve the above result.
SSAO
The first method is Screen Space Ambient Occlusion or SSAO in short. It is the “poor man's” Ambient Occlusion, since it doesn’t yield such a good result, but it does not burden the performance either.
HBAO and HDAO
Horizon Bazed Ambient Occlusion (HBAO) is the evolution of SSAO, and it is an Nvidia technology. The corresponding method by AMD is called High Definition Ambient Occlusion (HDAO).
The result of these two technologies is equally good and way better than SSAO. Consequently, they are a lot more demanding, as far as the processing power is concerned.
Ambient Occlusion is one of the most demanding filters which, however, do not require a lot of GPU memory.
Which is the recommended setting for ambient occlusion?
If our card supports it, the best option is HBAO and HDAO accordingly. The SSAO is relatively outdated, and it doesn't produce such good results; therefore it is not recommended, even for older systems.
VSync and Adaptive sync
VSync stands for Vertical Synchronization and allows us to synchronize the game’s frame rate with the monitor’s refresh rate. Its purpose is to eliminate tearing that results when those frame rates are different.
Adaptive sync is a relatively new technology, which does the opposite. With Adaptive sync, the monitor fluctuates its refresh rate, to fit the current FPS in our game.
Nvidia’s adaptive sync technology is called G-sync, and it works only with Nvidia cards. AMD’s technology is Freesync, and it will just work with AMD GPUs, respectively.
Both G-sync and Freesync need a monitor designed to use them, while VSync is available on any setup. Both Freesync and G-sync are better than Vsync, regarding the result, though.
How does VSync and adaptive sync affect the game's performance
The VSync will not burden our graphics card any further. The only thing it does is “lock” our frame rate at the screen’s refresh rate. Also, its primary goal is to eliminate tearing.

If we have a 60Hz screen, with the VSync activated the frame rate will be locked at a maximum of 60FPS, no matter if our GPU can produce more.
However, if our card cannot continuously produce at least 60FPS, the VSync will lower the frame rate to the highest aliquot part of 60, which is 30FPS.
If the card produces 59 frames even for a second, instantly our FPS in the game will drop to 30. On the contrary, FreeSync and G-Sync technologies eliminate this problem.
Which is the recommended setting for VSync and adaptive sync?
The users who own a monitor with FreeSync or G-Sync with the appropriate card which supports it, the best they can do is to activate them from the GPU drivers.
As far as VSync is concerned, the general rule is the following:
- If our frame rate is generally low and smaller than our screen’s refresh rate, then it is best to leave it deactivated.
- If the average frame rate is higher than the screen’s refresh rate, we can activate it if we notice any tearing.
Should I have G-Sync and vSync simultaneously?
Adaptive sync and vSync are settings that we will find in different places. As we mentioned above, adaptive sync is accessible through the GPU driver. As far as we know, no game has a specific G-Sync or Freesync setting within its menu.

So, it is entirely possible to activate both G-Sync from the driver and VSync from within the game. However, should we enable both?
From our research and our experience, the best option is this: After we activate G-Sync on the GPU driver, we click on "Manage 3D settings" and make sure that Vertical sync is "On."
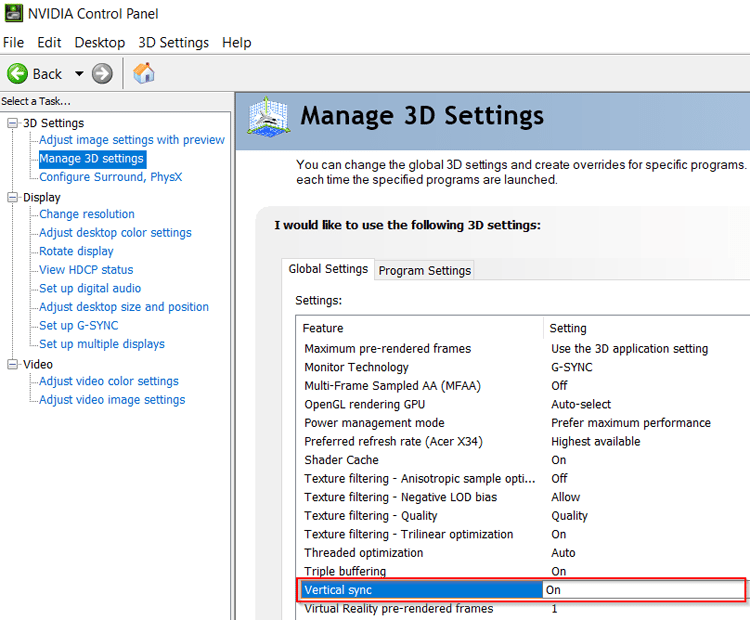
Then, from within each game's settings, we make sure that VSync is disabled.
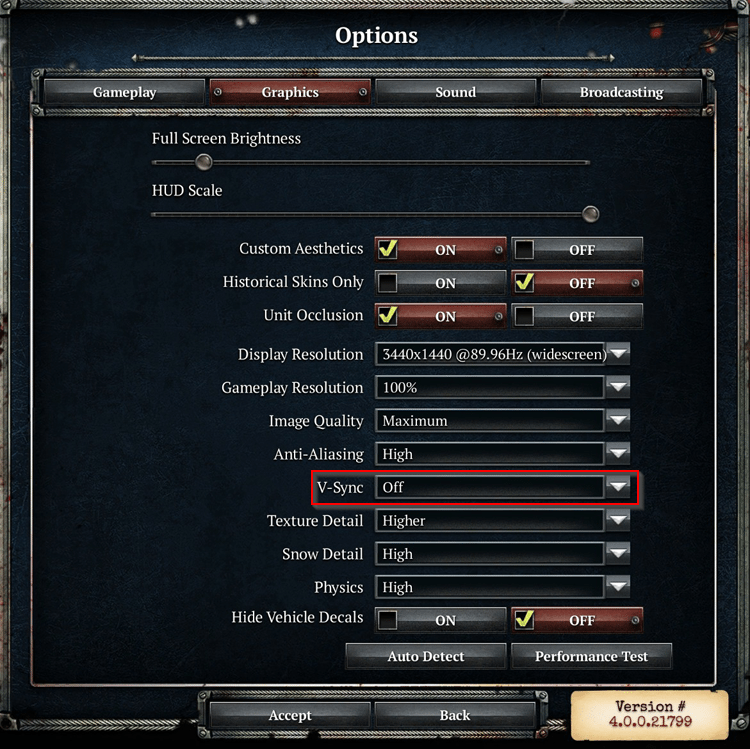
This is the optimal solution to have the best performance with the least screen tearing.
At the time of this writing, we didn't have an AMD GPU available, to test the same principle with Freesync, although it makes sense that it would work similarly. If you tried it, let us know in the comments section.
Have you found the optimal graphics settings for your hardware?
Did you know what the above graphics settings do and how much they affect the image quality in the games? Have you, by any chance, come across another graphics setting that you want to find out what it does?
Write your impressions and any questions you have in the comment section below.
Support PCsteps
Do you want to support PCsteps, so we can post high quality articles throughout the week?
You can like our Facebook page, share this post with your friends, and select our affiliate links for your purchases on Amazon.com or Newegg.
If you prefer your purchases from China, we are affiliated with the largest international e-shops:

Leave a Reply