Even if we don’t have a website, a professional-looking email address is an essential part of our business communication. Contrary to the free Gmail and Hotmail accounts, a custom email address inspires trust in our target audience and builds our personal branding. Let's see how we can set up our own professional email with free business email hosting services.
Unblock any international website, browse anonymously, and download movies and Mp3 with complete safety with CyberGhost, just for $2.75 per month:
Domain Name
Τhe first step to make our own custom email address is to get a domain name. Ιf we are tempted to register a free domain, it’s not a good idea for several reasons.
Country code TLDs such as .tk, for example, have significant disadvantages with the most important ones being the following:
- Free domain names don’t add value and credibility to our brand and will probably make a bad impression to our customers.

- Emails sent with these domain name extensions have a high chance of being identified as spam by the email filtering. A lot of spammers use free ccTLDs for illegal actions.
For a few dollars per year, we can buy a recognizable .com or .net domain extension with our brand.

Once we have the domain, we can create our custom email address on the following free business email hosting services.
Free business email hosting providers
First, we have to point out that we selected the following services because of their quality and our personal preference.
Furthermore, we will give examples of a basic business email address setup. The domain name configuration settings will be from the Namecheap registrar. However, the corresponding settings can be applied to other domain name providers as well.
Zoho
Zoho is a technology company that offers a free business email hosting plan for one domain, without any ads. The package includes 5GB of storage, 25MB attachment limit, and the ability to create up to five custom email addresses.

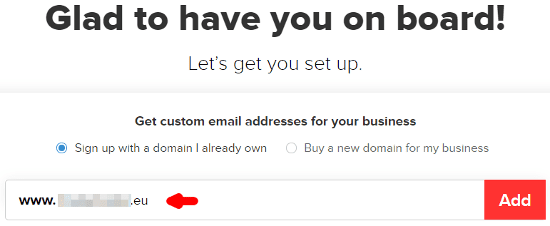
The first thing we have to do is to register for the free business email plan by providing them a domain name and our personal details.
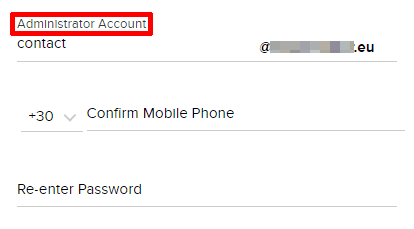
Note that in the “Administrator Account” field, we type our preferred email address which will also serve as our login account.
Afterward, we need to verify our domain name ownership with one of the following recommended methods:
- By adding a specific CNAME or TXT record to our domain’s DNS manager.
- By uploading a specific HTML file to our root directory, if we have a website.
Now, we will give an example of the first method, the CNAME verification. What we will do is to show to the Zoho service that the domain belongs to us and is registered on Namecheap.
So, we head to the domain name provider list and choose “Others” → “CNAME Method” from the drop-down menu.

As we can see, Zoho generated a CNAME code and a destination web address, which we will use in the Namecheap registrar.
Once we are logged in at Namecheap.com, we go to our domain list and click the “Manage” button next to our domain name.

There, we move to the “Advanced DNS” tab → “Host Records” and create a CNAME record by filling out the generated code and web address. As soon as we are ready, we save the changes and wait for about and hour for them to come into effect.

Then, we go back to the Zoho domain setup screen to complete the CNAME verification by pressing the respective button.

Once the verification is successful, we select “Create Account” to set our custom email address.

However, we still need an extra setting for our professional email address to be functional. We have to connect our domain to the Zoho email server by configuring the mail exchange records in the registrar.
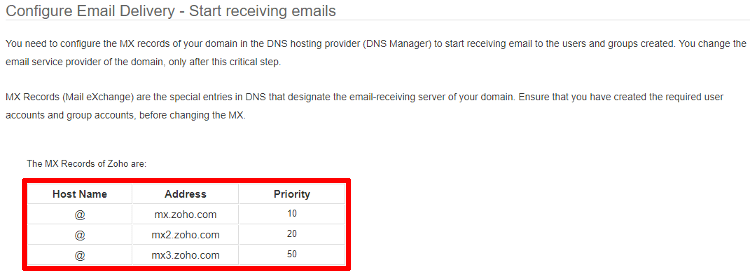
We head back to our domain at Namecheap.com → “Advanced DNS” → “Mail Settings” → “Custom MX” and add the MX records from the above image. Once we finish, we save the DNS changes.

Now, we can send and receive emails to our custom address by using the Zoho webmail client or their mobile app.

Yandex
Yandex is a Russian multinational technology company that specializes in internet services. One of their products is the Yandex.Mail which provides two free business email hosting packages for our domain name.
The first plan is the “corporate mail,” and the other one is the “personal mail.” Both services offer 1.000 mailboxes with unlimited inbox space and 10GB of cloud storage.
Their main difference is that the former type of email hosting has more productivity tools in its webmail interface such as a calendar, to-do list, and meeting organizer.
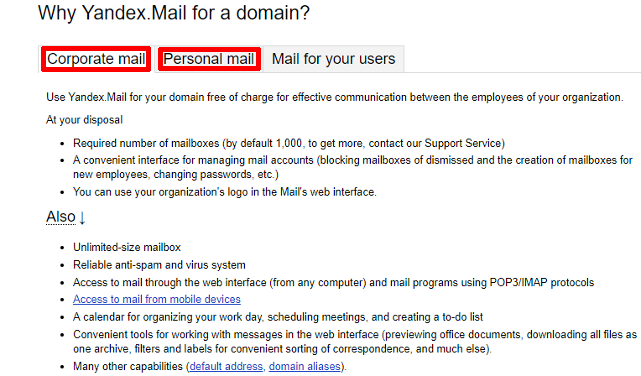
To set up a corporate mail hosting account, we first need to register at Yandex.com.

The next step is to type our domain name in the corresponding field, and then to press “Connect domain.”

Next, we have to verify our domain name by creating a CNAME record in the registrar, as shown in the previous section.
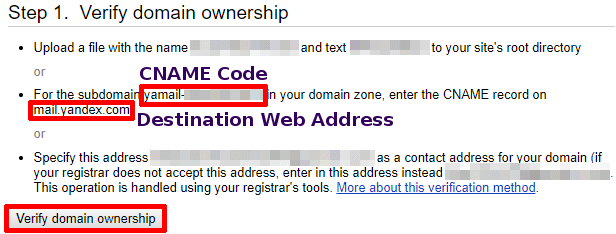
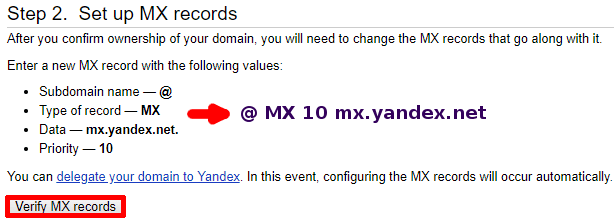
Once we verify the domain, we need to connect it to the Yandex email server. Like before, we have to add an MX record with the following values.
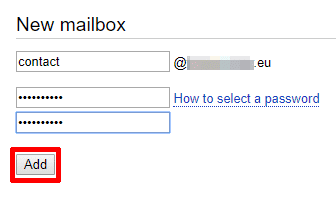
After that, we type our preferred email address, which will also be our login account for the webmail client, and set a strong password.
Finally, we are ready to compose, send, and receive messages to our professional email address.

Migadu
The last email hosting provider in our list is Migadu. This Swiss-based company offers a free business email hosting plan with unlimited mailboxes and one gigabyte of email storage space.
On the other hand, the free email hosting package has two drawbacks. We can send a maximum of ten outgoing emails per day which will include a discreet advertising signature (“Sent via Migadu”).
To create a custom email address with Migadu, we first need to register on their website. Note that in the “Email” field, we type our current email address because they will send us a confirmation link to access our Migadu account.
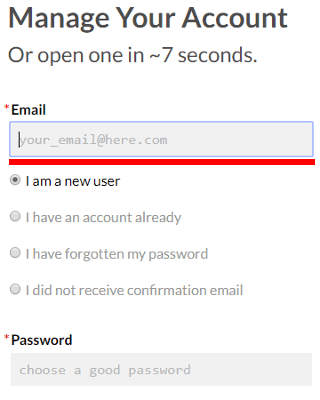
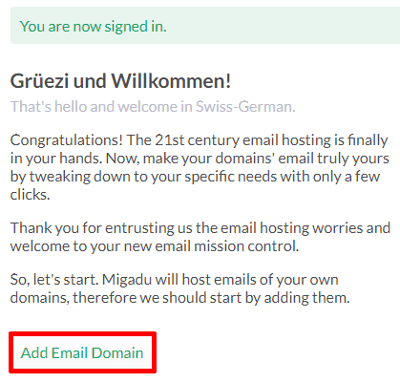
Once we confirm the account, we sign into the Migadu website and press “Add Email Domain.”
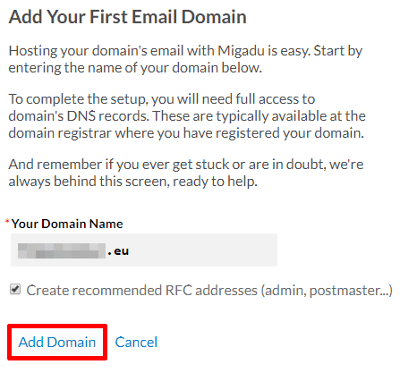
In the next screen, we fill in our domain name and click the respective button.
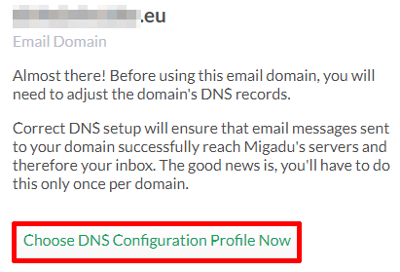
Now, we have to select a DNS profile by pressing “Choose DNS Configuration Profile Now”...
...and check the “Migadu Simple DNS” option before saving.
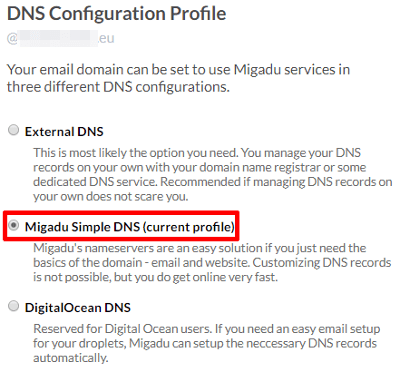
This is the easiest way to connect our domain name with the Migadu email service because all we have to do is to change our current domain nameservers.
Therefore, we go to our domain at Namecheap.com → “Manage” → “Domain” → “Nameservers” → “Custom DNS”...

...and replace the two values with those provided by the Swiss email hosting company. Once we save the changes, we wait a few days for them to propagate.
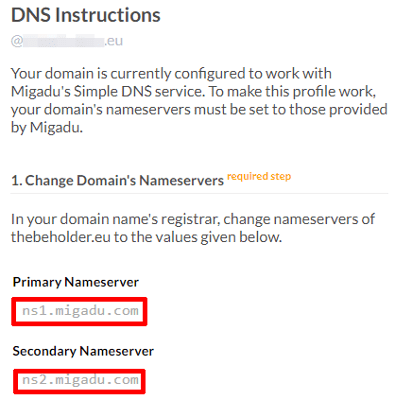
Then, we move to the Migadu website to verify the nameserver changes…
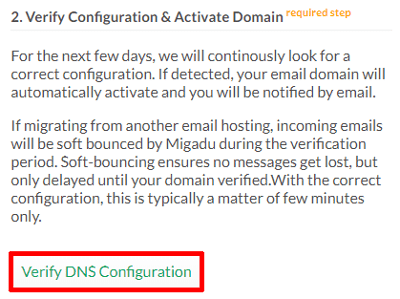
...and if the process is successful, we will receive a confirmation message.

The final step is to go to “Domains” → our domain → “Mailboxes” → “Add New Mailbox”...
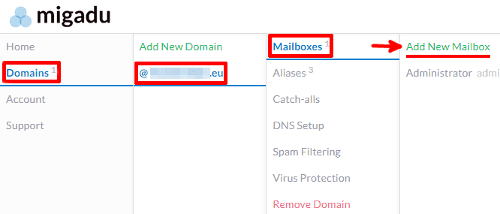
...to create our custom business email address.
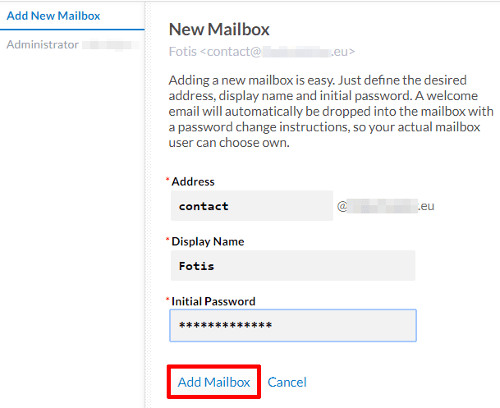
That’s it; now we should be able to send and receive email messages via the Migadu webmail client.
Do you know other free business email hosting services worth mentioning?
If you happen to know other email hosting providers with free plans, or you have any questions regarding the above guide, leave us a comment below.
Support PCsteps
Do you want to support PCsteps, so we can post high quality articles throughout the week?
You can like our Facebook page, share this post with your friends, and select our affiliate links for your purchases on Amazon.com or Newegg.
If you prefer your purchases from China, we are affiliated with the largest international e-shops:


Leave a Reply