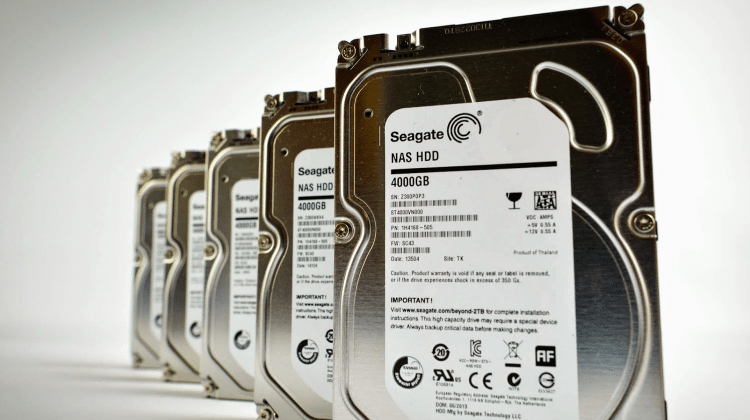
Software RAID 5 on Linux is the best RAID. It's cheaper than hardware RAID with a proper 400$ controller. It has better speed and compatibility than the motherboard's and a cheap controller's FakeRaid. And it's easy; we just need three HDDs and a few hours. Let's make a software RAID 5 that will keep all of our files safe and fast to access.
Unblock any international website, browse anonymously, and download movies and Mp3 with complete safety with CyberGhost, just for $2.75 per month:
We prepared this guide on Ubuntu 16.04 LTS and Linux Mint 18.1. It should also work with recent earlier and later versions, and on most distributions based on Debian/Ubuntu.
If something doesn't work for you, leave us a comment.
Will a Linux software RAID 5 work in Windows?
To create a Software RAID in Linux, we use mdadm, which is an application unique to Linux. It's impossible for Windows to recognize or access a mdadm RAID.
For software RAID 5 or Software RAID 1 on Windows, check out our guides:
How to Install mdadm
mdadm (Multiple Device ADMinistrator) is the prevalent solution for creating a software RAID on Linux. It's a straightforward and powerful application. We can use it not only for software RAID 5 but pretty much for any level of RAID, simple or nested.
Before we create our first array, it's always a good idea to do a full update. We just need to open a terminal with ctrl+alt+T and type:
sudo apt-get update && sudo apt-get dist-upgrade -y

The system will ask us for the administrator password. While we type the password, nothing will appear in the terminal, no asterisks, dots or anything. This is the default behavior for the linux terminal, so just type away and press Enter.
After the update, if it installed any new packages, it's a good idea to reboot the system. Since we already have a terminal open, the quickest way to reboot is by typing:
sudo reboot
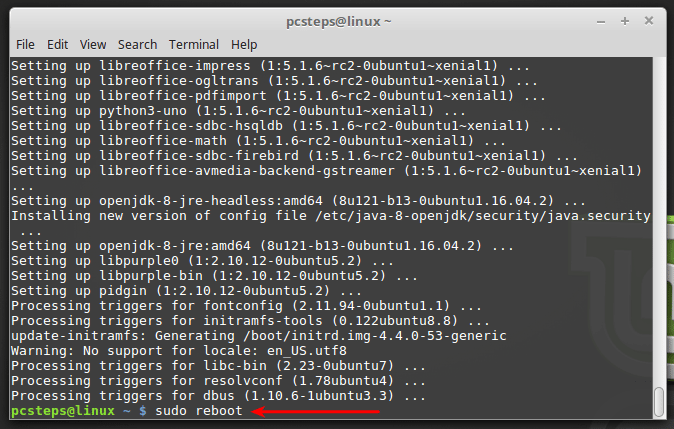
Once we log back in, we open a new terminal and type:
sudo apt-get install mdadm -y

At the end of the installation, we will get a couple of warnings by default. It's nothing to worry about.

How to install GParted
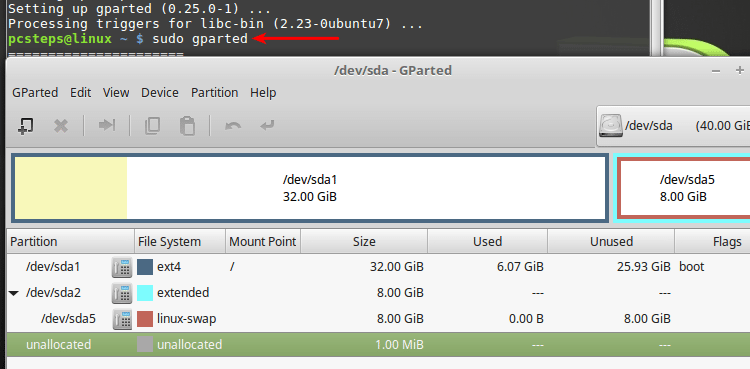
The Gnome Partition Editor, or GParted, is the best GUI partitioning tool in Linux. To install it, we type at the terminal:
sudo apt-get install gparted -y

We can start GParted with:
sudo gparted
How to create a Software RAID 5 on Linux
Software RAID 5 with mdadm is flexible. We can use full disks, or we can use same sized partitions on different sized drives. We just need to remember that the smallest of the HDDs or partitions dictates the array's capacity.
The array's capacity in RAID 5
For RAID 5, the formula for the total capacity is:
RAID = (total number of the disks -1) * (smallest disk's capacity)
If we have three 1TB disks, the total array size will be:
(3 - 1) *1 = 2TB
If we have three 1TB drives and one 500GB disk, the total array capacity will be:
(4 - 1) * 0,5 = 1,5TB
Preparing the disks
First off, we start GParted and make sure all the disks for the software RAID 5 are visible to the system.
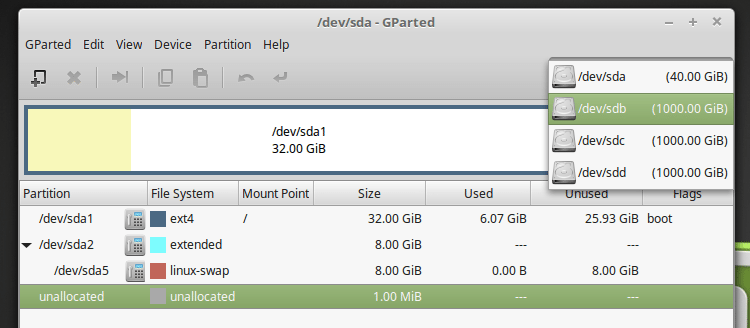
In the example we will create a 2TB software RAID 5 with three 1TB disks, /dev sdb, /dev/sdc, /dev/sdd.
We will use the full disks, but we could also create three equal partitions and select them for the RAID.
If the drives we use are brand new and have an exclamation mark next to the "unallocated" label, we need to create a partition table on each, through the Device menu.
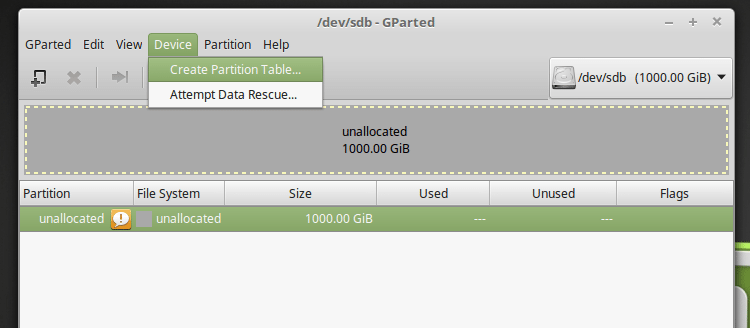
For disks less than 2TB we select msdos.

Disks more than 2TB require a gpt partition table.

After we created the partition table, and with the exclamation mark gone, we right-click and create a new partition on each of the three disks.
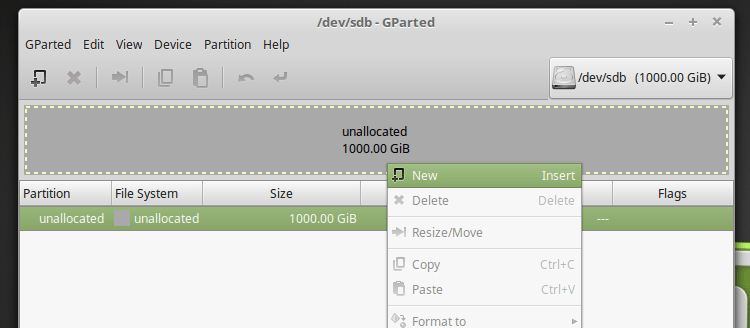
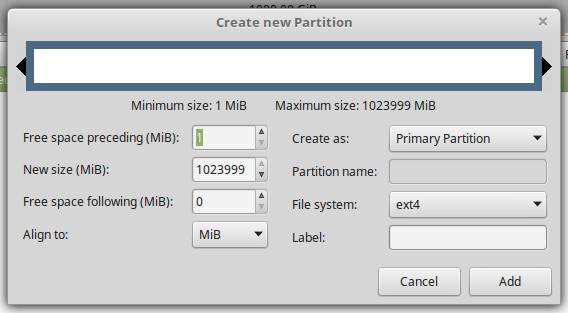
The file system we choose doesn't matter, since creating the software RAID 5 will completely wipe-out the selected partitions' content.
Finally, we apply the changes for all three disks.
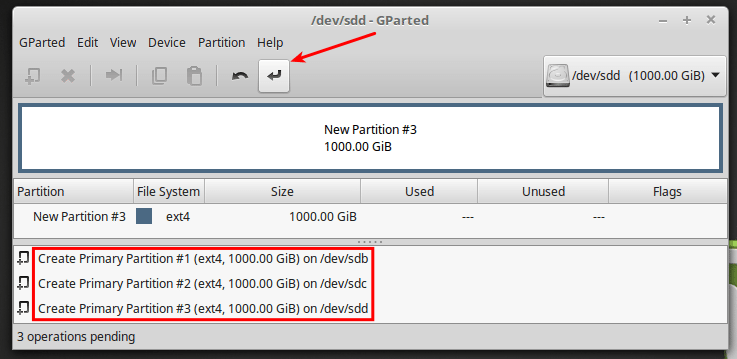
We also make sure to remember the partitions' names. On disk /dev/sdb the first partition will be /dev/sdb1, on the /dev/sdc it will be /dev/sdc1 etc.
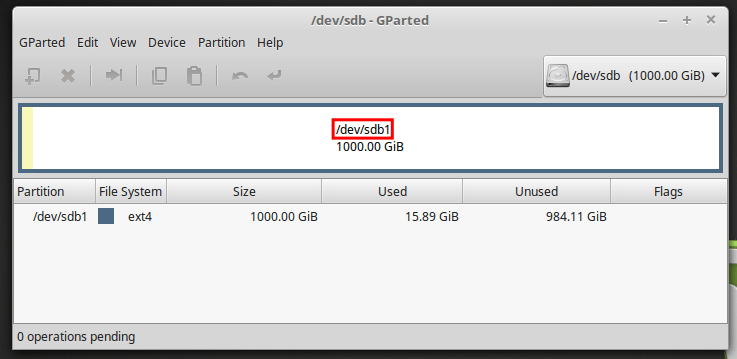
Caution: Don't mount those new disks/partitions. We need them unmounted to create the software RAID 5.
Make sure you have enough time
The array building procedure will take hours. It's automated, so we don't need to sit in front of the PC. But we can't shut down the computer or restart it either. And we can't pause or stop the procedure.
It took mdadm about seven hours to create a 2TB software RAID 5 with three 1TB disks. A bigger array could take more than twenty hours to build.
And, we cannot stress that enough, there is no way to pause or stop the array building. If this happens by force - e.g. we shut down the computer, or the power goes out - then we are in trouble.
Recovering the array is more complicated that creating it in the first place. Also, it won't resume from where it was; it will restart from the beginning.
Creating the software RAID 5
A single command is enough to create the array. Ignore that it wraps because of the page width, it's a single-line command.
sudo mdadm --create /dev/md0 --chunk=64 --level=5 --raid-devices=3 /dev/sdb1 /dev/sdc1 /dev/sdd1

In this command:
- md0 is the name we selected for the array, always in /dev/
- --chunk=64 is the stripe size. 64KB is a good value for most uses.
- --level=5 is the RAID level
- --raid-devices=3 is the number of disks or partitions
- /dev/sdb1, /dev/sdc1, /dev/sdd1 are the names of the partitions. If we are using full disks, we treat each of them as a single partition.
Mdadm will show us the size of the selected partitions and ask is if we want to continue creating the array. We type "y" for "yes."
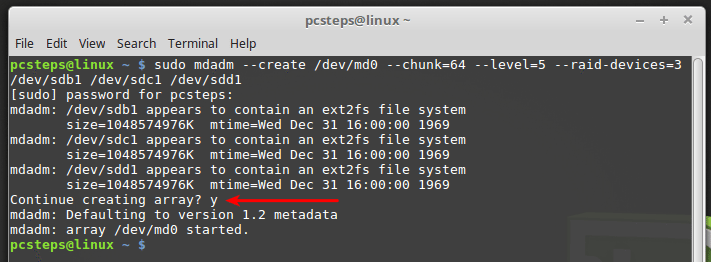
The building of our software RAID 5 has begun.
And now we wait
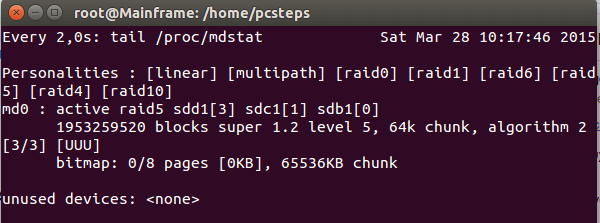
Even though the software RAID 5 building is under way, mdadm won't show its progress. To watch the procedure, we type:
sudo watch tail /proc/mdstat

This will show the RAID building and will refresh every 2 seconds.
As we mentioned, for an average array, this could take all night. We wrote this guide on a Virtual Machine with virtual hard drives, and the estimation for the software RAID 5 creation was at about 84 minutes.

However, on a real-world software RAID 5 we created back in 2015, the initial estimation was nearly four and a half hours.
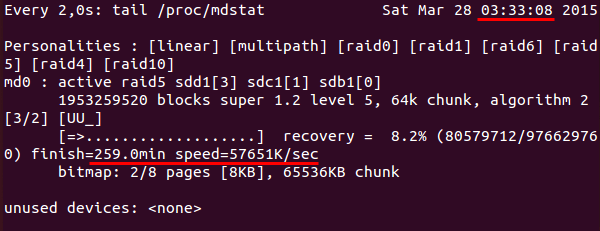
More than five hours later, on 8:49, the array still wasn't done, with another 20% to go.
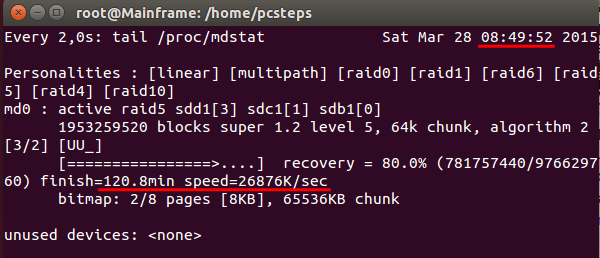
The procedure ended at around 10:15, about 7 hours after it started for a 2TB software RAID 5.
Format and mount the array
Once the array is ready, we need to format it with the file system of our choice. We can't format it though GParted, so we need to do it with a command:
sudo mkfs.ext4 /dev/md0

We will find the new array among our devices.
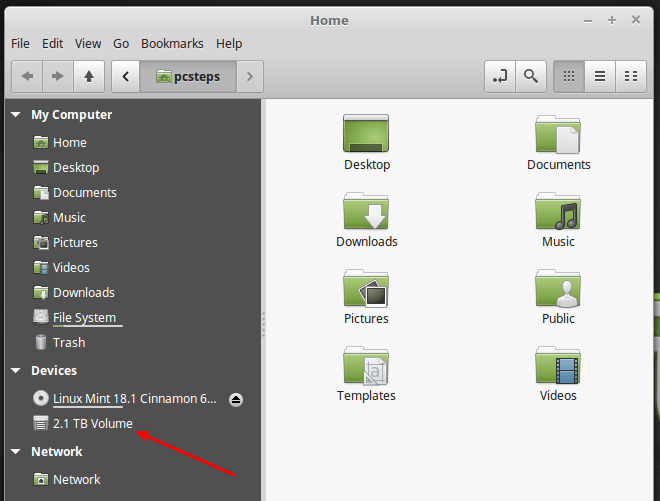
Now, we must create a folder to mount it on each startup automatically. A good choice is the /media/ folder, where the external storage gets mounted.
sudo mkdir /media/Raid
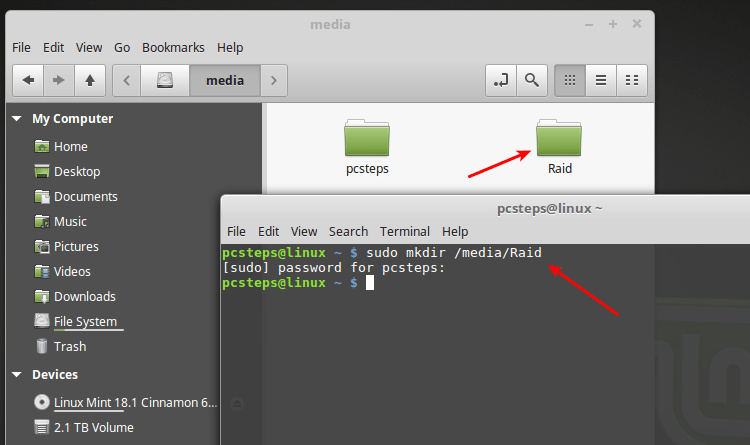
We mount the array with:
sudo mount /dev/md0 /media/Raid

Finally, we take full ownership of the RAID, to get write access.
sudo chown -R (username):(username) /media/Raid

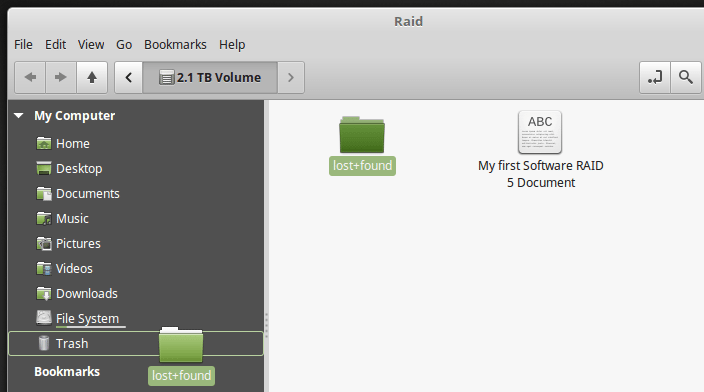
Now we can create files and folders as we wish. We can also delete the lost+found folder.
Auto-mount the software RAID 5 on startup
For the final step, we will set up the software RAID 5 to auto-mount at boot time.
First, we need to find the UUID of our array. We do that with the command:
sudo blkid | grep /dev/md0
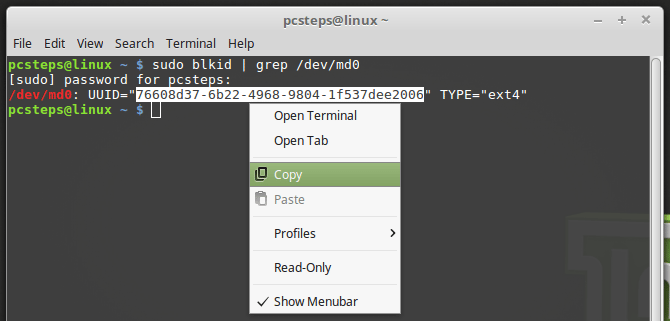
This will show a multi-character text, which is unique for our RAID. We select it, right-click and copy it.
Then we open the /etc/fstab file as root with a text editor, e.g. gedit on Ubuntu or xed on Linux Mint.
Ubuntu:     sudo gedit /etc/fstab
Linux Mint: sudo xed /etc/fstab
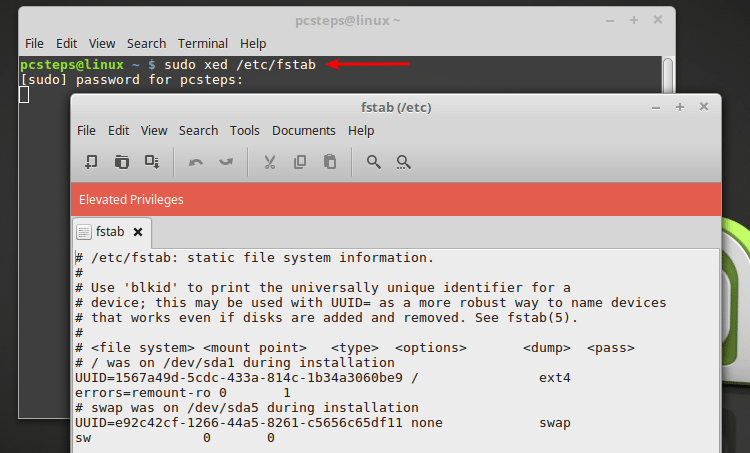
At the end of the file we add:
UUID=(our UUID) /media/Raid ext4 defaults 0 2
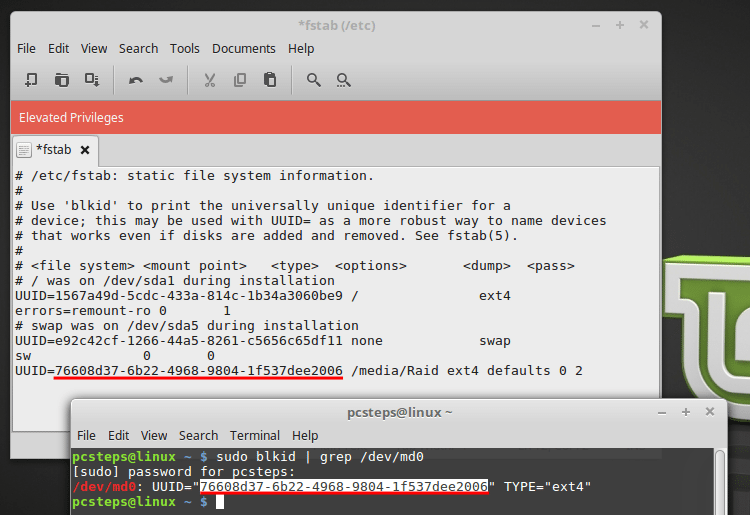
We save the file, and that's it.
Now, on each boot, the RAID will already be mounted for us at the /media/Raid folder.
Did you have any trouble creating a software RAID 5 in Linux?
If anything on the guide didn't work as described, and you weren't able to create a software RAID 5 on your Linux distribution, leave us a comment.
Support PCsteps
Do you want to support PCsteps, so we can post high quality articles throughout the week?
You can like our Facebook page, share this post with your friends, and select our affiliate links for your purchases on Amazon.com or Newegg.
If you prefer your purchases from China, we are affiliated with the largest international e-shops:
