

TrueCrypt used to be the go-to app for file encryption. In 2014, however, its developers declared that "TrueCrypt is not secure" and abandoned the project. 18 months later, some severe security flaws were discovered. Let's see how to do file and disk encryption with VeraCrypt, an actively developed TrueCrypt fork.
Unblock any international website, browse anonymously, and download movies and Mp3 with complete safety with CyberGhost, just for $2.75 per month:

What is VeraCrypt and how is it different from TrueCrypt?
VeraCrypt launched in June 2013, nearly a year before the abandonment of TrueCrypt. IT security consultant Mounir Idrassi, who is based in France, is VeraCrypt's creator and chief contributor.
Back in 2012, Idrassi wanted to integrate TrueCrypt with a client's product. However, when he carried out a security audit of TrueCrypt's code, he discovered some minor issues. Since TrueCrypt is open-source, Idrassi decided to create a version of his own, and VeraCrypt was born.
The interface and functionality of VeraCrypt are nearly identical to TrueCrypt since it has inherited much of its code.
The main differences are behind the scenes, with VeraCrypt enhancing security over the original TrueCrypt, and solving several security issues and weaknesses.
For more technical information, you can read Idrassi's post of October 2014 on the official forum.
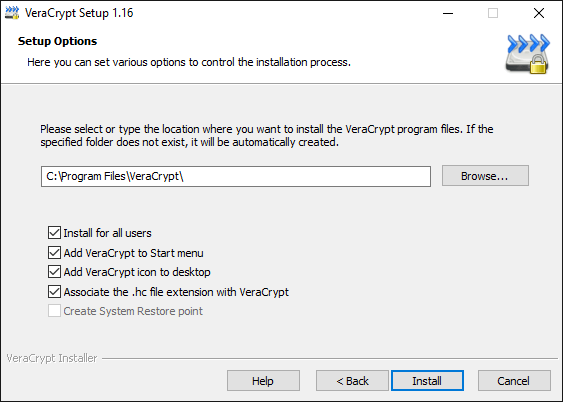
Install VeraCrypt
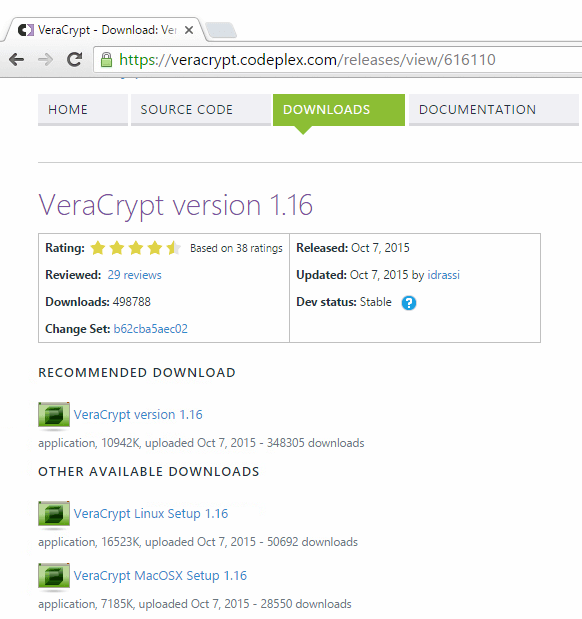
We will find the latest stable version of VeraCrypt on the official website. VeraCrypt is available on Windows, Mac OS X, and Linux.
We can either do a full installation or extract the files, to run VeraCrypt as a portable app. The portable option, however, can't encrypt the system partition or the system drive, so we should only select it for file encryption and non-system partition/disk encryption.
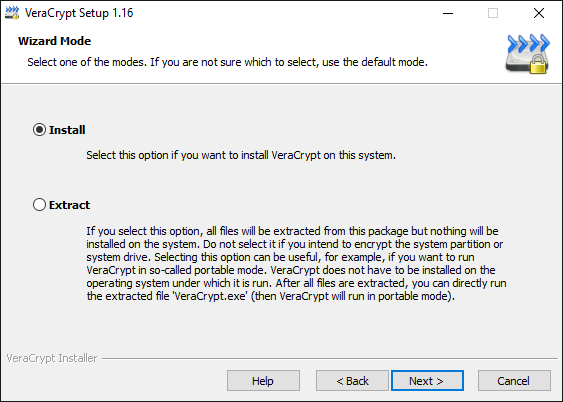
The rest of the installation is safe, VeraCrypt won't attempt to install unwanted third-party apps or toolbars.
File Encryption
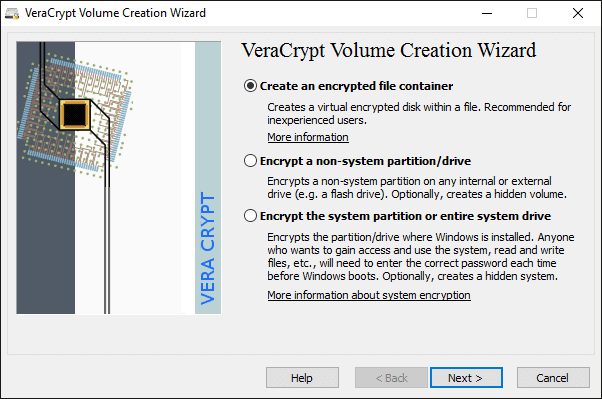
File encryption is the simplest mode to encrypt our data. We are going to create an "encrypted file container", which is a file that will work as a virtual encrypted disk and contain all of our sensitive files and folders.
Creating an encrypted file container
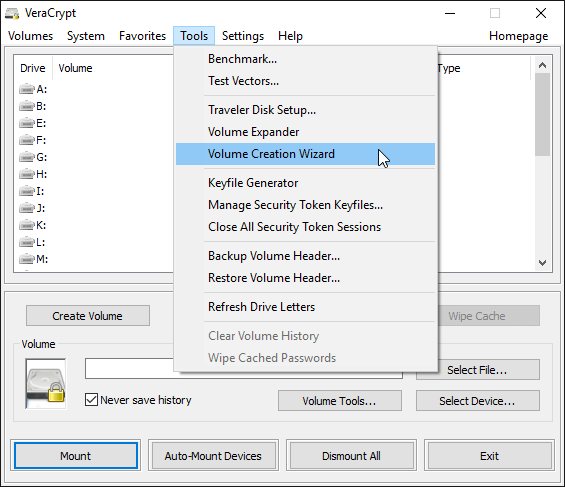
To create this container we need to go to Tools -> Volume Creation Wizard.
There, we leave the default option "Create an encrypted file container".
For this tutorial, we will describe the procedure for creating a Standard VeraCrypt volume.
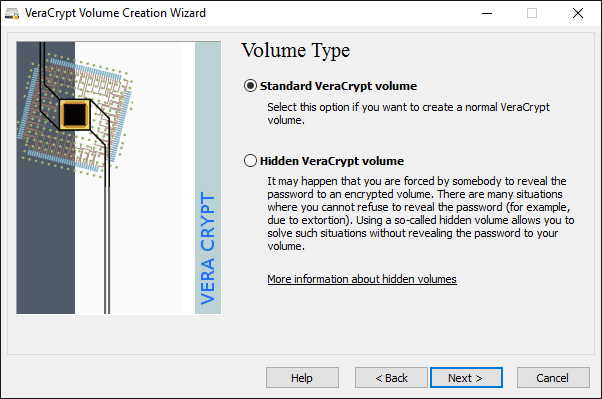
The hidden volume is an advanced file encryption system, where we select a fake password that will lead to false data and a real password for our personal files. Since the creation of a hidden volume is a little more complicated, we will tackle it in a different guide.
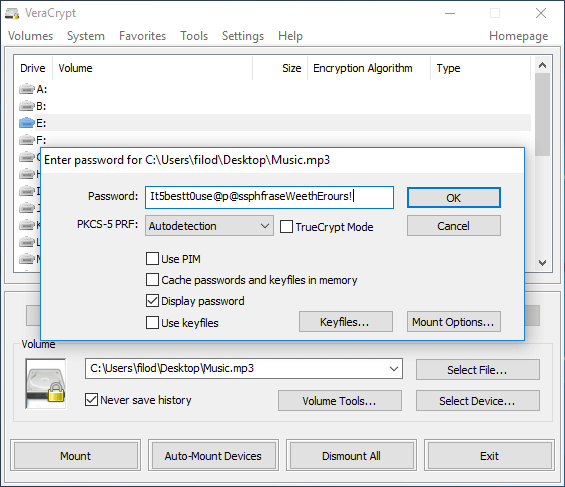
The first thing we will select for our volume is the location and the name. We can choose any name or extension, even Music.mp3 like in the example.
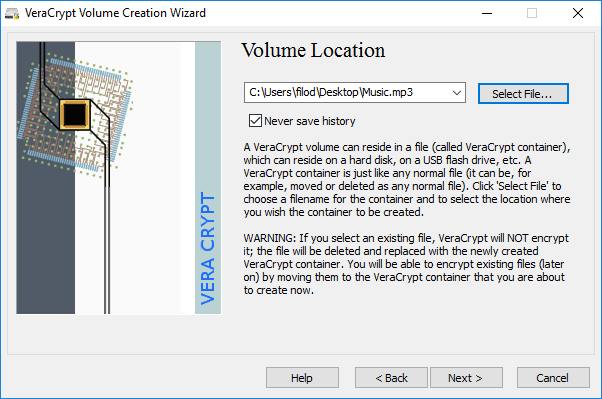
The key is to create a file that will appear inconspicuous. If we intend to store 4GB of encrypted data, a .mp3 file will be suspect, to say the least. It would be best if we created a .iso file, which would appear normal at such a size.
We just need to make sure not to select an already existing file; if we do, the encryption procedure will destroy the selected file, and replace its contents with our encrypted data.
Also, it is impossible to create with VeraCrypt a functional .mp3 that can play music and can also store encrypted data. That would have been an excellent cover, but it is way beyond the scope of the file encryption.
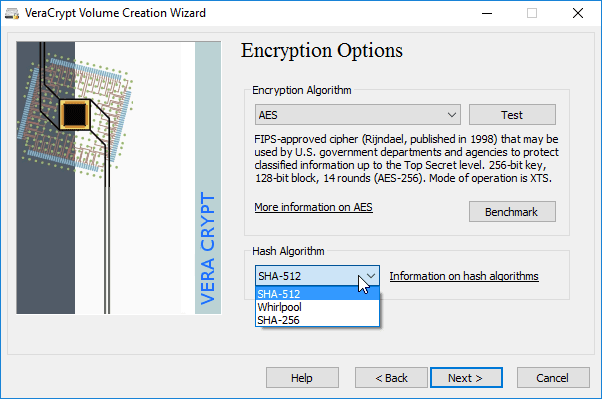
On the next step, we select the Encryption Algorithm and the Hash Algorithm. For the 99.99% of the users, the default AES is perfect for file encryption.
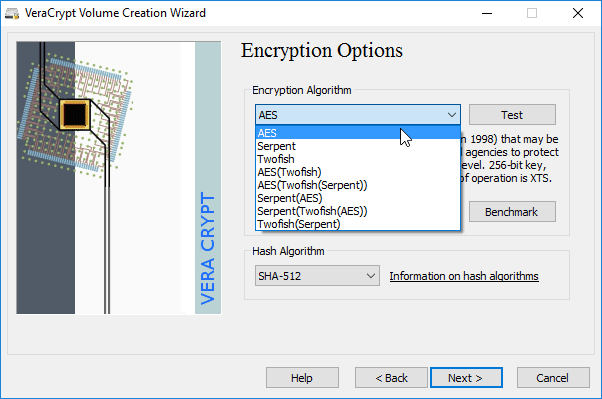
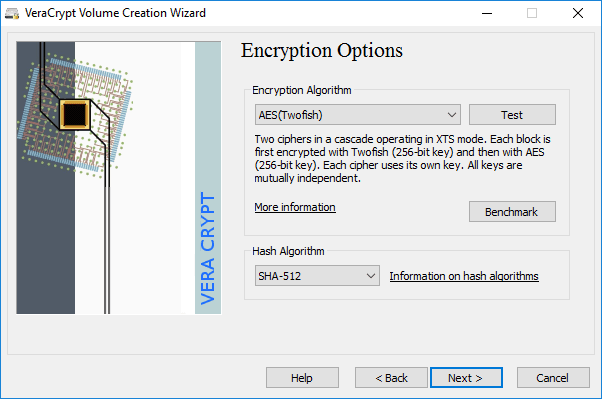
The other options allow us to encrypt files using up to three consecutive algorithms, with a separate key for each. But this is hardly necessary in a home or an office environment.
After all, the AES algorithm is what the US Government departments and agencies are using to protect classified information, so it should be enough for us too.
Similarly, the default SHA-512 is the best option for the Hash Algorithm.
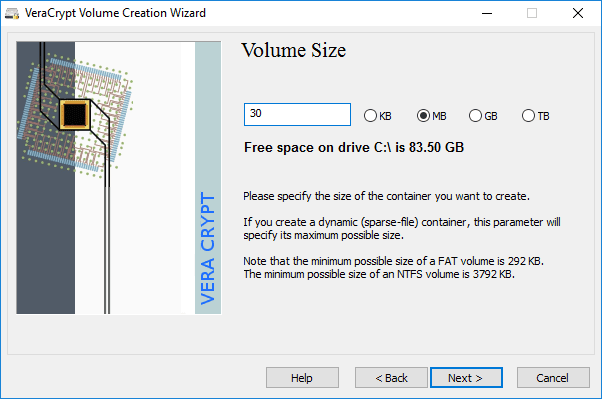
Next, we get to choose the file of the size. Remember to pick a file size that would look natural at the file type we selected for the file encryption. We almost never see 1GB Mp3s, but 20-30 MBs aren't unusual, for full albums or extended remixes.
Probably the most important aspect of the file encryption is selecting a strong password or passphrase. The default option won't display the password; we have checked the "Display password" checkbox for the example.
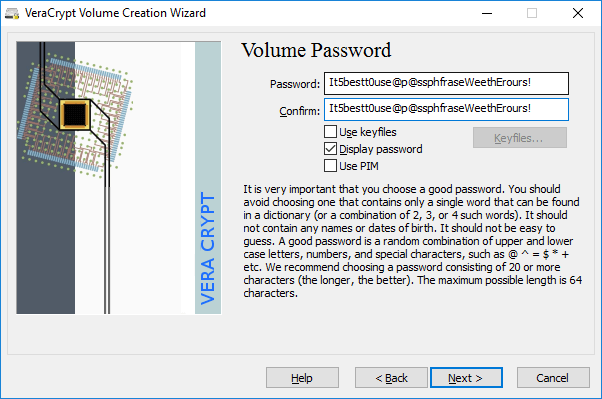
VeraCrypt provides some excellent advice regarding the password security. We need to hit the perfect balance between a password that is long and impossible to guess, but also that we can personally remember without having it written down. A full phrase with some strategic spelling errors will work wonders for our file security.
On this stage, we can also select to use keyfiles, which are special files that VeraCrypt will create to complement the password. Even with the correct password, the volume won't unlock without the keyfiles.
The PIM number, which stands for "Personal Iterations Multiplier", also strengthens the security. It multiplies the iterations used by the key derivation function, which significantly increases the security against brute force attacks. We also need to provide the exact PIM number along with the password to decrypt the files.
Both the keyfiles and the PIM are an overkill for a home environment. Unless a government agency with an army of cryptographers is after us, a plain strong passphrase is more than enough for the safety of our files.

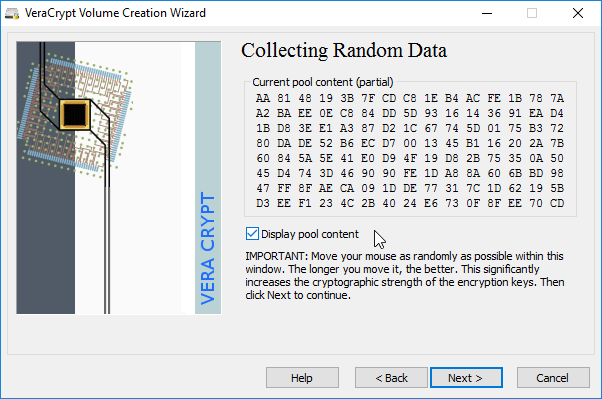
For the final stage, we need to provide randomness for the file encryption. We just need to move the mouse pointer erratically inside the program window, and this random movement will increase the cryptographic strength of the encryption keys.
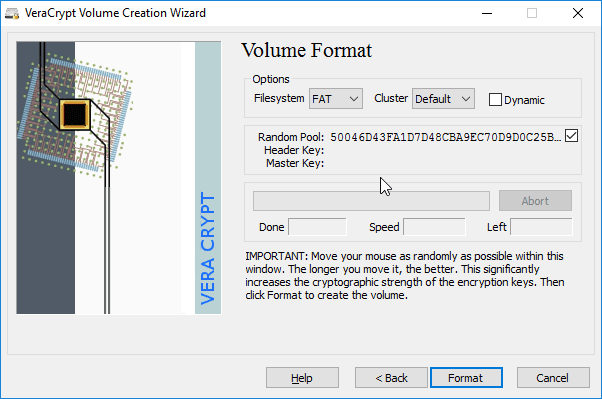
There is not a minimum or a maximum amount of time we should devote to this process. One or two minutes should be more than enough, but we can do it for longer if we want.
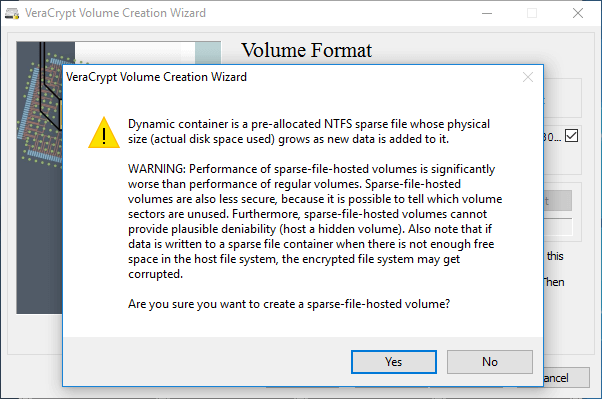
On this screen, we can also select to create a Dynamic container. This type of container will save space on the disk, by only occupying the volume of the files contained. On the other hand, though, it will take longer to process, diminish security, and will have a risk of corruption if we try to add more files than it can contain.
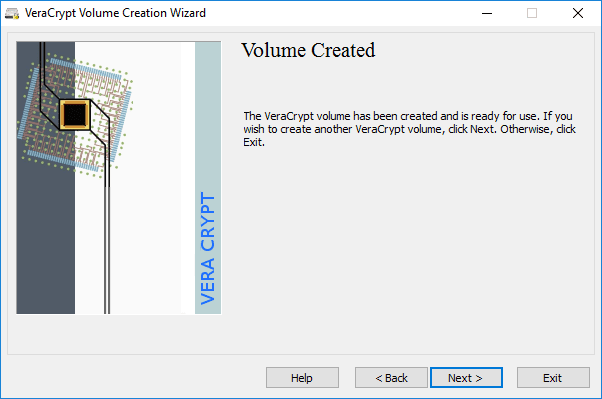
After we are satisfied with the mouse moving, we click on "Format" to create the encrypted volume. Since we create a volume from scratch, the process will be fairly quick.
The program might mention 11 minutes left on the screenshot, but the process was in fact over in just a few seconds, VeraCrypt didn't even have the time to update the "Left" counter.

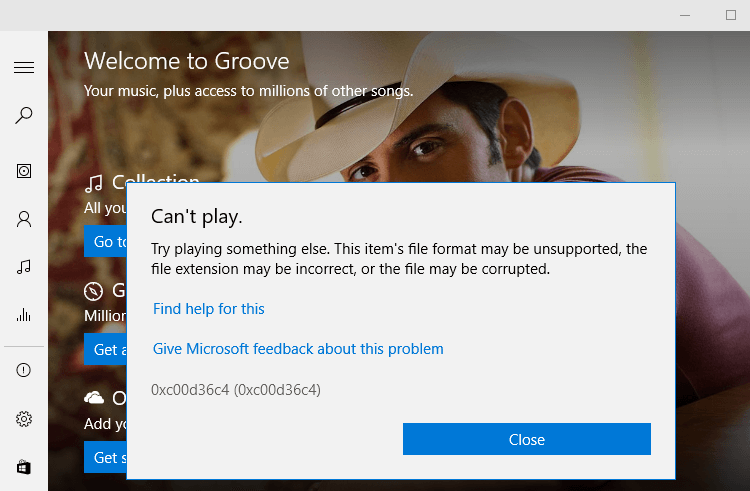
As we mentioned earlier, the music.mp3 file we created is impossible to function as a music file, trying to run it will only throw an error.
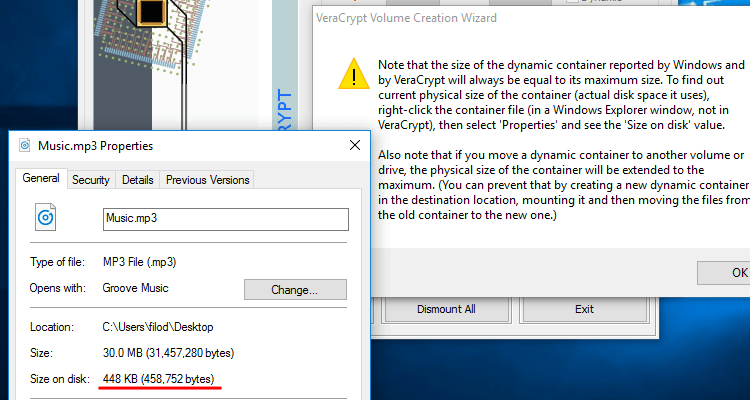
Also, if we selected a dynamic container, we can see the true file size by right-clicking the file and selecting "properties".
Finally, we can create a new VeraCrypt volume with Next, or click Exit to close the program.
Mounting the encrypted file container and adding data
With the file container ready, the final step for the file encryption is to mount it and add any files or folders to be encrypted.
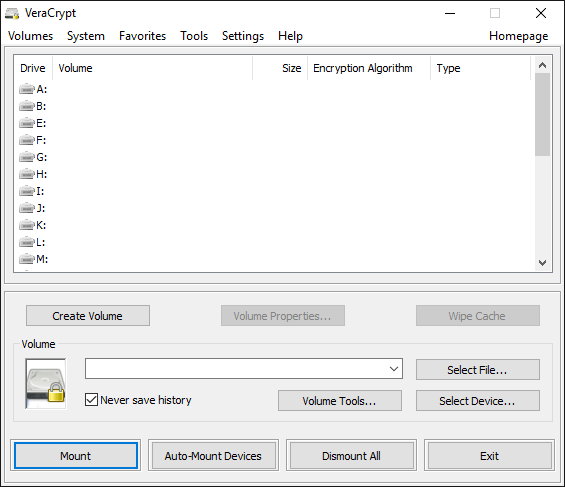
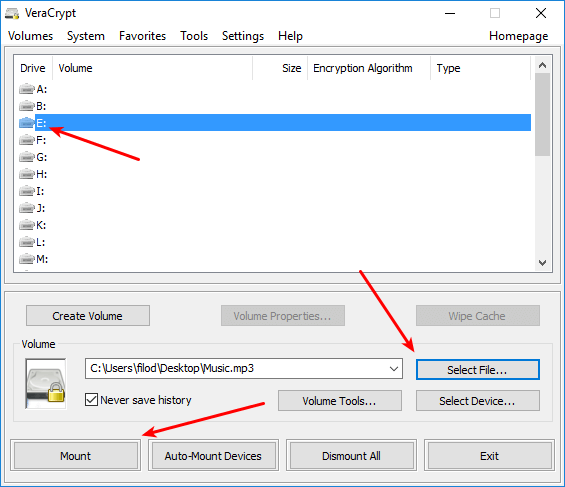
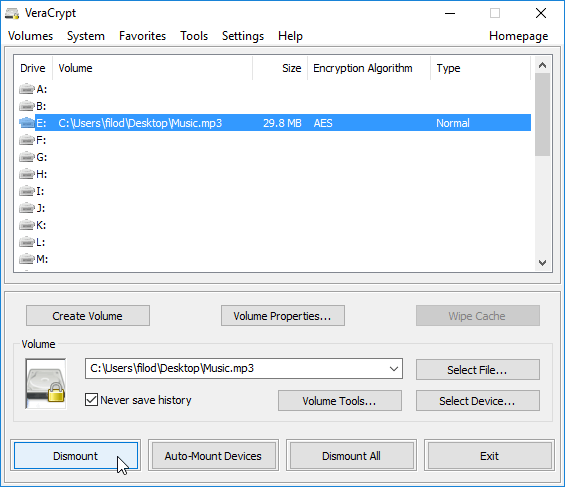
On the initial screen of VeraCrypt, we need to click on one of the available drive letters, find the file container through "Select File..." and click on "Mount".
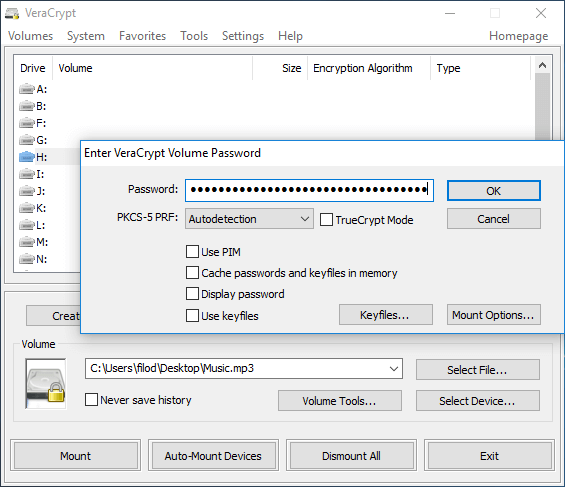
VeraCrypt will ask for our password, which again will be hidden by default, we only selected "Display password" for the demonstration.
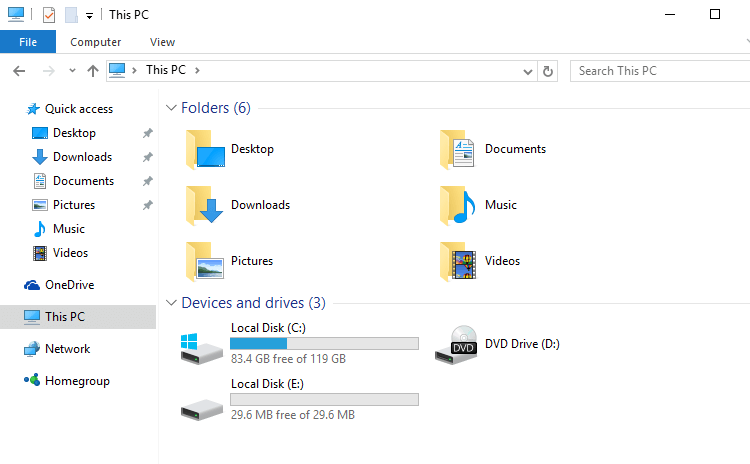
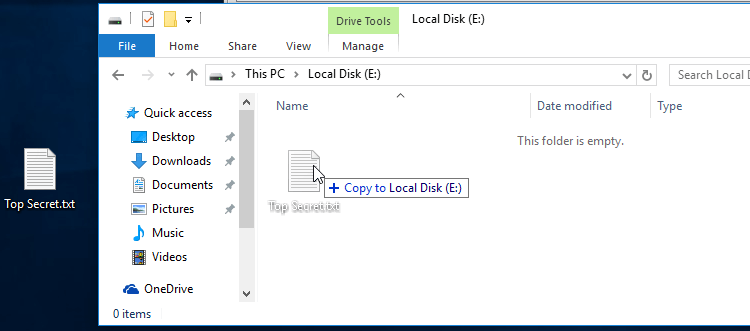
After successfully entering the password, we will have a new partition inside "This PC" with the drive letter we selected.
We can copy or move any files and folders we want inside.
When the file transfer is over, we just click on "Dismount" on VeraCrypt to hide our data.
We should point out that the encrypted file container might protect our files from unauthorized view, but nothing protects the file container itself from deletion, including all the data.
So, it's best if we don't leave the encrypted file container in plain sight on the desktop. Especially since it doesn't work as its filetype suggests, and another user could think it was corrupted and delete it.
Partition / Disk Encryption with VeraCrypt
The Partition or Disk Encryption with VeraCrypt has several similarities with the file encryption using an encrypted file container. For the sake of brevity, we have skipped the screens that are identical, such as the password selection screen.
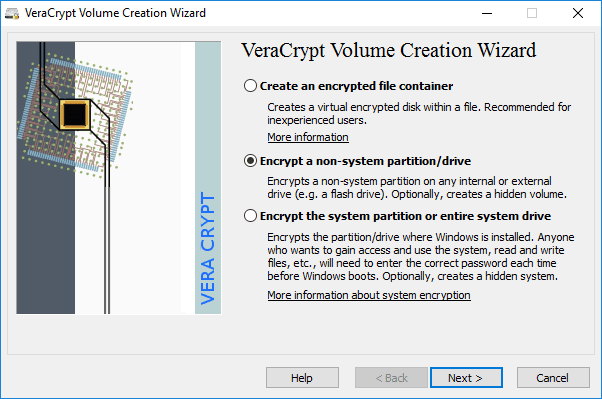
After we start the Volume Creation Wizard from the Tools menu, we select the second option, "Encrypt a non-system partition/drive".
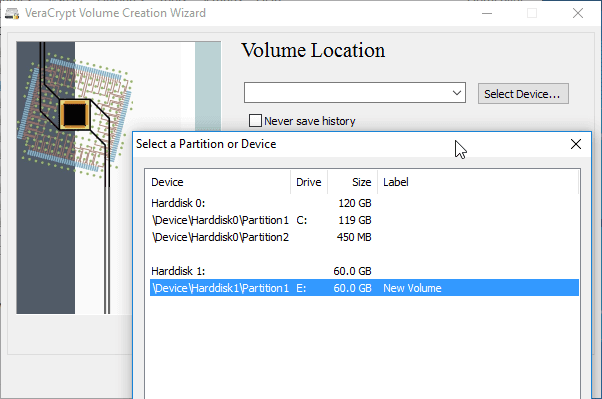
From the volume location screen, we select the partition or device we wish to encrypt.
Creating a new encrypted volume, or applying disk encryption on existing data
If we have a brand new disk or USB thumb drive, we can leave the default "Create encrypted volume and format it". This option is significantly faster, but if the disk contains any data, it will destroy it.
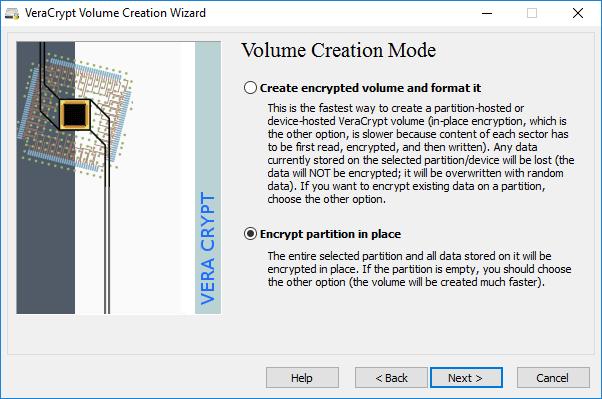
For the example, we went with the second choice, which does a partition or disc encryption and keeps all the data. For large disks with many files, this procedure can take a while.
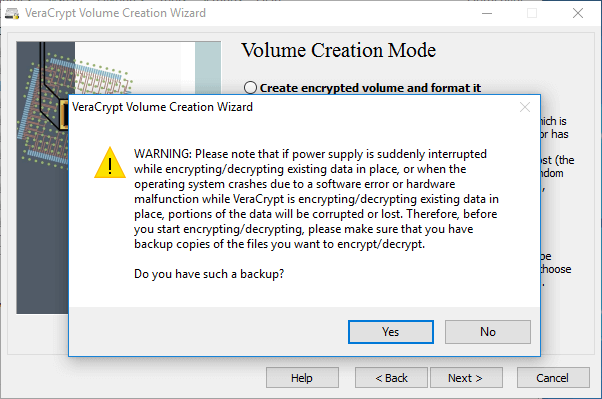
Of course, it's always wise to have a backup of our files before we attempt the partition or disk encryption. A random operating system crash or power loss could result in data corruption.
The "Collecting Random Data" screen is a bit different looking than on the simple file encryption, but it works the same way; we just move the mouse cursor randomly inside VeraCrypt's window to increase the cryptographic strength of the encryption keys.
VeraCrypt will also offer to Wipe the disk, so there is no trace left of the unencrypted data.
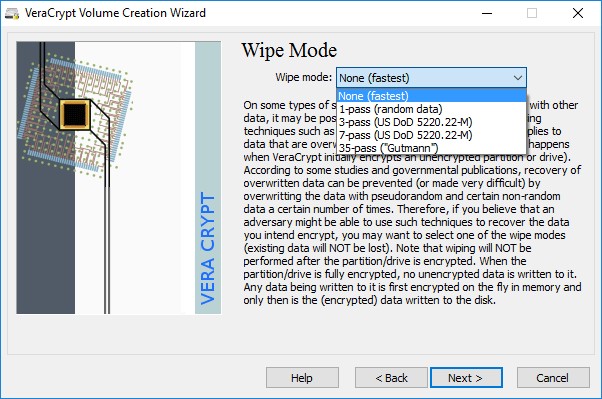
You see, the way HDDs work, it is possible to discover magnetically the previous data written to the hard drive's sectors, even if it has been overwritten once. So, if we don't want any trace of the unencrypted files, we need to overwrite the data it at least twice.
Of course, when we say "it's possible" to discover the previous data, we mean with laboratory equipment costing hundreds of thousands of dollars, not with a typical data recovery app.
So, unless the FBI is after you, "None (fastest)" is good enough, wiping the data is unnecessary. As for the 35-pass, it is way beyond overkill; even the US Department of Justice only goes up to seven passes.
Finally, we click on "Encrypt" to begin the process.
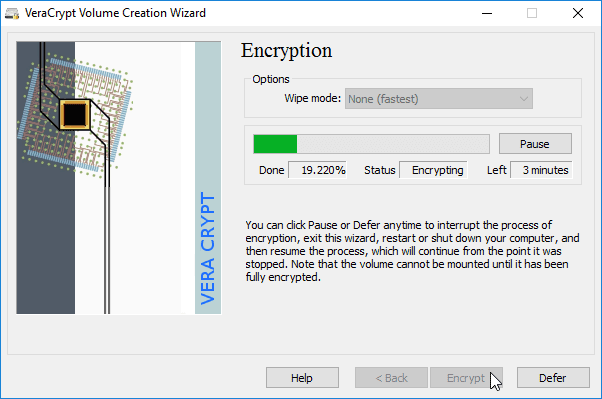
On a large hard drive and a less than latest PC, the full disk encryption can take hours. However, we can always pause the process, and resume at a later time. But we won't be able to mount the volume until it has been fully encrypted.
How to mount a partition or device after the disk encryption
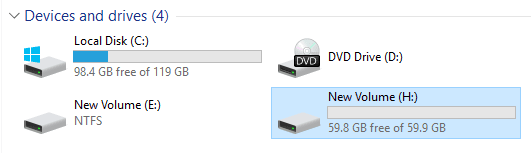
Let's say we encrypted a USB thumb drive with the letter "E:". We will still see a drive "E:" on "This PC", but attempting to open it will only produce a message to format the drive.
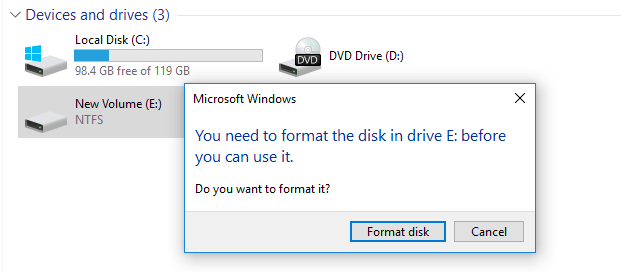
Whatever you do, don't format the drive. Doing so will erase all of your encrypted data.
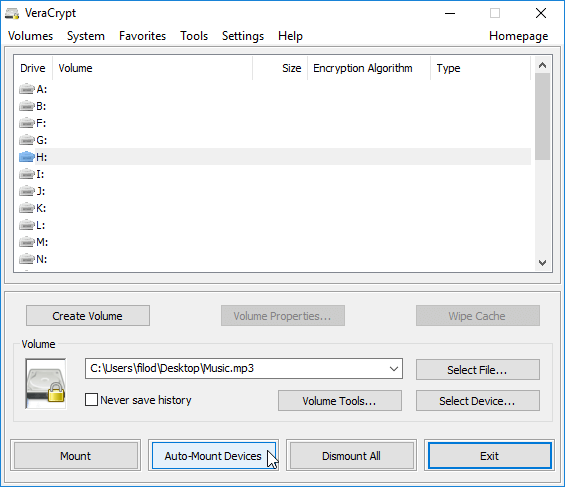
To access the data, we need to run VeraCrypt, select a different drive letter, and click on Auto-Mount Devices.
After we provide the password...
...VeraCrypt will decrypt the drive or partition. During the decryption, which can take a while depending on the drive size, VeraCrypt may seem unresponsive.
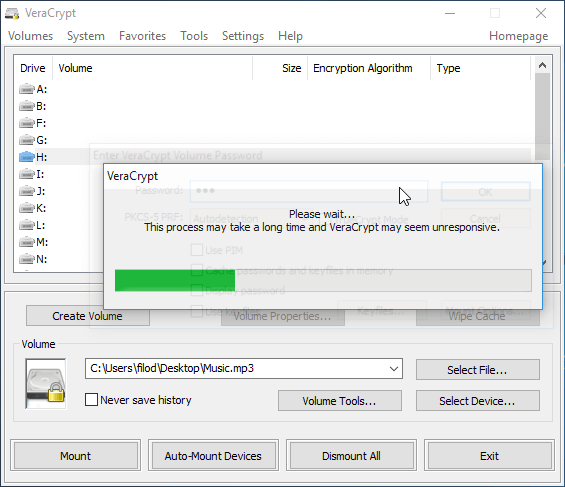
We will end up with a new drive with the drive letter we selected, containing all of our encrypted data.
To be continued: System disk encryption and Hidden volumes with VeraCrypt
In future guides, we will take you through the process of encrypting the operating system disk or partition, and how to utilize the hidden volume feature for encryption that has beaten the best cryptographers the FBI had to offer.
Stay tuned!
How was your experience with VeraCrypt?
Have you been using TrueCrypt and switched with VeraCrypt? Is this your first experience with file encryption? Did you have any problems with partition or disk encryption? Leave us a comment.
Support PCsteps
Do you want to support PCsteps, so we can post high quality articles throughout the week?
You can like our Facebook page, share this post with your friends, and select our affiliate links for your purchases on Amazon.com or Newegg.
If you prefer your purchases from China, we are affiliated with the largest international e-shops:

"...VeraCrypt will decrypt the drive or partition." ... it's doesn't "decrypt" the drive, it mounts the still encrypted drive virtually in order to gain access to the still encrypted data; like opening a password protected ZIP file for viewing, but without extracting the files or removing the password.
"Decrypting" a drive results in the disk no longer being encrypted at all.
Since you have full access to the original data through the mounted virtual drive, and not the encrypted gibberish, it is considered decrypted.
Decrypting data and completely removing the encryption are not the same thing.
Please open the veracrypt tool and look for the option "completely remove encryption"... you won't find it. But you will find various options to "encrypt" or "mount" drives, and an option to "permanently decrypt" drives.
While writing a How-To for a specific application, it's important to use the terms the app developers use, for the same things. This helps unfamiliar users avoid confusion.
And please don't tell me this Hot-To was written for people who should already know better.
Or, in other words, virtual decryption and permanent decryption are not the same thing. And I know that. But you were not specific. And as the goal of this How-To isn't to explain the difference, it better to avoid having to by just using more appropriate terms.
PS: thanks for not considering the context of the conversation before responding. It shows consistency; which isn't necessarily a bad thing.
I tried VeraCrypt and it has a lot less features than I expected and I don't feel safe securing my data with it like with this software: http://www.winzip.com/win/e... which is easy to use and if you have large amounts of data files that you need to send or store you can compress (Zip) them as you encrypt them.