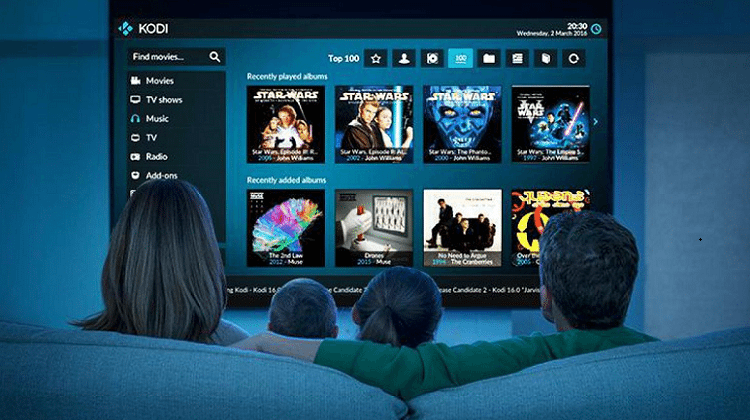
Kodi is the best solution if we want to create a multimedia center at home. While we are expecting the v18 Leia edition, this guide will show you how you can add the top new Kodi add-ons for online films and sports. The new Kodi add-ons replace the former well-known add-ons which were shut down. Also, you will find out in what way you can enjoy the simplest Kodi that ever existed for Windows and Android TV Box.
Unblock any international website, browse anonymously, and download movies and Mp3 with complete safety with CyberGhost, just for $2.75 per month:
What we need to know
As it is known, 2017 was the year that Kodi add-ons were attacked by certain companies, due to Piracy 3.0. Many known repos and add-ons were forced to close down owing to fear and also lawsuits made by the entertainment industry.
Some other Kodi add-ons survived though. They still work; however, some of them are not in good shape at all.
For instance, it is worth mentioning the well-known Covenant, which is not supported by its designers any longer. Also, the repository ‘Colossus’ which owned Covenant has closed down as well.
 Even though Covenant moved to a new repository - the XvBMC Repository - it still might not be updated any longer, and the streaming failures may still occur. Unfortunately, we can imagine the consequences.
However, if we have already installed it and we run it on Kodi, at least for now, we do not need to worry because it still works.
Although, if you are used to Covenant, it is a good idea to add its two new counterparts, which we will describe later.
The new Kodi status
The phenomenon that tends to become a habit on Kodi is the fact that very often some popular Kodi add-ons are ‘left to die’ slowly while, at the same time, new similar ones are ‘born.’
However, most builds have started to delay a lot, because they incorporate many add-ons. This happens either because of the unsuccessful updates when opening Kodi or due to the abrupt stop of their function.
Of course, the best builds, such as BoomShakala and Durex, get frequent updates, so that they remain functional. Still, the speed is incomparably higher at the predefined Kodi shell with the few add-ons that we will see.
Why we should use only the necessary Kodi Add-ons
In comparison with the recent past, when Piracy 3.0 did not exist, nowadays the best action we can perform to have a very fast, light, and easy Kodi is to add only the necessary add-ons for online movies and sports; the ones which work correctly.
This way, we will be able to switch from one to another among very few add-ons, in case that one of them fails.
In fact, as we are about to see, we do not have to add them all. With the top three of them, we can easily watch all the movies and series. We will keep the rest as substitutes.

So, with these few add-ons, we will not burden our system at all. This is going to be even more perceptible on the TV Boxes which do not have the same processing power as the computers, nor the 4 or 8GB memory which we usually have on a PC.
There is no doubt that Kodi works great on a computer and it offers us higher visual quality than any other media. However, many of us prefer a TV. So, we can achieve that easily with Kodi in a TV Box.
At the same time, we maximize the performance of Kodi on the PC, by avoiding the unwanted delays and the confusion that an abundance of add-ons can inflict on heavy builds.
Also, we should not forget that the use of a VPN on Windows and Android (preferably paid) is imperative if we want to ensure our anonymity entirely with the use of the third-party, unofficial add-ons that follow.
How to install Kodi on Windows and Android
On Windows, we can install the official Kodi edition from the Microsoft shop. This way we ensure that new open software editions will be updated automatically.
Therefore, by downloading Kodi from Windows Store, all its databases as well as the add-ons, which we will see next, will not be compromised. Everything should run along with the settings in the upcoming Leia edition which will stand on top of Krypton.
For Android and the TV Boxes, we can download it directly from Play Store, or we can visit Kodi's website.

v18 Leia edition
When the new version v18 Leia becomes official, we won't need to do almost anything, apart from what we will see in this guide. For now, only the v18 nightly editions are available, which are very unstable.
Because of that, we should note that if we proceed to install the current nightly edition, this may lead to unexpected errors.
Despite all that, v18 will be similar to Krypton, contrary to the ‘cosmogenic’ changes from v16 Jarvis. The only significant difference will be that the new edition will come as a full 64-bit Windows application.

This will mean that Leia will be much faster than the previous Kodi editions. The speed will be more noticeable on systems with more than 4GB of RAM.
One way or another, either something changes drastically regarding Kodi appearance or not, we will cover it with an updated guide, after the official edition v18 has appeared.
Getting started with Kodi for Windows and Android
Naturally, we will get started with the basics, since many beginners would at last like to include Kodi into their entertainment, as simply as possible. All the actions we are about to see are the same for Windows and Android.
So, by opening Kodi, the graphical user interface (GUI) will appear, which takes place because of the two skins, Estuary and Estouchy.
If we want to switch from full screen to window and vice versa, we press the key with the symbols \ and | which we will usually find above ‘Enter.’

Otherwise, if we do not have such a keyboard, we can perform the following route:
Main panel→ Settings (cog) →System settings →Display→Display mode →Full screen

Activate unknown sources
Almost none of the add-ons for online movies come from the team of the designers of the application. By definition, these ‘add-ons’ get no support from the Kodi team, and they are considered unknown sources.
We have seen something similar on Android. However, there is no security issue in the case of Kodi or the suggestions of this guide.
So, to add the best active add-ons for sports, series and online movies, we go back to the empty Kodi on the main screen.
To navigate back to the Kodi tabs, we press ’Esc’ to return to the main panel. With ‘backspace’ or the extra side keys of a mouse, we can return gradually.

So, by clicking on the system settings…

…and then on the add-ons, we activate the unknown sources, with a click on the respective icon.

Right after that, we will receive the usual warning about the action we have performed, which we accept fearlessly by clicking ‘Yes.’

The current best Kodi add-ons
Below, you will find the current best Kodi add-ons for online movies and sports. We present them in no particular order.
Incursion
This is a new Kodi add-on similar to Covenant, and currently offers more high-definition online movies than any other add-on.

At this point, we need to remember that if no high-definition streams turn up, we may need to take a step back and probably they will show up on our next go.
This happens with most add-ons, depending on the movie and the series.
How to individually add Incursion to the Kodi shell:
- Main panel →Settings →File management →Add source (double click) →None.
- We paste the following URL:
http://dimitrology.com/repo
- Make sure that there are no gaps before or after the URL and then click on ‘OK.’
- We name the source ".Dimitrology" and then we click ‘OK.’
- We return to the Main Menu, and we click on ‘Add-ons.’
- Click on the icon at the top left which looks like an open box.
- Install from .zip file →Dimitrology → Incursion.repository- XXX.zip (where X stands for the numbers of each new edition).
- We wait for a while until the add-on is activated. It might take a while for the activation to show. We will see the confirmation at the top right section of the screen.
- Next, on the same window, we select ‘Install from repository.’
- Incursion Repository → Add-on videos →Incursion →Install.
- We wait until the download is complete.
- If there is an error while installing, we proceed with the rest of the add-ons that we want and we leave it for last because sometimes errors come up when installing it.

Sub-menu main sections and minimum settings
We will briefly present the central parts of the sub-menu and the few actions we need to take to have the best possible results with online movies.
- Click here to see the various movie categories.
- We do the same with TV series.
- The useful Add-on tools.
- We go to ‘search’ and type the online movies or series that we want. If a TV series has many episodes, once it appears on the results we first click on its title. On the next window that appears we right-click and place the series on our favorites. They are on the main panel.
- Occasionally through the tools, we can perform maintenance on the add-on.


Placenta
This new Kodi add-on is excellent for online movies.

It is the counterpart of Covenant in all respects, regarding menu and search, where it maintains its previous searches. Furthermore, it is continuously updated, and it has a relevant section at the start menu. We will see how long this lasts.

How to add Placenta to the Kodi shell:
- Main menu→ Settings→ Add source (double click)→None.
- We paste the following URL:
http://blamo.teverz.com/
- Make sure that there are no gaps before or after the URL and we select ‘OK.’
- We name the source .Blamo and we click ‘O.’
- We return to the main panel, and we click on ‘Add-ons.’
- Click on the icon at the top left which looks like an open box.
- Install from zip file →.Blamo → repository.blamo- XXX.zip (where X is the number of each new edition).
- We wait a while for the add-on to be activated. It might take up to one minute for the activation to show. We will see the confirmation at the top right section of the screen.
- Next, on the same window, we select ‘Install from repository.’
- Blamo Repo →Add-on videos →Placenta → Install.
- We wait until the add-on downloading is complete.
- Ready to use the Kodi Add-ons section.

Sub-menu main sections and minimum settings
We briefly present its main sections.
- Click to show the various movie categories.
- We do the same with TV series.
- The useful add-on tools. Here we can find the field ‘Accounts,’ in case we want more HD movies from Alluc, which we will see at the end of this guide.
- We go to ‘search’ and type the online movies or series that we want.
- Occasionally through tools, we perform maintenance.


Rebirth
This is a mixture of the good old Elysium and Exodus. Undoubtedly Rebirth is one of the best Kodi Add-ons for high definition online films and series.

How to individually add Rebirth to the Kodi shell:
- Main menu →Settings →Files management →Add Source (double click) →None.
We accurately paste the following URL:
http://cypher-media.com/repo/
- We make sure that there are no gaps before or after the URL and we click on ‘OK.’
- Name the source ".Cypher" and click ‘OK.’
- We return to the main panel, and we click on add-ons.
- We click on the icon at the top left which looks like an open box.
- Install from zip file →.Cypher →repository.Cypherslocker- XXX.zip (where X stand for the numbers of each new edition).
- We wait a while for the add-on to be activated. It may take up to one minute for the activation to show. We will see the confirmation at the top right of the screen.
- Next, we select ‘Install from repository’ on the same window.
- Cypher Locker →Add-on videos →Rebirth →Install.
- We wait until the downloading of the add-on is complete.
- Ready to use on the Kodi Add-ons section of the main menu.
The main sections
- Click to show the various movie categories.
- We do the same with TV series.
- The add-on tools. As we will see later, Alluc doesn't support many FHD films.
- We go to ‘search,’ and we type the title of the online films or series that we want. If a TV series has many episodes, we right click and place it on our favorites.
- Occasionally through tools, we perform small maintenance on the add-on.


The four best alternative Kodi Add-ons
We do not have to install any other Kodi add-ons for films. The above top Kodi add-ons of this season will undoubtedly cover us until further notice.
Then again, nowadays, these Kodi add-ons could stop working without any notice. Thus, the add-ons below might come in handy.
Besides, if an add-on fails with some films and series, we only have to proceed to the next one. In fact, if we have already added them, they will be ready to run.

Cerebro ShowBox
The basic set-up of this add-on is almost the same as with Exodus/Covenant, but with a more functional and beautiful environment, which offers more choices and features.
The best thing is that it offers automatic pairing with FHD streaming services, which we will see in the respective section at the end of this guide.

How to add Cerebro ShowBox to the Kodi shell:
- Main menu →Settings →Files management→ Add Source (double click) →None.
- We paste the following URL:
http://repo.cerebrotv.co.uk/
- We make sure that there are no gaps before or after the URL.
- Name the source .Cerbero TV and press ‘OK.’
- We return to the main menu, and we click on ‘Add-ons.’
- We click on the icon at the top left which looks like an open box.
- Install from .zip file→ Cerbero TV→ Install cerebro repo.zip
- We wait for a while until the add-on is activated. This can take up to one minute for the activation to appear. We will see the confirmation at the top right part of the screen.
- Next, on the same window, we select ‘Install from repository.’
- Cerbero TV Repo→ Add-on videos→ Cerebro ShowBox→ Install.
- We wait until we see the notification that the downloading is complete and the add-on is activated.
- Ready to use on the Kodi Add-ons section on the main menu.

The main sub-menu sections
- We go to ‘search’ and type the title of the online films or series that we want.
- Here we can click to see the various online film categories.
- We do the same with TV series.
- These are the useful tools of the add-on. Here, if we go to ‘Accounts,’ we will find Alluc.
- Occasionally, we can perform maintenance.


Neptune Rising
Neptune Rising is currently, one of the best Kodi add-ons for online high definition movies and series. We will find it in the same repository as the Placenta add-on.
Therefore, we can skip the steps for the addition of the source, and we can go straight to the following:
- Add-ons →We click on the icon at the top left which looks like an open box →’Install from repository’.
- Blamo Repo →Add-on videos→ Neptune Rising → Install.
- We wait until the downloading is complete.
- Ready to use on the section Kodi Add-ons of the main menu.
The main sections
- We click for the various movie categories to appear.
- We do the same with TV series.
- The useful add-on tools that we are about to see next.
- We go to ‘search’ and type the title of the online movies or series we want.
- We perform small maintenance on the add-on.

Genesis Reborn
This is a new updated version of the Genesis add-on, which still works great.
Furthermore, the online films and series that work with Alluc are provided in high-definition (1080p), improving the visual result to a great extent. This, however, does not always happen.

How to add Genesis Reborn to the Kodi shell:
- Main menu→ Settings →File management →Add source (double click) →None.
We accurately paste the following URL:
http://jesusboxrepo.xyz/repo/
- We make sure that there are no gaps before or after the URL.
- Name the source .jesusbox and press ‘OK.’
- We return to the main panel, and we click on ‘Add-ons.’
- We click on the icon at the top left which looks like an open box.
- Install from zip file→ .jesusbox.→ repository.jesusboxtv.zip
- We wait for a while for the add-on to be activated. It might take up to one minute for the activation to show. We will see the confirmation at the top right part of the screen.
- Next, on the same window, we select ‘Install from repository.’
- JesusBox Repository→ Add-on videos→ Genesis Reborn→ Install.
- We wait until we see the notification that the add-on is activated.
- Ready to use on the Kodi Add-ons section of the main menu.

Main sub-menu sections
- We click for the various film categories to appear.
- We do the same with TV series.
- The Add-on tools. Alluc supports for more HD films.
- We go to ‘search,’ and we type the title of the online films or series we want.

Covenant
As we mentioned at the beginning, things are somewhat unstable with the Kodi Add-ons. Even though Covenant was suggested to have been abandoned by its designers, however, it works fine on the new repo.
It is worth having it in our arsenal because we never know what happens with Covenant.
How to add Covenant to the Kodi shell:
- Main menu →Settings→ File management→ Add Source (double click) → None.
We accurately paste the following URL:
http://archive.org/download/repository.xvbmc
- Make sure that there are no gaps before or after the URL and click ‘OK.’
- We return to the Main menu, and we click on ‘Add-ons.’
- We click on the icon at the top left which looks like an open box.
- Install from zip file→ .xvbmc→ repository.xvbmc-4.2.0.zip.
- We wait a while for the add-on to be activated. It may take up to one minute for the activation to show. We will see the confirmation at the top right part of the screen.
- Next, on the same window, we click on ‘Install from repository.’
- XvBMC (Add-ons) REPOsitory→ Add-on videos→ Covenant→ Install.
- We wait until the downloading of the add-on is complete.
- Ready to use on Kodi ‘Add-ons’ on the main menu.
- All the sections and settings, without exception, are straightforward and they are the same as those we saw on Incursion and Placenta.

More online HD films
If we are not satisfied with the definition from the streaming services on the Kodi add-ons we saw, and we want more online HD series and movies, we should activate the well-known Alluc that we have mentioned many times in the past.
Even though it may not be as effective as it used to be in the past, it may work well with most of the active Kodi add-ons of this guide. Possibly, it will work well with the future ones that will appear and support it with their tools.
But we have to know that the videos by those providers may not have the quality that is said to be. Furthermore, the dozens of 1080p ‘ALLUCEN’ that we see below may not appear.

Alluc
If we want more Kodi add-ons and online HD movies, we open the browser, and we perform the actions we see in the pictures below, one by one.
The defining action is a registration to the Alluc website. Next, we will receive a confirmation text on the email we have registered with, so that we can activate the account through the link we received.

Once we receive the confirmation to our email and our Alluc account has been activated, we connect to the website, and we will see the API, which is a series of digits.
This is a free key which allows us to regain many FHD videos per day through Kodi add-ons. Therefore, we only need to copy it.

Then, we go to Kodi, and through the menu of the add-on which supports it, we successively click on ‘Tools→ Accounts→ Alluc.’ We will usually find this Alluc subcategory at the bottom of the Accounts window.
Then, in the respective field with the indication "2" which we can see below, we paste the API, and then we select ‘Downloads’ and click ‘OK.’

The important Openload pairing (olpair) / Thevideo / Vshare / Vid up me
Many 1080p videos inside Alluc come from Openload (olpair), Thevideo, and Vshare, which sometimes will require the necessary pairing for the film to play.
Incursion, which we saw before, has such high definition films outside Alluc. Sometimes, it will require a pairing as well, whether we have activated Alluc on the add-on or not.

It is good to put this pairing websites on the browser favorites so that we have immediate access when we are asked through Kodi, shortly before the film starts.

Cerebro Show Box that we saw before is the only add-on, for now, which offers the process of this pairing in an automated way.
All we have to do is click on ‘Click here to pair’ on the start menu…

…and then we should successively select the respective pairing services we mentioned before; thus, the pages will automatically open.

This authentication will last four hours, and sometimes it will be valid for all the remaining add-ons, without exceptions.

Sports online with two of the top currently active Kodi add-ons
There is no doubt that apart from films, many of us enjoy sports matches at home.
With the following Kodi add-ons, we will have all the big live broadcasts of many football leagues, with most important the Champions League, English Premier Leagues, Spanish LaLiga, and basketball NBA.
However, we need to know that live sports on Kodi are much more unstable compared with the online films, even though the add-ons that host them are updated. One day everything works in perfect order, but the next day nothing works, or there are constant interruptions in streaming.
In such cases, we can resort to Reddit streaming services. Especially if we are NBA fans, Reddit is by far the best means for free HD streaming.

Maverick TV
This is an add-on which, apart from many films of the highest 4K, it also offers other exciting services, especially sports and live broadcasts.
Even though it is not a new add-on, still, at the moment it seems that it offers the most accessible and most reliable live streaming of the matches, from start to end.

We only have to be patient and try out all the alternative links of the add-on that we show below. Some of these links broadcast the live matches successively, and if there are many important matches on that day, maybe we won't need to leave our seat at all.
While writing this guide with two of the relevant add-on links, no frustrating interruptions took place.
Of course, we do not know how long this positive effect will take place on the Maverick live sports.

How to add Maverick TV to the Kodi shell:
- Main menu →Settings →File management →Add Source (double click) →None.
- We paste the following URL:
http://mavericktv.net/mavrepo
- Make sure that there are no gaps before or after the URL.
- We name the source ".Maverick" and we press ‘OK.’
- Return to the Main menu and click on ‘Add-ons.’
- We click on the icon at the top left which looks like an open box.
- Install from zip file →. Maverick →repository.maverickrepo-2.2.zip
- We wait for a while for the add-on to be activated. It may take up to one minute for the activation to show. We will see the confirmation at the top right part of the screen.
- Next, we select ‘Install from repository’ on the same window.
- Maverick TV Repo→ Add-on videos→ Maverick TV→ Install.
- We wait until we see the indication of the add-on's activation.
- Ready to use on the Kodi Add-ons section of the main menu.

Main menu
- We enter the sports menu.
- The most significant matches of the day from ‘Maverick Live Sports’ section. It is the most useful one, and we can move it to our favorites with a right-click. There are alternative links for each game, and unfortunately, some of them take a while to open.
- All the channels with live broadcasts from ‘Maverick Sports.’
- Here we can see the live broadcasts of the day.
Project M
While writing the guide, Project M performed as good on the live broadcast of few matches.

This is an add-on with many submenu categories for TV sports shows, divided into several segments and subsections that may give us a hard time at first. We will demonstrate it with pictures later.
How to add Project M to the Kodi shell:
- Main menu → Settings → File management → Add Source (double click) → None.
- Paste the following URL:
http://mwiz.uk/repo/
- Make sure that there are no gaps before and after the URL.
- Name the source ".Merlin" and press ‘OK.’
- We return to the Main menu, and we click on ‘Add-ons.’
- We click on the icon which looks like an open box.
- Install from zip file → .Merlin→ repository.merlin.zip
- We wait for a while for the add-on to be activated. It may take up to one minute for the activation to show. We will see the confirmation at the top right part of the screen.
- Then on the same window, we click on ‘Install from repository.’
- Merlin Repository→ Add-on videos→ Project M→ Install.
- We wait until we see the indication that the add-on has been activated.
- Ready to use on the Kodi Add-ons section of the main menu.

Main menu
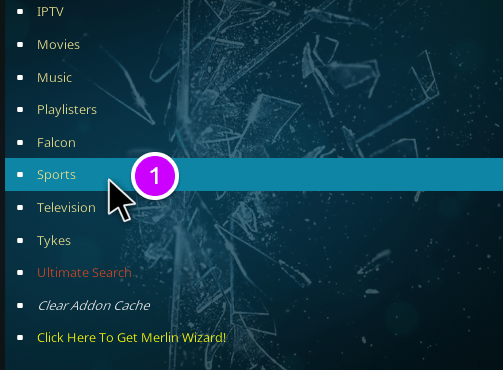
- We enter the sports menu.
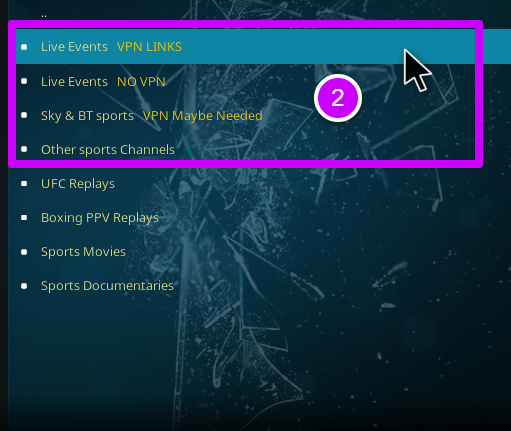
- The live broadcasts of that time. ‘VPN links’ offers live all the football matches of the day. VPN concerns British users more. It is the most useful one, and we can place it on our favorites with a right click. There are alternative links for each match. The indications for the matches of the day will appear shortly before the matches begin.
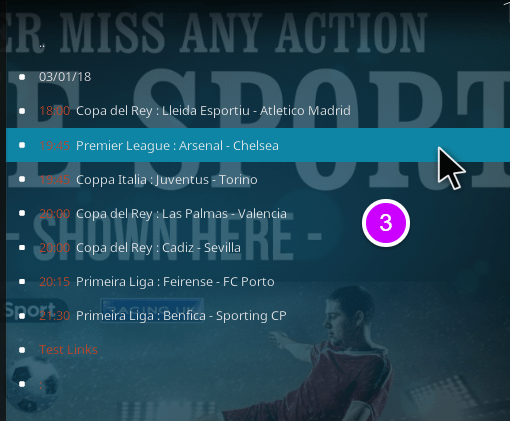
- All the matches of the day on ‘VPN links.’
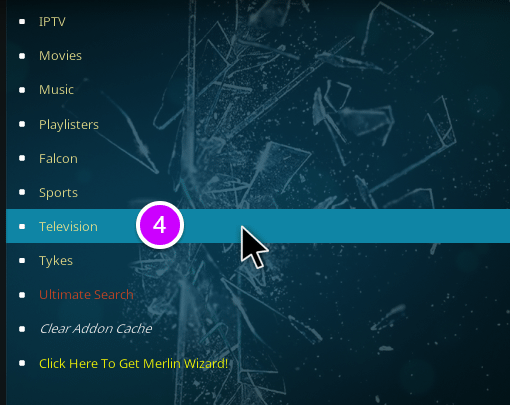
- Television: The second section on the menu of the add-on for live sports.
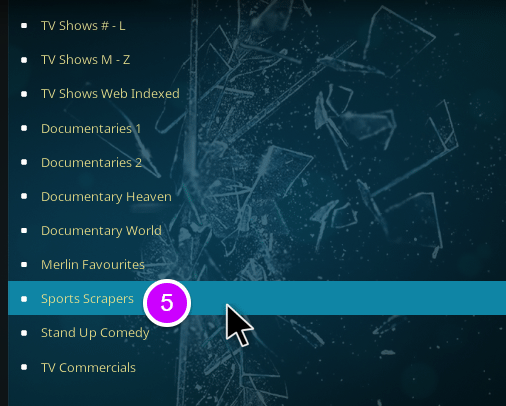
- Sports Scrapers: We click to continue.
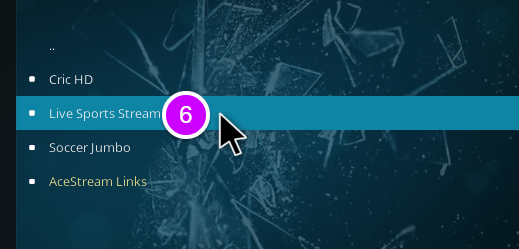
- Live Sports Steam: We click for the next one. (We can move this section to our favorites with right click).
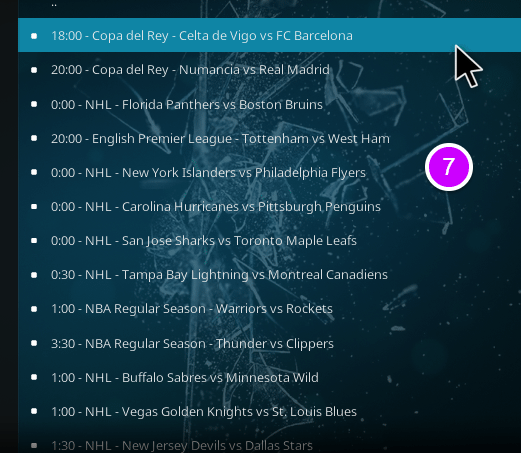
- All the football and basketball matches and everything else that plays on the day. The NBA denied, and there is a chance that there will be interruptions in this Television section.
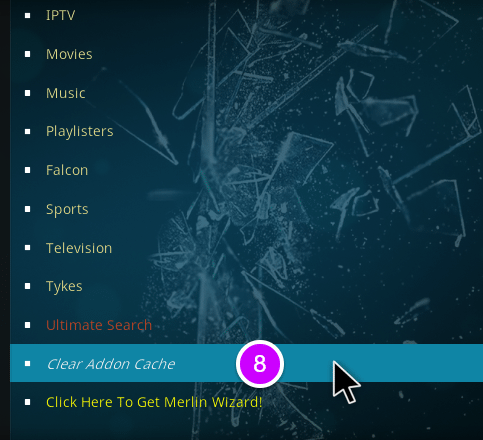
- We can perform maintenance on the add-on, especially if there have been many live sports broadcasts.
What to do if I already have a build
As we mentioned at the beginning, Kodi in its primary form with only the minimum necessary add-ons that we saw, is undoubtedly much faster than any other build.
However, if we are happy with a build we are using, and we do not experience delays, we do not have to discard it. Besides, if the build we have is often updated, it is possible that it has already added few of these Kodi add-ons.
However, if we have Windows 10, we can have two different Kodi installations. The only thing to do is download the other edition.

From then on, we can use either of the two different Kodi installations and switch from one to the other, by trying the new add-ons on the empty Kodi. It is more than certain that few good ones can give us an even better result.
How easy is to watch movies with Kodi add-ons?
With Kodi, our home entertainment gets a significant boost. We will be owners of an excellent media center where we can watch films, series, and sports online without paying subscriptions. At the same time, our whole family and friends will be impressed.
If you have questions about the Kodi add-ons of this guide or you want to share your general Kodi experience, you can write to us in the comments below.
Support PCsteps
Do you want to support PCsteps, so we can post high quality articles throughout the week?
You can like our Facebook page, share this post with your friends, and select our affiliate links for your purchases on Amazon.com or Newegg.
If you prefer your purchases from China, we are affiliated with the largest international e-shops:


Leave a Reply