

Over the past decade, Kodi has become the most popular media center for home entertainment. The great open-source software has been quite tricky. However, in a recent guide, we figured that it can become quite simple with a few Add-ons. In this guide, you can find out the most wanted new tricks regarding all of the Kodi settings, without exception, and eventually how to become experts of this ultimate media centeronce and for all.
Unblock any international website, browse anonymously, and download movies and Mp3 with complete safety with CyberGhost, just for $2.75 per month:
All the Kodi settings
Kodi settings constitute a challenge which requires effort and patience, since learning all about them isn't exactly considered easy to do.
Even though, as we've seen, watching movies has become a very simple procedure with Kodi's precious Add-ons, more research of the home system is necessary if one wants to have a decent understanding of it.
Keyboard shortcuts
The media center supports many keyboard shortcuts. This way, we have the opportunity to perform any action we like, much faster than we would otherwise be able to.
Naturally, shortcuts may turn out to be especially useful for TV Boxes that come with a wireless alphanumerical keyboard.
All the shortcuts concern the Latin characters on a typical keyboard. We are mentioning them briefly.
- Alt + F4: Instant Kodi switch-off. We need to give it a few seconds before we switch it back on again.
- S: Quickly shows the 'exit Kodi' option.
- P: Play
- A: Each time we press this key, it gradually adjusts any potential sound delay so that it is synchronized with the video.
- X: Stop
- Spacebar: Alternate between 'Play' and 'Pause.'
- R: It rewinds the video. By pressing it once, it rewinds at a slow pace (x2). By pressing the key twice, it rewinds at a faster pace (x4), and so on.
- Z: Every time we press this key, it gradually changes the size and aspect ratio.
- Ctrl + V: Paste text in Kodi.
- Esc: Direct return to the main menu.
- Backspace: Gradual return. It can be performed with one of the side mouse buttons, if we have set it this way.
- F8: Mute.
- Windows icon: Fast access to Desktop and other open programs.
- Symbols \ and /: Switch from full screen to window and vice versa.

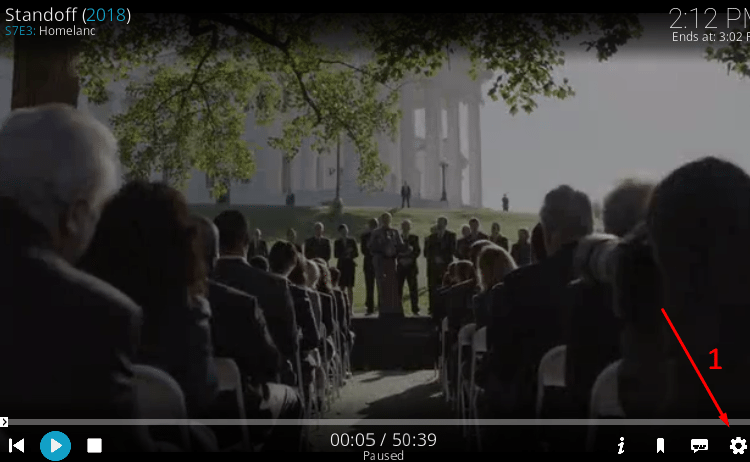
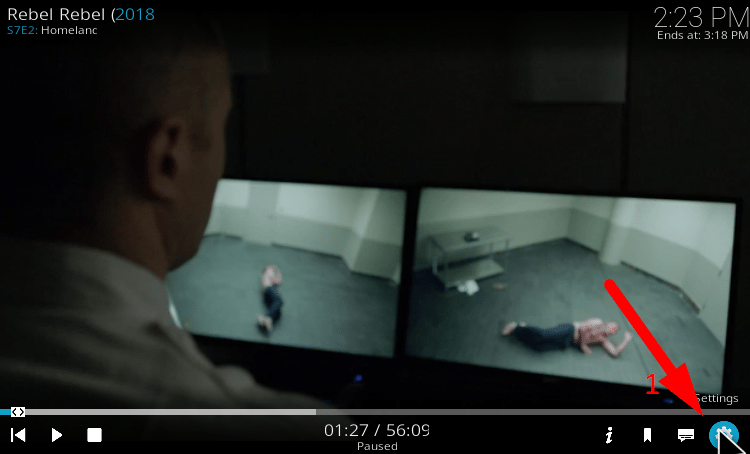
How to navigate Kodi without exiting the movie
It often happens that when a movie begins, we realize that we have forgotten to adjust a setting or simply that we have to return to the main menu for a while.
In such cases, there is no need to exit the movie and start the whole process from scratch after we are done with the Kodi settings or tasks we remembered we had to take care of.
All we have to do is pause the film...

...and then by pressing "Esc" or "Backspace," as we saw in the keyboard shortcuts, we can navigate through the Kodi sections without exiting the movie.
Next, after we have finished with whatever we had to do inside Kodi's environment, we click on "pause", as we see below, or on a blank space of this screen in order to enter the movie or the series screen.
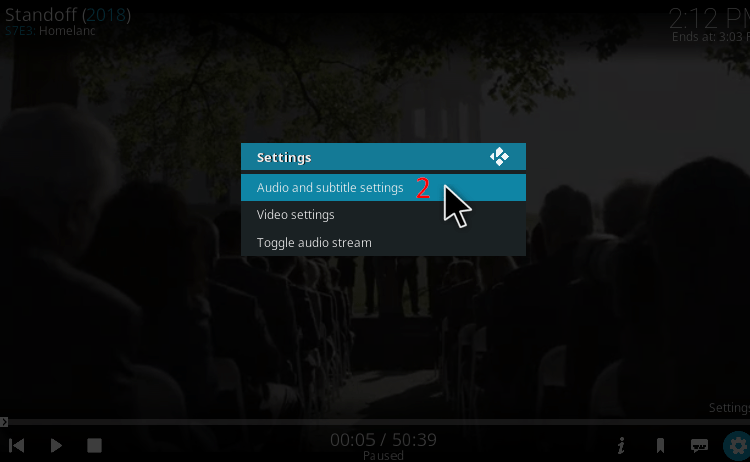
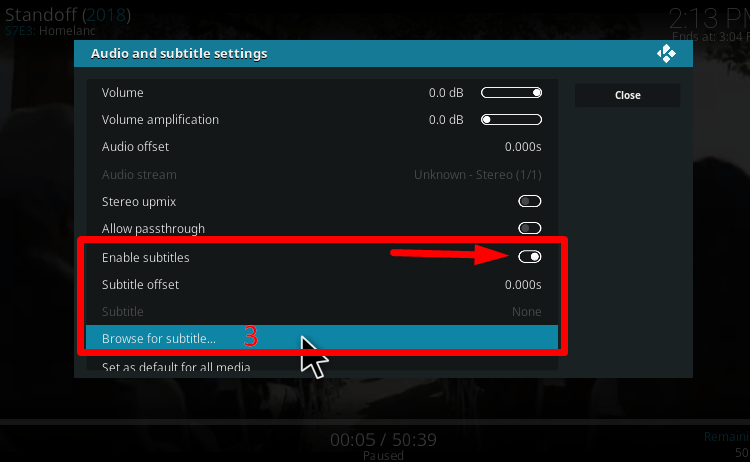
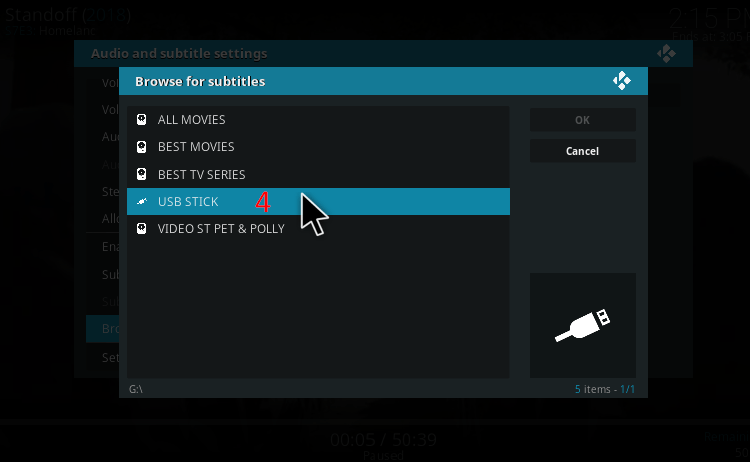
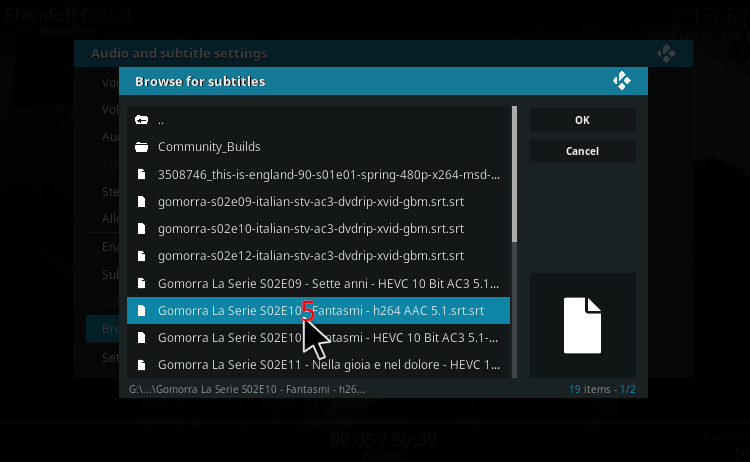
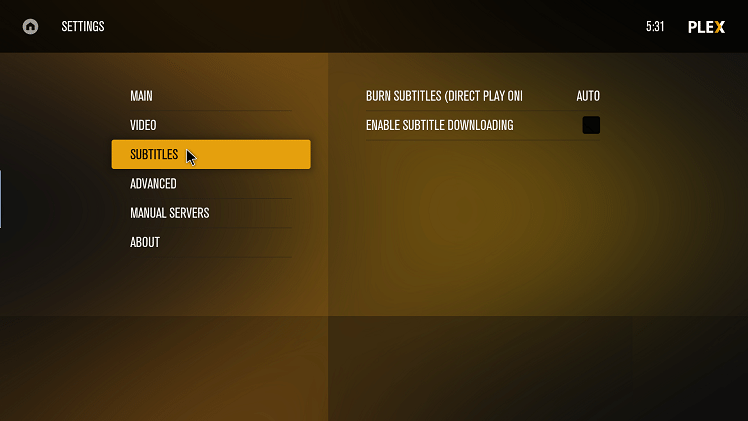
External subtitles addition
The Add-on for movies that we use, in most cases, will get us subtitles online. However, Kodi gives us the option to add the subtitle files that we have externally stored if we wish to.
All we need to do is transfer the SRT file of the subtitle to a USB stick, which is connected to the device where Kodi runs.
Next, we follow the five simple steps that we can see in the pictures below.
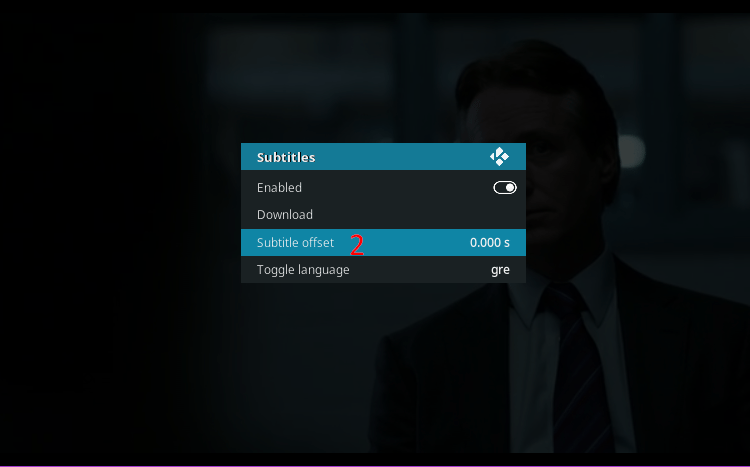
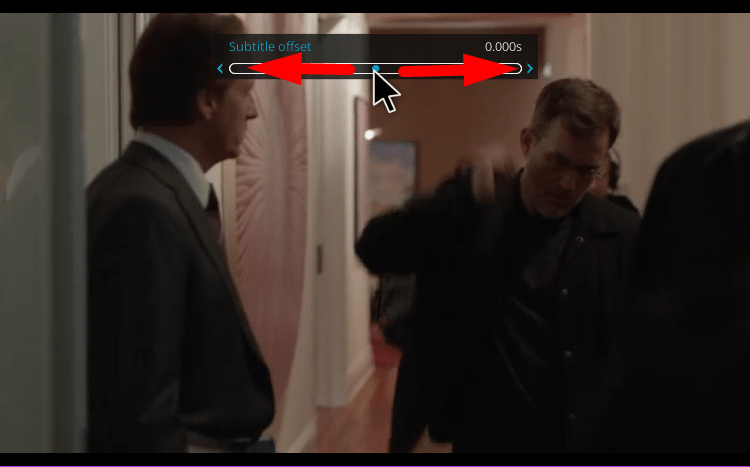
How to correct subtitles
In most cases, we will not face any problems with the subtitle synchronization during the movies. But there might be a few available subtitle files for some unknown films online which may not be properly synchronized.
In this case, we click on the "subtitle offset," as we can see in the following pictures. On the bar that will appear on the upper section of the player<, we move the cursor right or left, until we find the proper synchronization of the subtitles.
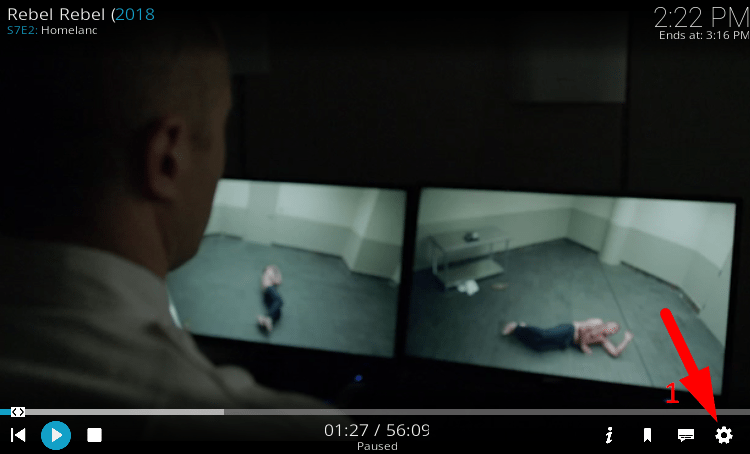
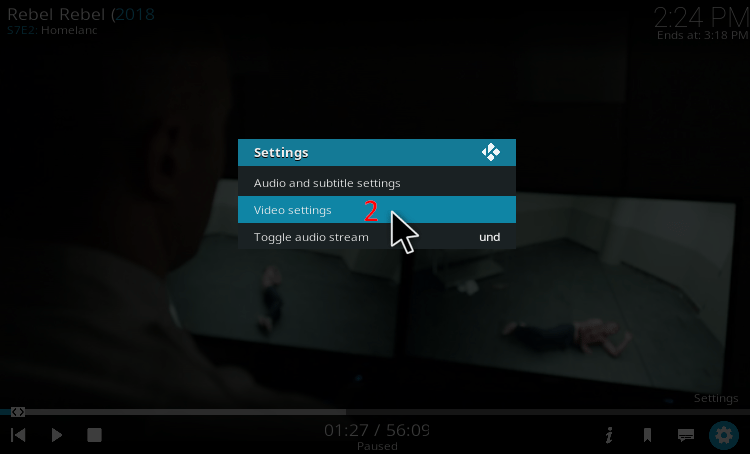
Here, through the use of pictures, we present the simplest Kodi player settings that we have to adjust. Once we finish, we press "Esc" or "Backspace" to return to the movie.

Player settings
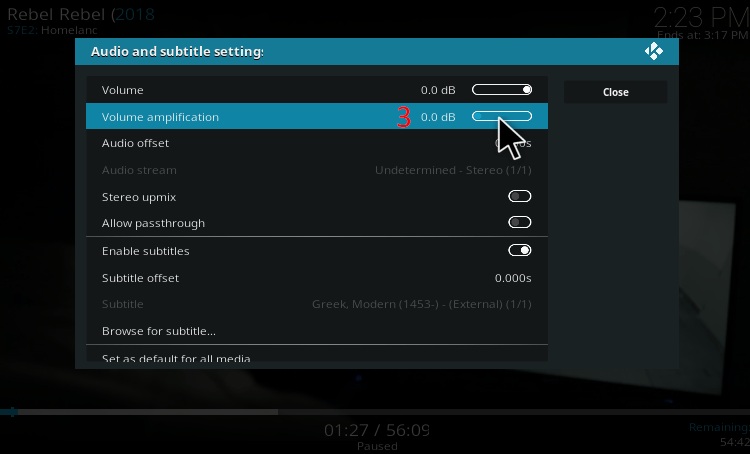
If we do not have a powerful sound source in the device where we run Kodi and the movie has a low volume, we can significantly increase it through the media center.
In this case, we move on to the three simple actions that we can see in the pictures below.

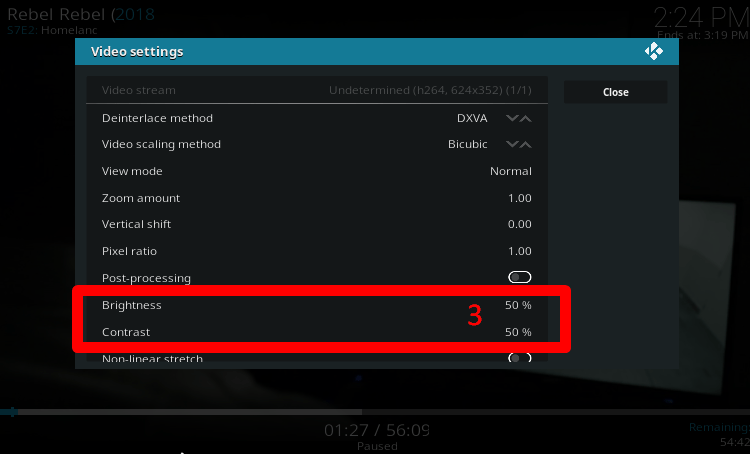
If we are not happy with the brightness and contrast of the movie, we can adjust it through Kodi's player once again. All we have to do is follow the three steps seen below.
Black bars on the movie screen
On the same window, we can also set the view mode of the movie, in case the aspect ratio is 4:3 or something like that.
It is very common to notice black bars on the top and bottom sections of the movie screen. If this occurs and it bothers us, we need to select 16:9 aspect ratio.
The two following actions demonstrate how to tackle such cases:


Image flicker
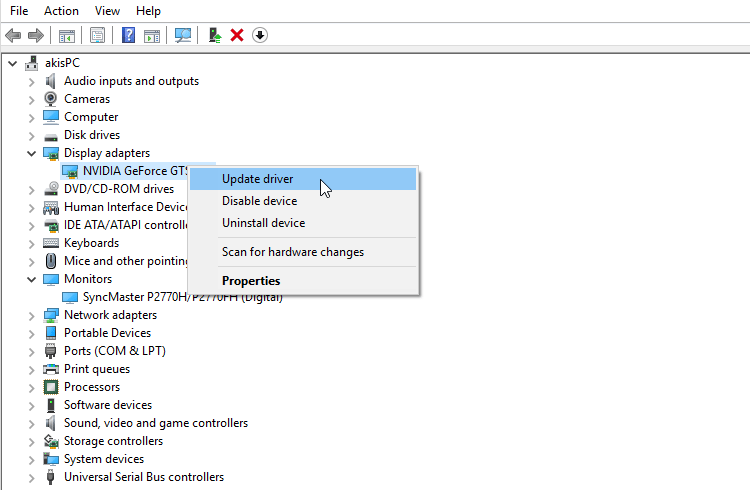
If the screen flickers or we cannot see our videos on Kodi on Windows, we might need to update the graphics card.
In this case, we right-click on the Windows icon on the taskbar, and select "Manage devices." Then, we update the driver of the screen adaptor, that is, the graphics card we possess, as we see below.
If nothing happens, or there is still an image flicker on Kodi on Android, we need to follow the route below in the Kodi menu.
Main menu → Settings (cog icon) → Player settings → Videos, and we deactivate hardware acceleration DXVA2, as we see below.
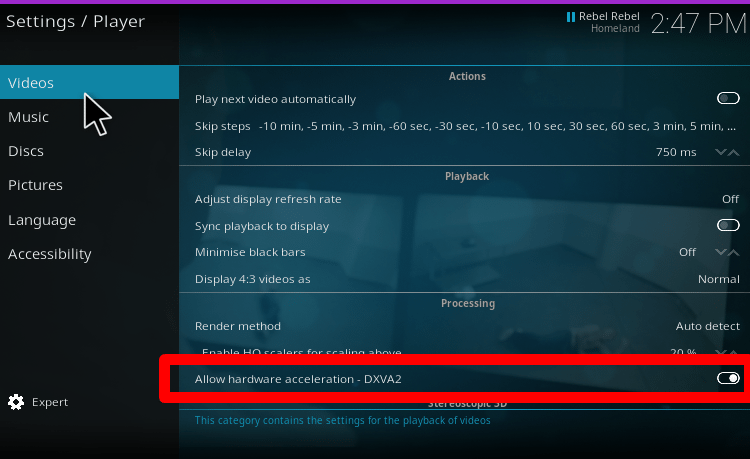
If the problem continues, then on the same unit and window, we select "Enable HQ Scalers" and set it to 100%. Then, we change the render method from "Auto detect" to "Software".

Then, we restart Kodi and the computer or the TV Box.
Add/remove favorites
We might have noticed that by opening the favorites unit, we cannot right-click to remove the things we no longer need, because there is no 'remove' option.
What we have to do is simply click on the indication from the favorites section...
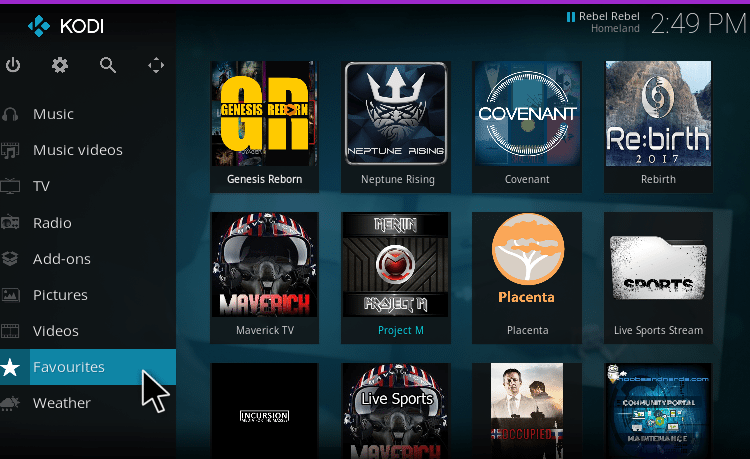
...and on the new independent window that will open, right-click on the respective indication for 'move', 'rename', or 'remove' that will appear.
We can 'add to favorites' by right-clicking on the item we want to add.
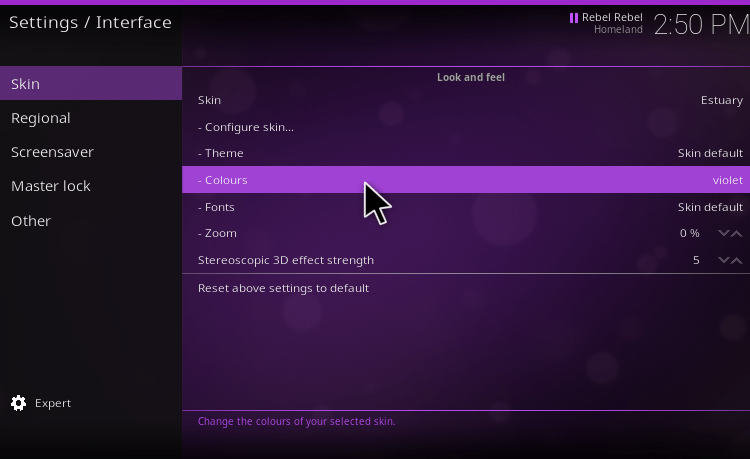
How to change color
If we are no longer happy with the default color of the Kodi shell and we want something different, we can change it.
Go to 'Main menu' and we select "Settings (cog)→ Interface settings → Skin → Colours." There, we can choose any color we prefer.
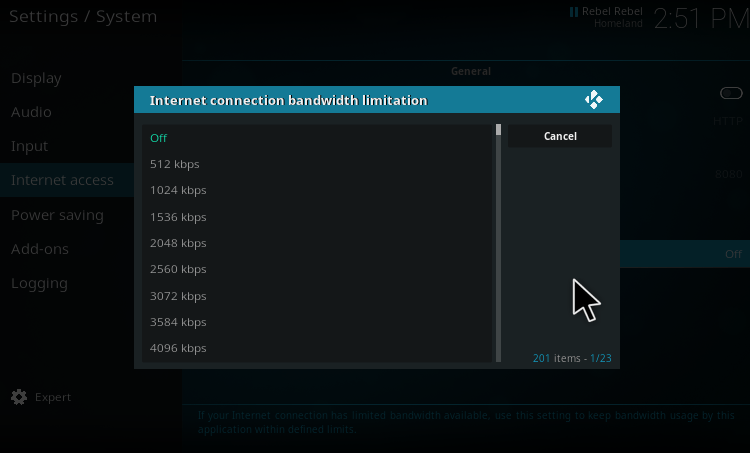
Limited speed connections
If our internet connection is relatively slow, what we have to do is go to ''Settings(cog) → System settings → Internet access," and activate 'internet connection bandwidth limitation.'
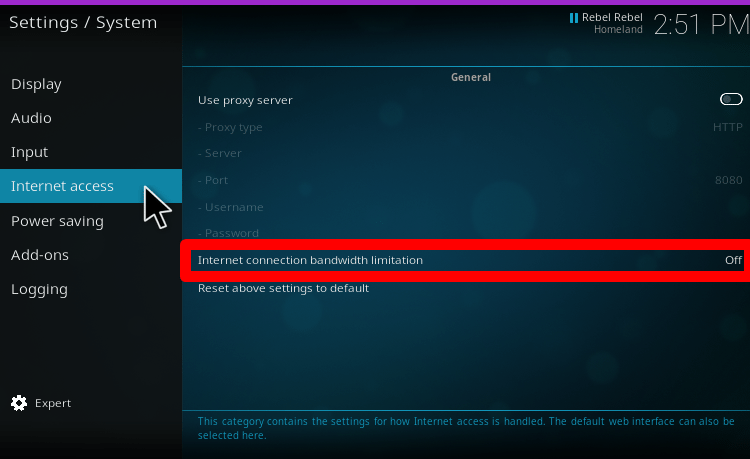
Next, we select our type of connection.
If we're not doing all that well in that field, we can greatly improve the streaming speed if the TV Box is connected via Ethernet cable and not Wi-Fi.
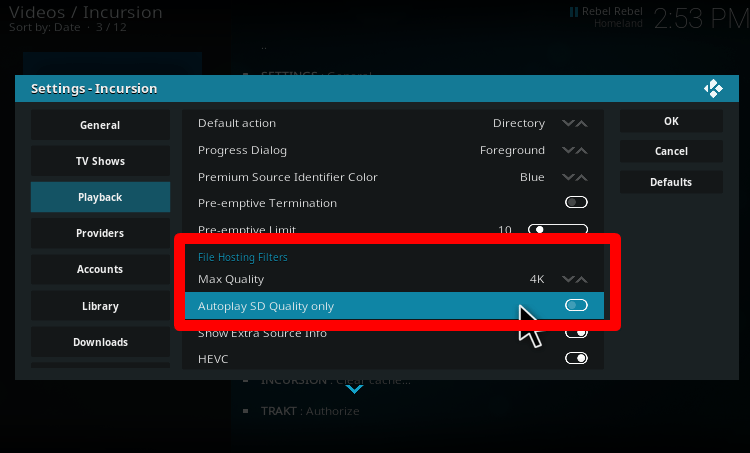
Furthermore, with low-speed connections, and in the case that the buffering problem remains, it will help a lot if we select regular resolution (SD) for the movies on Kodi, avoiding 1080p.
We can find this setting in the tools of the respective movie Add-ons, on the 'Play' section. There, we can set the maximum quality at 480p, as we see in the following picture.
How to avoid buffering (video interruptions)
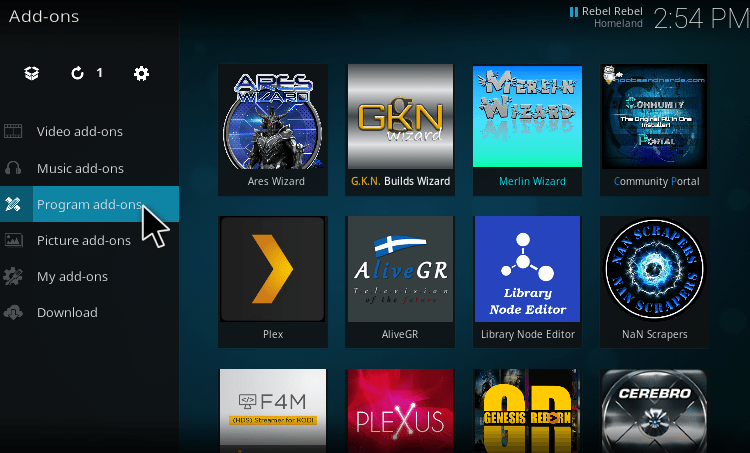
Until recently, the ideal all-in-one tool which had automated all theAdd-ons, Builds, and many more, was undoubtedly the well-known and very effective Ares Wizard.
At the end of May 2017, the "Wizard" had to face lawsuits with companies in the U.S.A. and it stopped working. However, recently, the very useful maintenance department returned, along with an automated way of eliminating buffering for Kodi.
How to get Ares Wizard
- Main menu → Settings (cog) → File management → Add source (double click) → None.
- We paste the following URL: http://androidaba.com/addons/
- Make sure that there are no gaps before or after the URL and then click on "OK".
- We name the source .Ares Wizard and then click on "Add-ons".
- Click on the icon at the top left which looks like an open box.

- Install from zip file → Ares Wizard → script.areswizard-0.0.69.zip.
- We wait until the add-on is activated. It might take a while for the activation to show. We will see the confirmation at the top right section of the screen.
- If an error has occured during the setup, we might be successful the second time around, since failures of that kind come up occasionally.
- Next, Ares Wizard will be here: "Add-ons → Program add-ons." We can place it on our favorites by right-clicking.

Automatic buffering improvement
If we come to the conclusion that the annoying buffering is here to stay, we can open Ares Wizard and cautiously proceed to the six actions that we see in the following pictures.
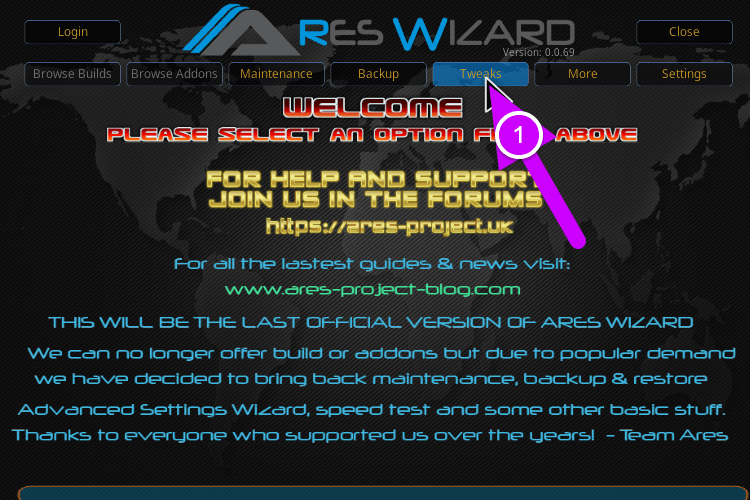

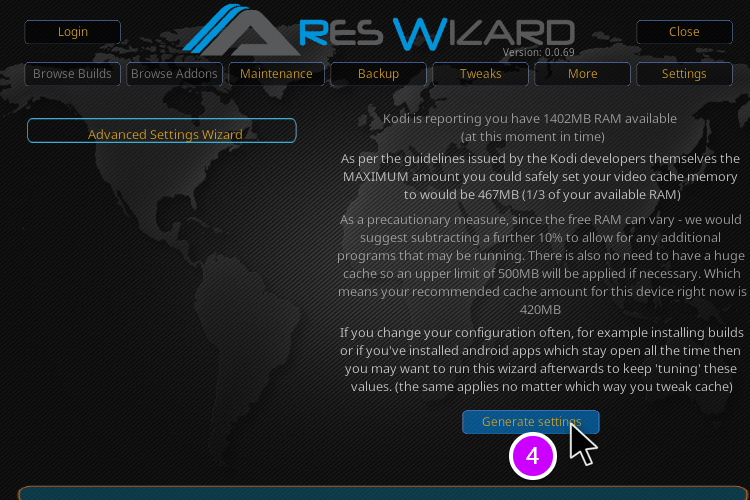

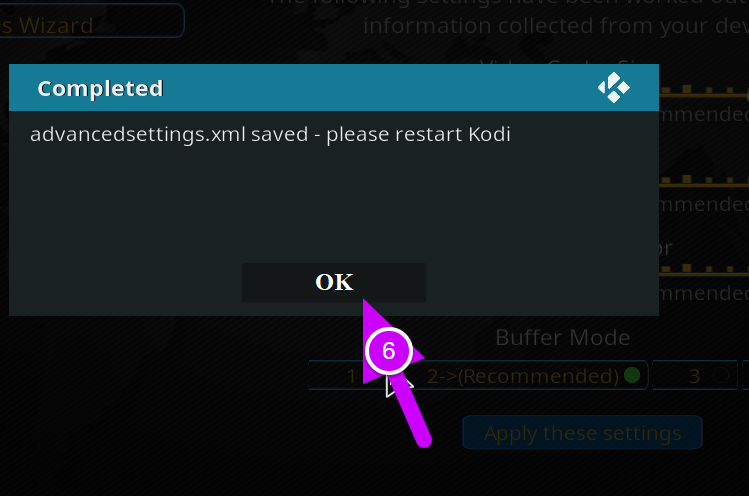
These actions will create the best setting for the device cache, and will most likely eliminate the buffering.
Once we restart Kodi, we can often delete our cache through Ares Wizard, by selecting the following indications.

If we can not eliminate the buffering even with all the mentioned improvements, we need to know that many ISPs decrease their connection speed if they detect illegal streaming, even though they refuse to openly admit doing so.
In other words, we may have high-speed internet when trying out a 'Speedtest', for instance. When we try to download a torrent or watch something online on Kodi, however, our speed will dramatically decrease.
In case these buffering isuues appear often on the Add-ons, despite having a good connection and using the tool we saw earlier, then perhaps we need to detour the ISP limitation.
As a matter of fact, we should hide our online activities from the internet services provider that has seen what we are doing. In this particular case, we need to use a VPN for Windows and Android, preferably a paid one for better results.
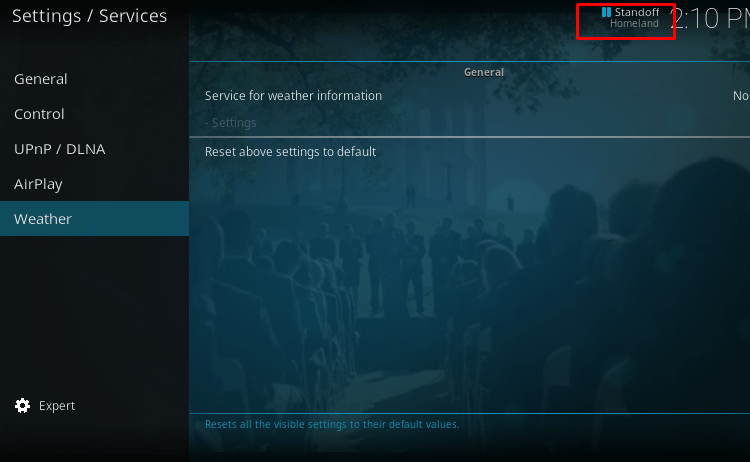
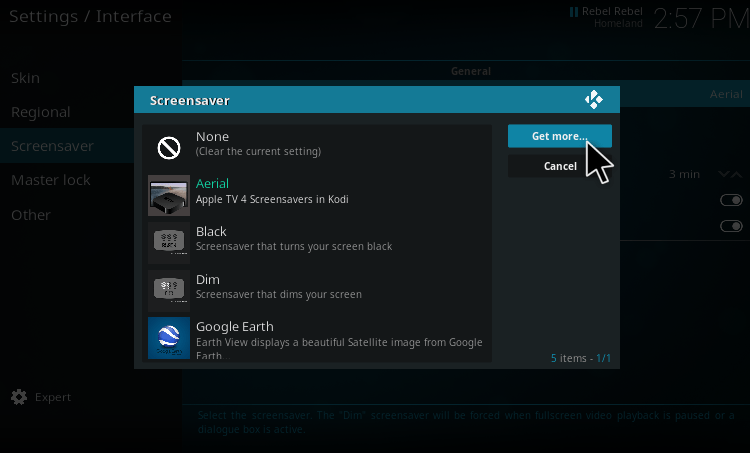
How to create a screensaver
Kodi settings offer a range of choices, which allow us to set our own screensaver. We can achieve that by going to "Settings (cog) → Interface → Screensaver → Screensaver mode."
Next, we can select among various screensavers by clicking on "Get more."
One of the most interesting options is the Apple TV screensaver, Aerial, with impressive photographs from famous cities around the world. Equally remarkable is Google Earth, and Picture Slideshow, which we can fill with our photographs.
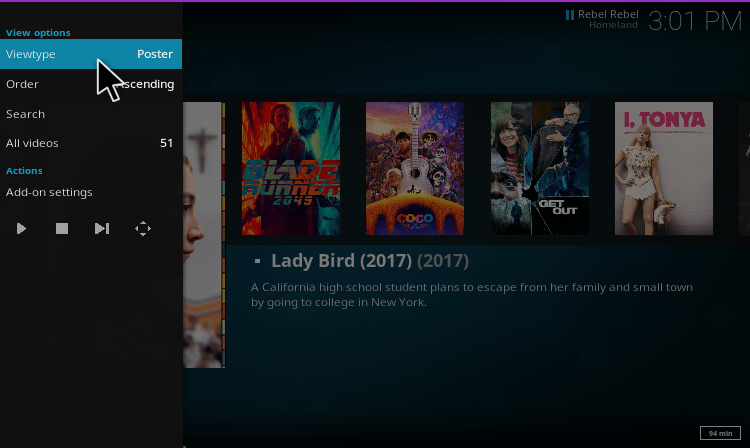
How to change the film display
The customization of the display of the add-ons and the films can become even more impressive if we drag the mouse pointer to the left or click on the options we can see in the this picture.
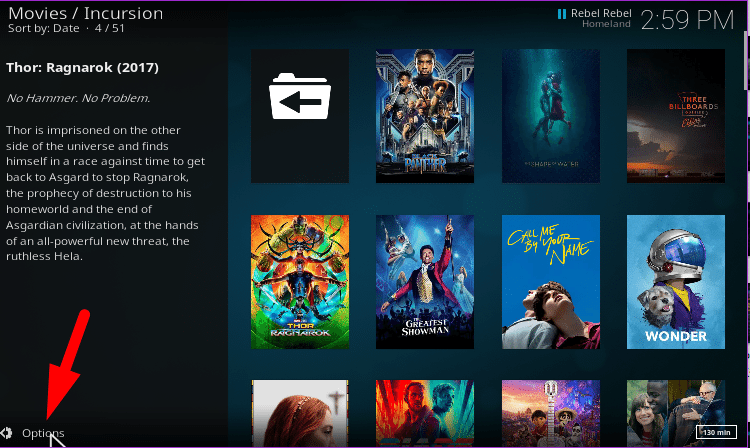
Then, we can change the view mode either to ''Wall'' if we want to see all of the movies in thumbnails...
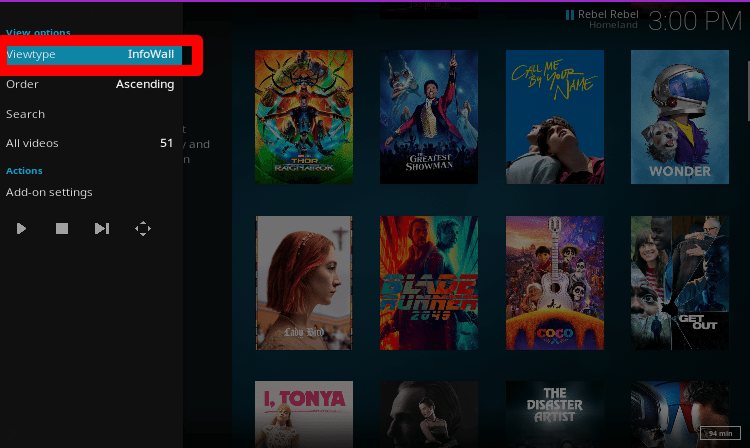
...or to ''Poster'' if we want to see the plot of each film separately.
Audio adjustment
With the Kodi settings, we can change the audio of the whole media center. We go to "Settings → System settings → Audio → Navigation sounds," and we select the second indication, as we can see in the picture below.
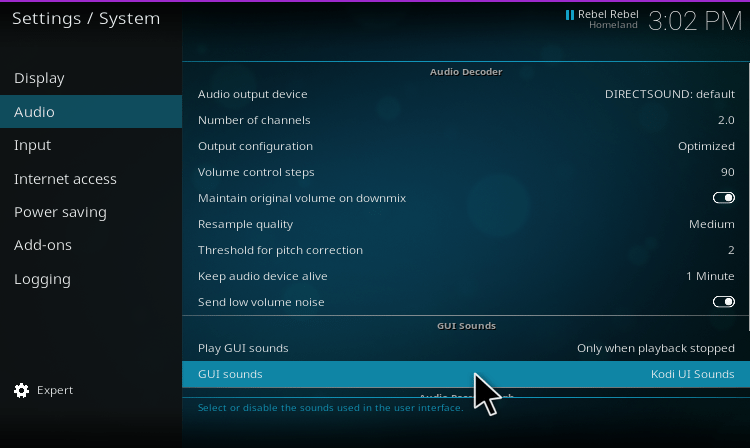
Then, by clicking on ''Get more,'' we can select the sounds we prefer. For instance, if we have a TV Box, Android sounds might be more suitable.

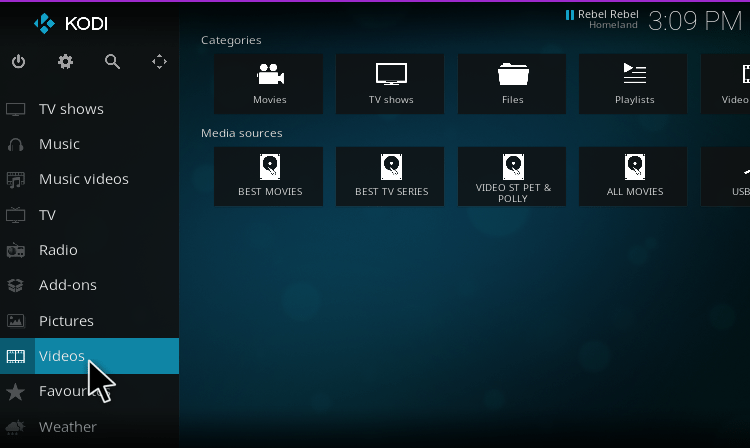
How to transfer all our personal videos and movies to Kodi
It is certain that most of us keep our personal videos and pictures on our PC and other portable smart devices. Not to mention the films that we have saved on our hard drives.
With Kodi settings, we can transfer all those to the media center with all their thumbnails. This way, we will have a single complete home entertainment media center.
To perform this transfer, at the default Kodi shell in the video section, we select files...
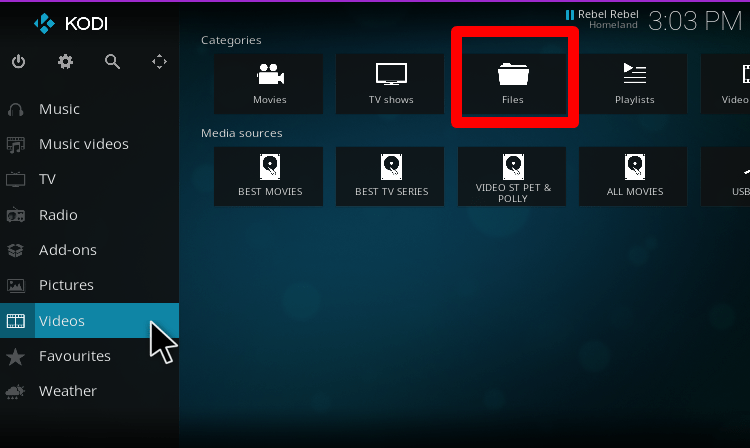
...and then click on ''Add videos''...
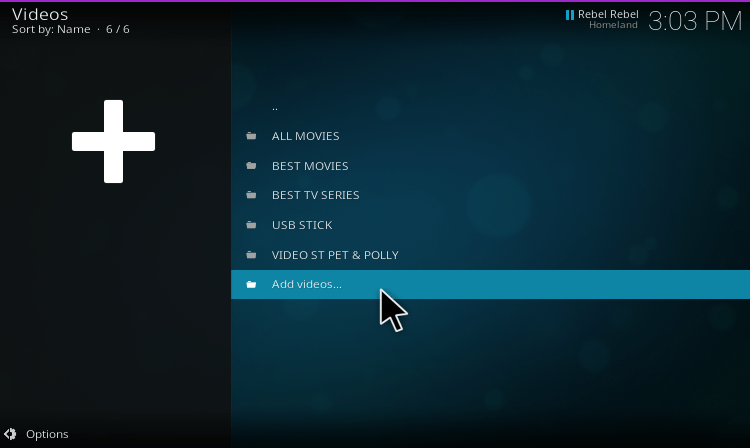
...before clicking on ''Browse."
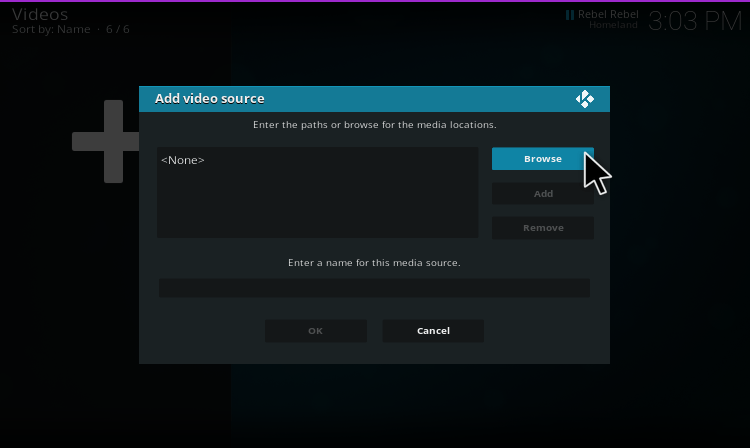
From then on, Kodi will guide us on how to sort our multimedia with relevant notifications.
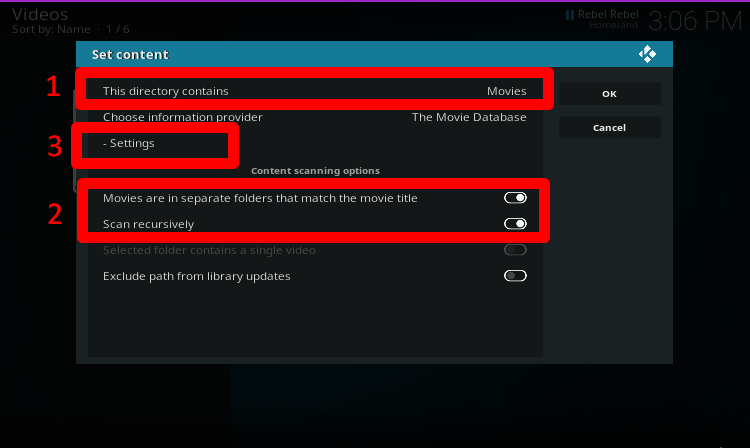
Once this pleasant and straightforward procedure is over, all our videos and multimedia will be in the section where we set them, under 'movies,' 'TV series,' etc.
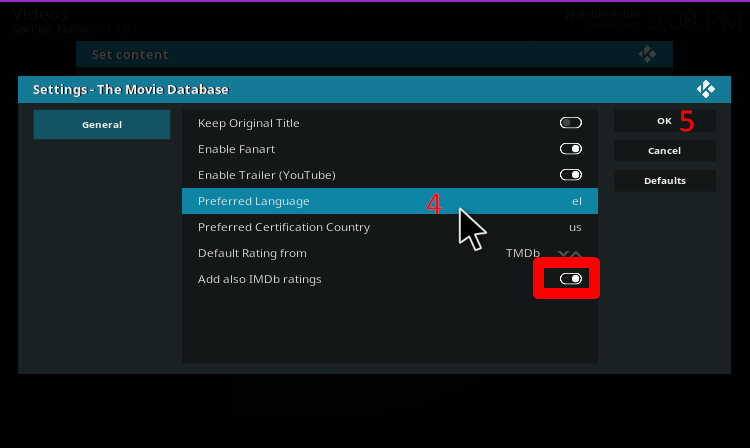
On the 'set content' window, a customization menu opens, as seen below.
Once Kodi is on, as it is set by default, we will be able to see the films which are on our hard drives. The subtitles will start being downloaded when the movie or the episode starts.
Any personal video that we have not moved to the movies and series will appear once we click on the videos section.
We can also add the personal videos that interest us the most to our favorites, as we would do with any other multimedia.
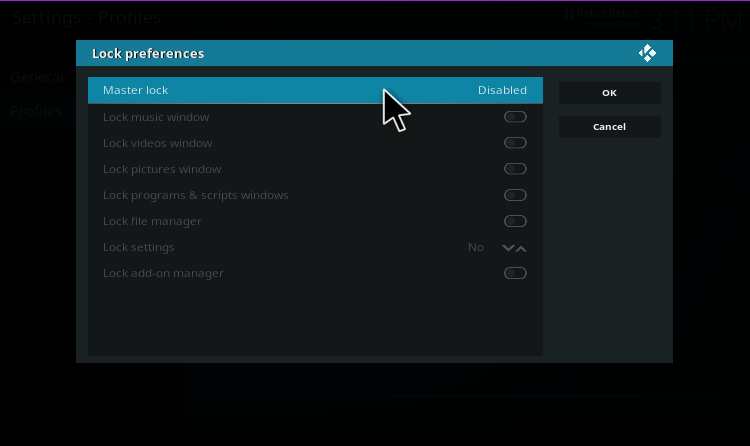
How to create multiple profiles
Kodi profiles are useful if all the members of a family use the media center on the TV Box.
This way, we can protect the content with a password, ensuring that our little friends or anyone nosy enough will not tamper with it or change it by accident. The process is quite simple.
Starting from the main menu and by clicking on the respective icon for the Kodi settings...
...we select the profile settings, as we can see in the picture below.
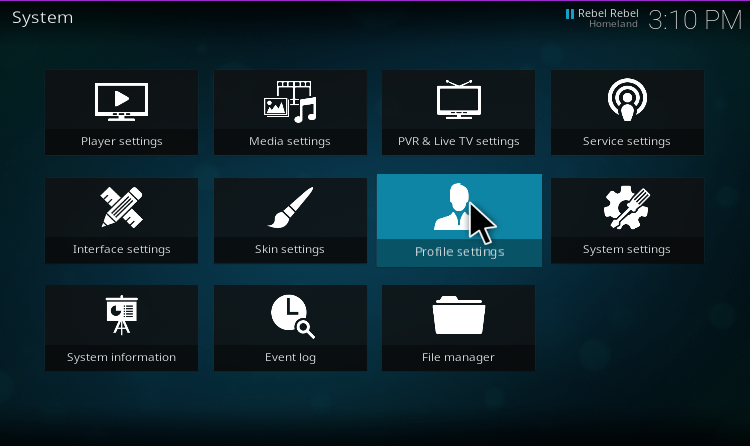
From that point on, we can change the profile name, add our picture, and a password if we wish so. If we want even better control due to small kids, we can select the corresponding section of the parental control.
Furthermore, we have the chance to lock the individual Kodi settings, and at the same time, set it to ask for a password before it starts operating.
Kodi Add-on settings
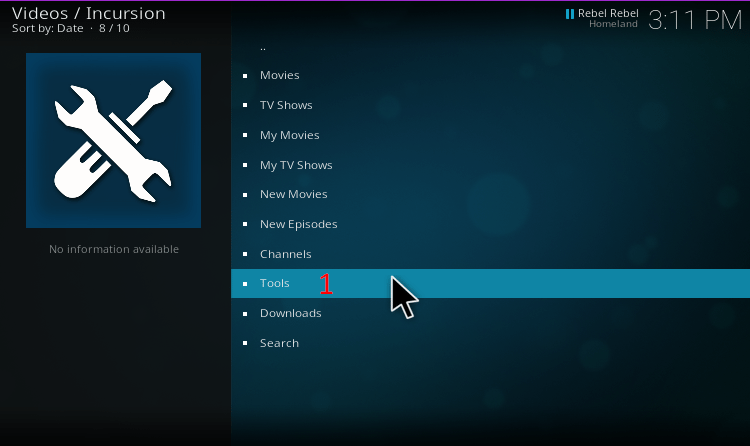
We can find all the main add-on settings for films and series, like Incursion and Placenta, which we saw recently, in the tools section.
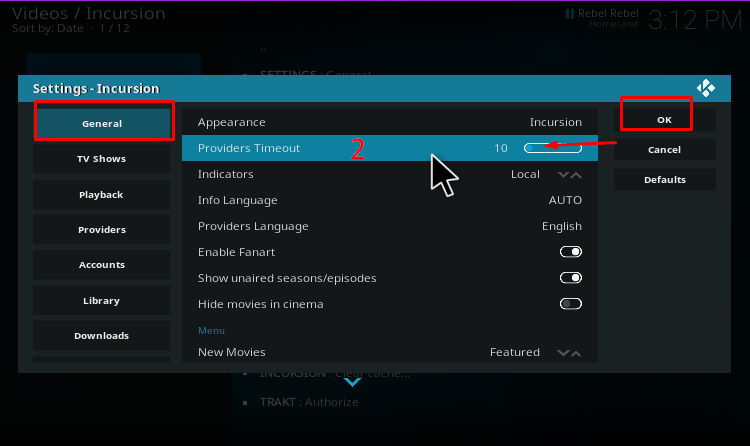
Providers and downloads for offline film viewing
After what we presented in the previous guide about the Add-on tools, we are now presenting the main Kodi settings for the Add-ons with pictures, so that movies can load faster. Also, we will figure out how to download them for online watching.
- Enter the Add-on tools.
- From "General," we reduce the time limit of the providers if we want a smaller delay while searching for them. We confirm by clicking ''OK''.
- From ''Downloads,'' we activate the movies and episodes downloading.
- We define where we want them to be saved.
- We confirm the changes.
- Once the providers show up, we pick one of them, and we right-click on ''Download''. The same procedure goes for the downloading of the episodes of a series.
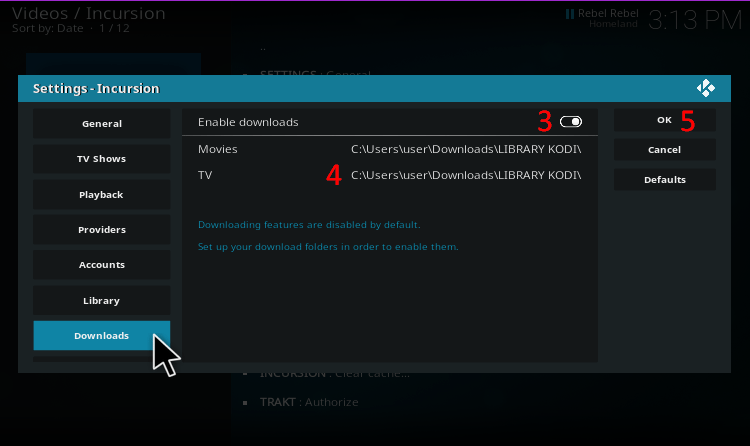

If any errors occur while downloading, it might be thanks to the servers and their location. In such cases, a VPN is the only solution.
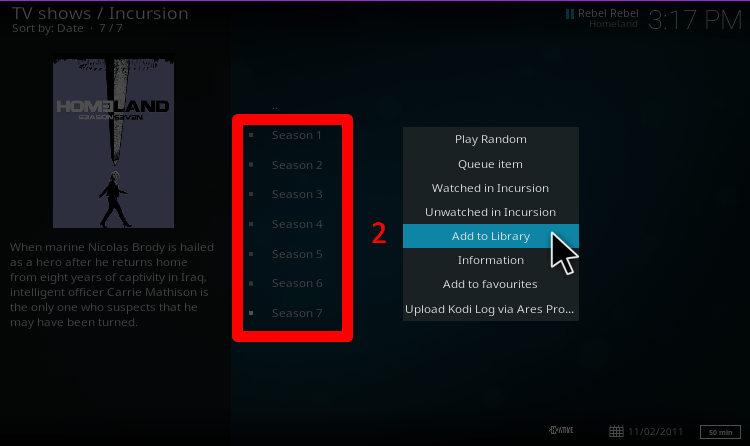
Add-ons Library
We can add all the films and TV series to the libraries the Add-ons offer us. Even though we may put them on the favorites, it is inevitable that at some point, we will lose track because favorites tend to pile up.
The library is the best solution, since, among others, it gives us direct access to the movies and series, without wasting time or getting lost in translation. Here are the simple steps with pictures.
- From the ''Library'' section, we set successively on which external place we want the film libraries to be saved, and we confirm the changes. We can create as many folders as we wish to and name them accordingly.
- With a right click, we move any film or series we want to the library.
- They are all going to be located in the ''Library'' section of each add-on that we have set.
- At the same time, they are also in the external folder that we created through Kodi.


Kodi maintenance
Assuming we've spent all this time fiddling with Kodi's settings, something going wrong resulting in us losing all of our progress should sound like a doomsday scenario right about now. Therefore, we need to prevent such situations with daily backups.
Manual Backup on Windows and Android
After we have made sure that Kodi is off, we find the Kodi folder on Windows, which is located at the following places:
Kodi for Android:
Android\data\org.xbmc.kodi\files\.kodi
At this point, we must note that for Android, this Kodi folder is hidden. To make it appear, we need to have installed a relevant app which activates hidden items, as is the ES files manager. Then, through the app, we need to activate 'show hidden files.'
Kodi from Microsoft store:
C:\Users\(username)\AppData\Packages\XBMCFoundation.Kodi_4n2hpmxwrvr6p\Local Cache\Roaming\Kodi
Kodi installer downloaded from the software page:
C:\Users\(username)\AppData\Roaming\Kodi
Here, we should note that instead of "(username)," that we see earlier, we have to use our Windows username. Also, just in case, let's activate the hidden items on Explorer.
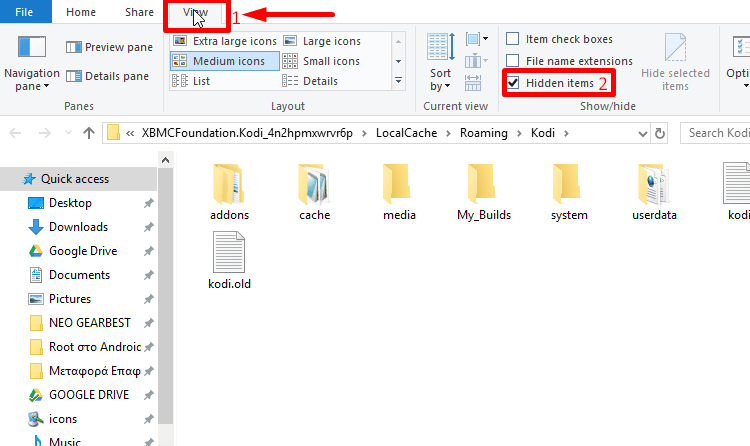
From then on, we only have to move three folders to a safe external place, such as another hard drive or a USB stick. Namely,''userdata," ''media,'' and ''addons."
If the media folder does not appear, it is still OK, because the other two are the important ones.
It is worth giving this file that we moved the folders to a relevant name to the Kodi backup so that we will remember what it contains and be able to find it in a heartbeat.
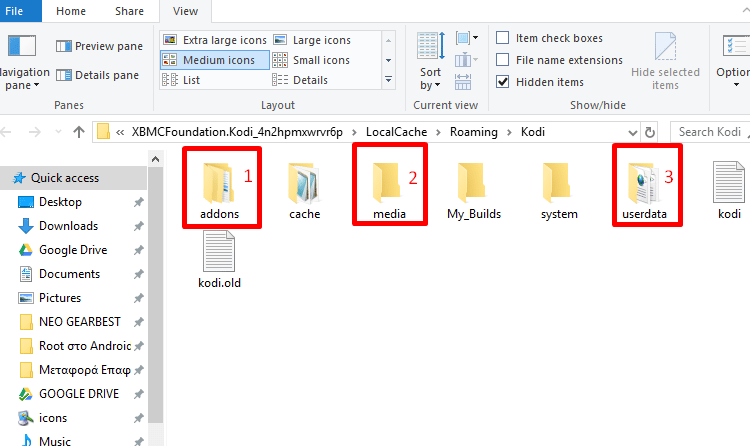
These folders constitute the whole backup of whatever we have done up to that moment on Kodi, along with all the Kodi settings. Obviously, it is worth performing it often, so that the three folders can replace the older ones on the external drive.
If something goes wrong along the way, this is the most reliable way to bring them back to the same Kodi folder inside Windows where we copied them from.
We can perhaps use a Windows backup tool to make the transfer process automatic.
Kodi Backup and Reset with a third-party tool
In the past, we could back up and reset Kodi with specific add-ons, which have now stopped working.
Nowadays, one of the best tools is the Community Portal, which is great as far as maintenance on Kodi is concerned, and more specifically, it offers an automated backup and reset.
How to add the Community Portal
- Main menu → Kodi settings (cog) → File management → Add source (double click) → None.
- We paste the following URL: http://archive.org/download/repository.xvbmc
- Make sure there are no gaps before or after the URL and click on ''OK''.
- We name the source .xvbmc and click on ''OK''.
- Return to 'main menu' and click on ''Addons''.
- Click on the icon at the top left that looks like an open box.
- Install from zip file → .xvbmc → repository.xvbmc-x.x.x.zip (where X are the numbers of each new version).
- We wait for a while until the add-on is activated. It may take up to one minute for the activation to show. We will see the confirmation at the top right part of the screen.
- Then, on the same tab click on ''Install from repository''.
- XvBMC (Add-ons) REPOsitory → Add-on applications → Community Portal → Install.
- We wait until the Add-on download is complete.
- Ready to use on ''Add-ons → Add-on applications'' from the main menu.We can move it directly to our favorites with a right click.

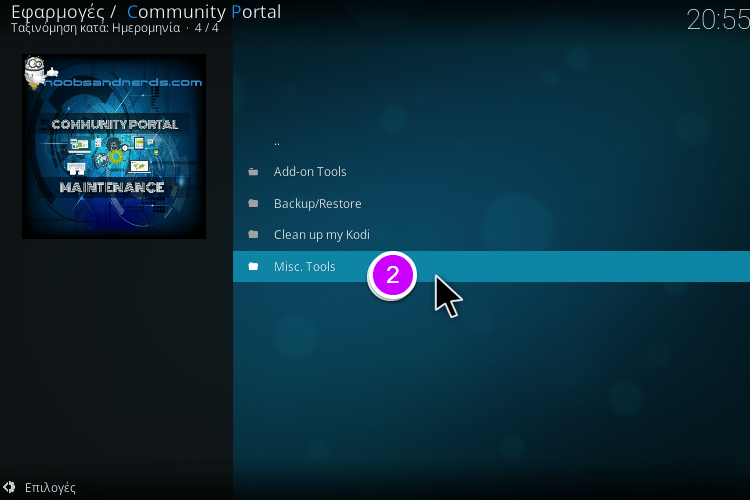
Main tool sections and settings
Here, we will briefly mention the main sections and actions we have to perform to have the best possible results regarding Kodi backups with Community Portal.
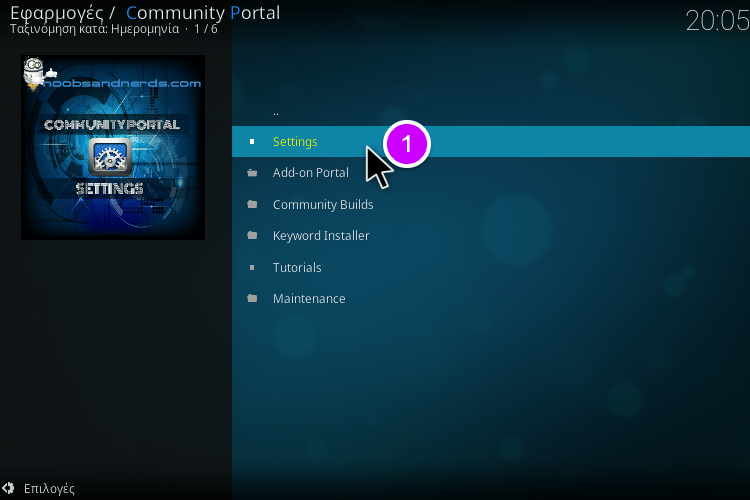
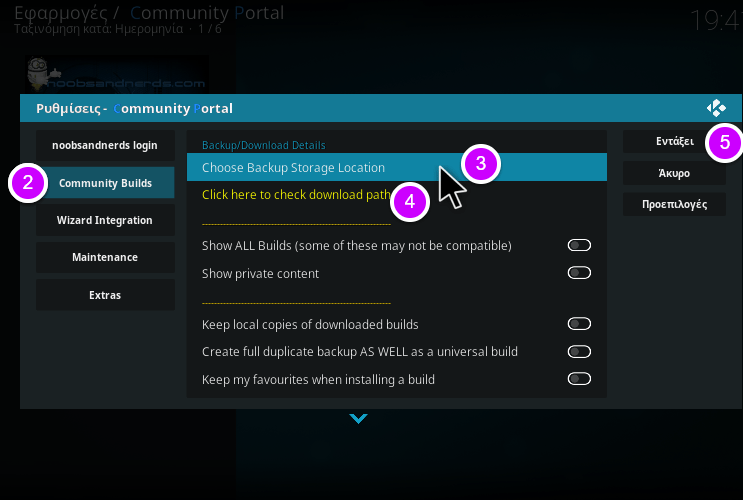
- Enter 'Kodi settings.'
- Go to ''Community Builds'' section.
- Select the external place that the backup will be stored. For Android, it is going to be either a USB stick or a micro SD card.
- We order the tool to perform a scan to check if the external location we chose before is correct and active.
- Confirm the actions we have performed.
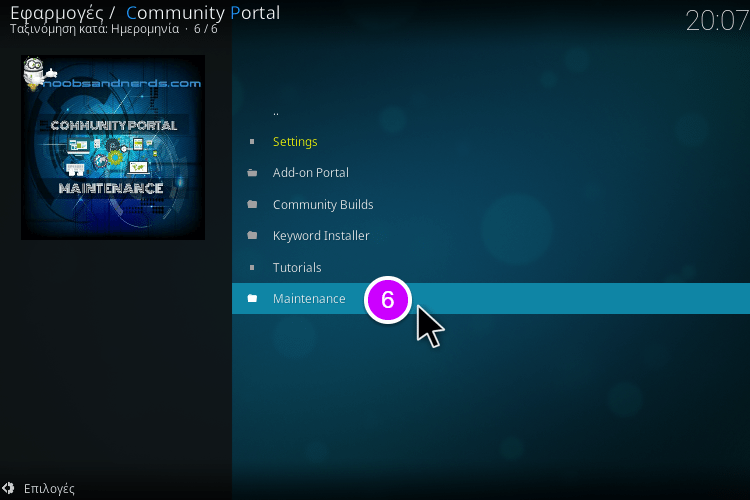
- Enter the maintenance section.
- We click to proceed with our first backup.
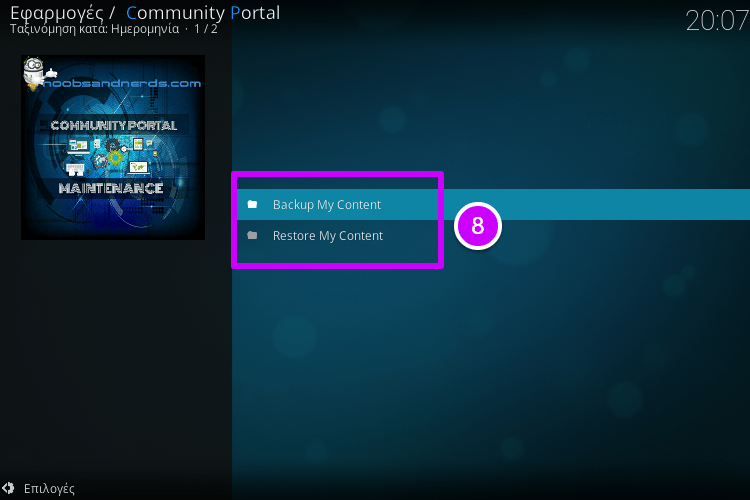
- Select whether we want to perform a backup or restore previous backups that we had created with this tool.
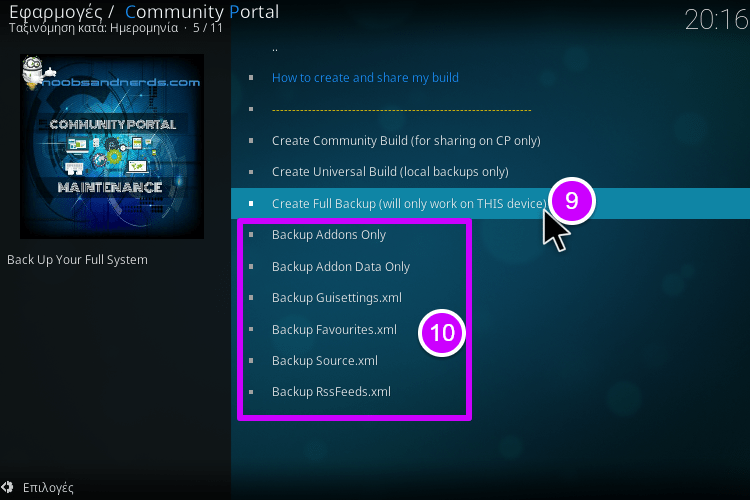
- Select the full backup.If we do not want a full backup, select what we want to partially back up.
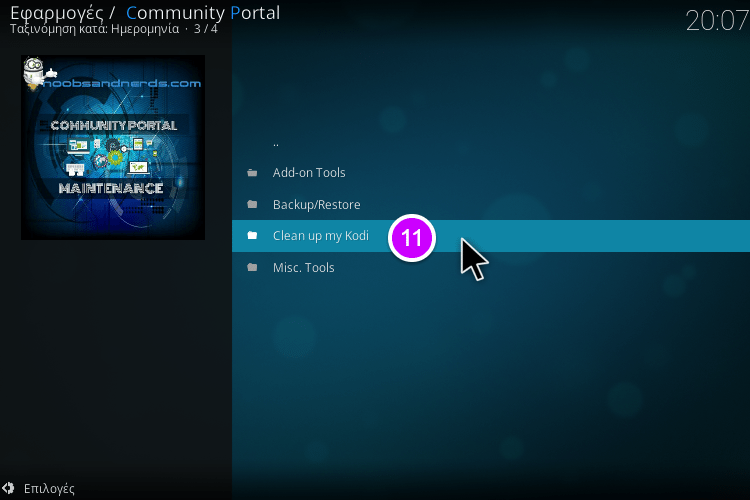
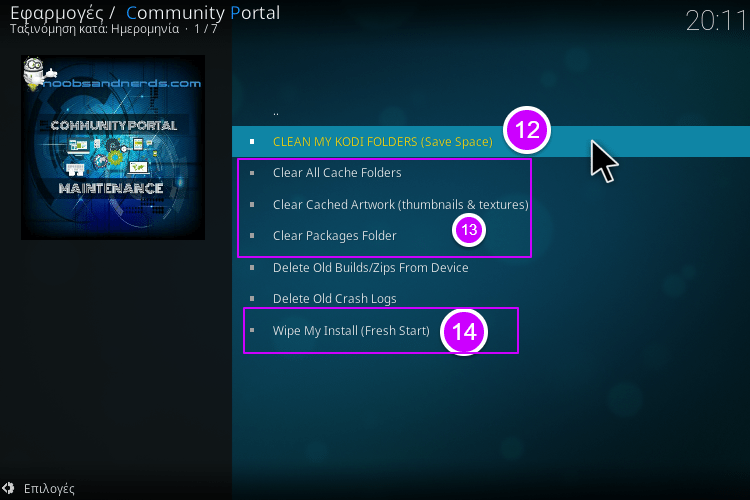
- Enter Kodi cleaning.
- Go to general cleaning that is going to save us a lot of MB.
- Partial Kodi cache cleaning.
- It deletes everything inside Kodi and gives it back to us as it was when we downloaded it. Community Portal is the only thing that remains untouched.

Instant Kodi switch-off on Windows and Android
A frequent little snag that we face with Kodi is that it sometimes takes way too long to switch off. The Community Portal incorporates a function that turns it off in a heartbeat with a single click.
All we have to do is follow these steps:

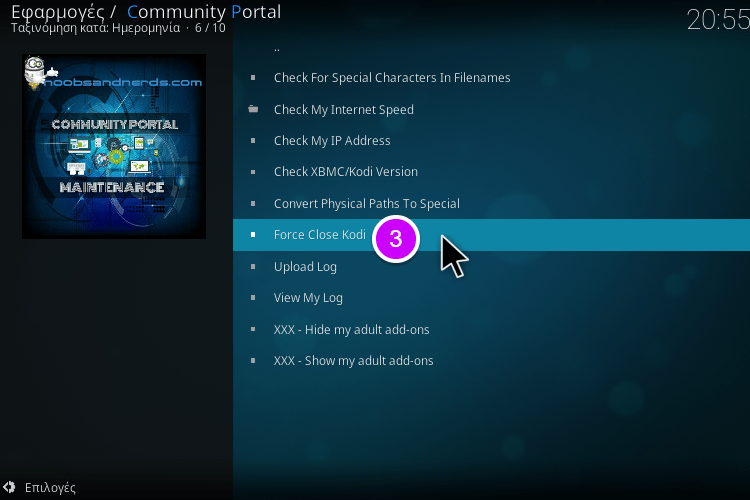
Don't forget to add 'Force Close Kodi' to our favorites.
How to turn your Android smartphone into a Kodi remote control
Our Android device can be used as a remote control for Kodi if we have a TV Box or Apple TV.
This way, we can watch online movies and manage everything through Kodi, from our smartphone.
Play Store offers two top remote control apps, Kore and Yatse.
Kodi settings for remote control
Before we come back to the smartphone and the respective app, we need to adjust the necessary Kodi settings for the remote control.
First, we go to Settings (cog) and then to Service Settings...
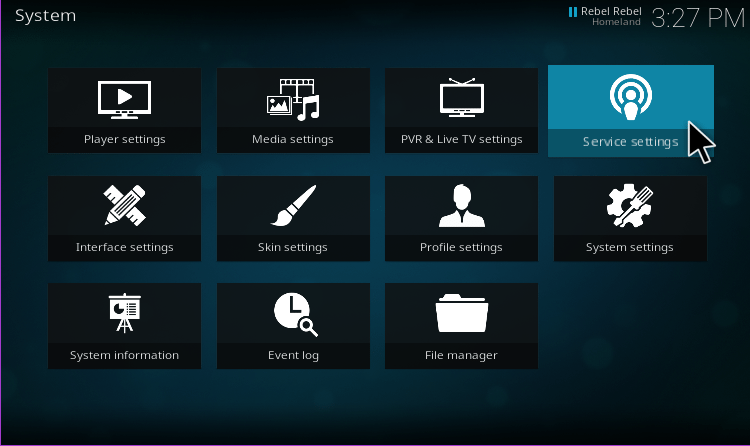
... and right after that, we select the name we wish. Typically, we keep 'Kodi.'
Right below that, we will see 'Zeroconf.' This setting allows Kore to trace Kodi automatically. However, Apple's 'Bonjour,' needs to be installed through the hated iTunes.
If we have not installed it already, it is better not to choose Zeroconf, to avoid getting lost in the Kodi settings.

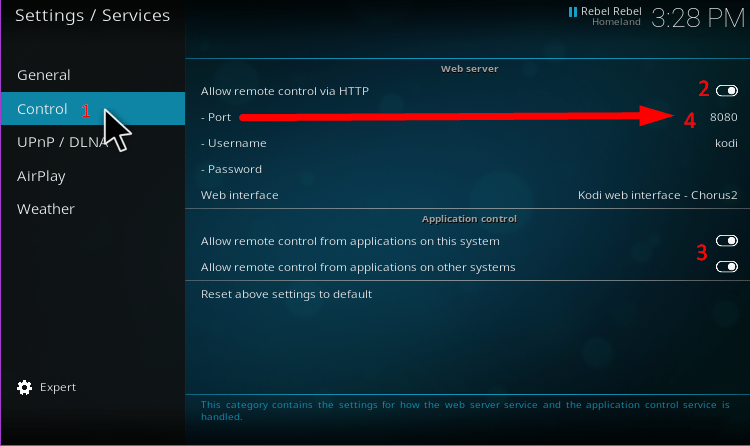
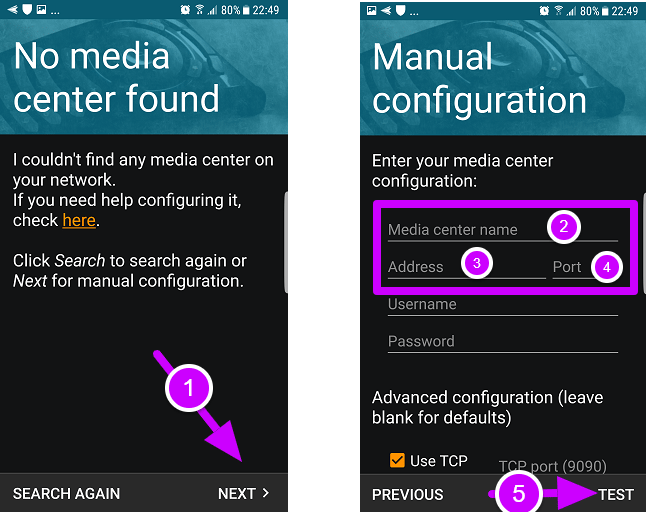
Then, we go to 'control,' and select the remote control through http, plus the two fields of the remote control that we see in the picture.
We write down the port number that we see on the indication No4 because we will need to enter it into Kore later.
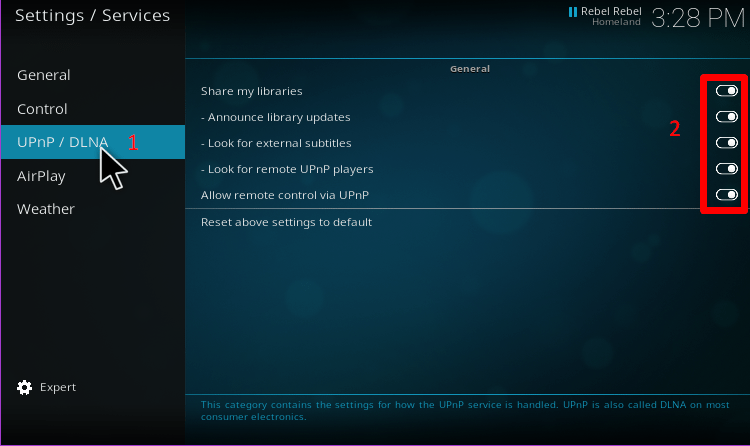
To finish, we click on ''UPNP/DLNA'' and select the advanced settings down on the left, so that all the options will appear on the tab. We click on all five that we spot on the right of the screen and return to the smartphone.
Next, if we have an active VPN on our devices, we deactivate them temporarily and then restart Kodi. If we do not have VPNs, we move on to the next steps.
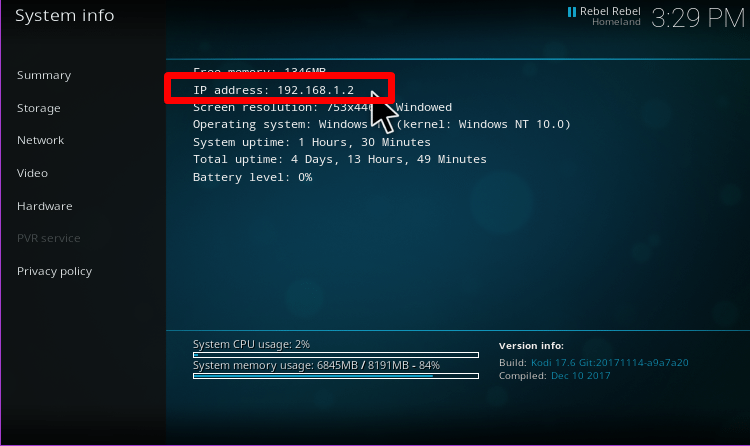
Return to the main menu and click on ''Settings → System Information → Briefly,'' and write down the address that we see next. Later, we will have to enter it into Kore, along with the port that we saw before.
Kore
It is the official remote control of the Kodi team, and nowadays, it has become very efficient regarding simple remote controlling from our Android device.
Once we open Kore, it will almost instantly recognize Kodi on the PC, without us having to perform any action. However, this will happen only if we have activated the famous ''Zeroconf'', for which we need to have installed iTunes on our PC.
However, if we have a TV Box or we don't have iTunes, we have to manually add the digits of the address and the port that we wrote down earlier into Kore.
This way, we only have to click on ''Next'', and then we should type "Kodi" on indication number 2. Then, on the ''Address'' field, we enter the digits of the address, and on ''Port,'' the respective ones of the port.
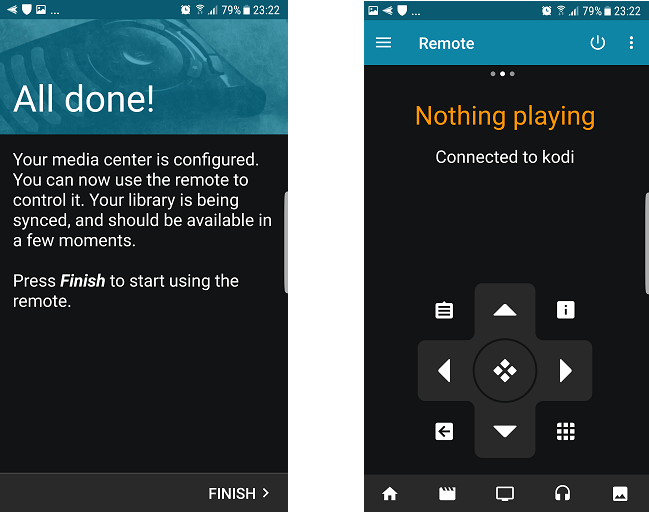
Then, by clicking on ''Test''...
...we will be notified that the Kore remote is ready to use and that we now have the remote control of Kodi from our smartphone.
Every time we open the app, the touchscreen remote control that we can see in the following picture will appear.
Free Plex TV on Kodi
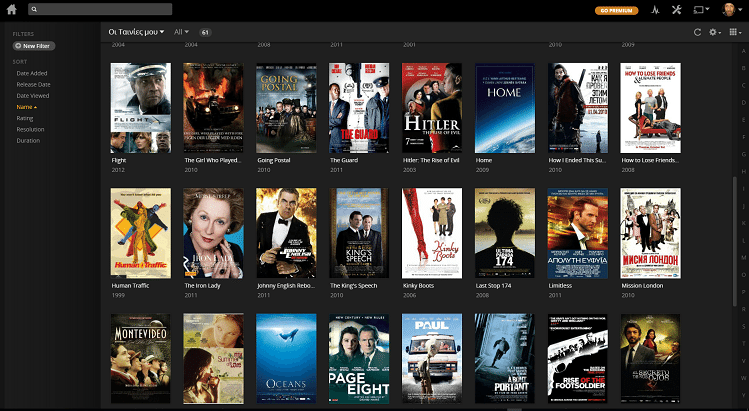
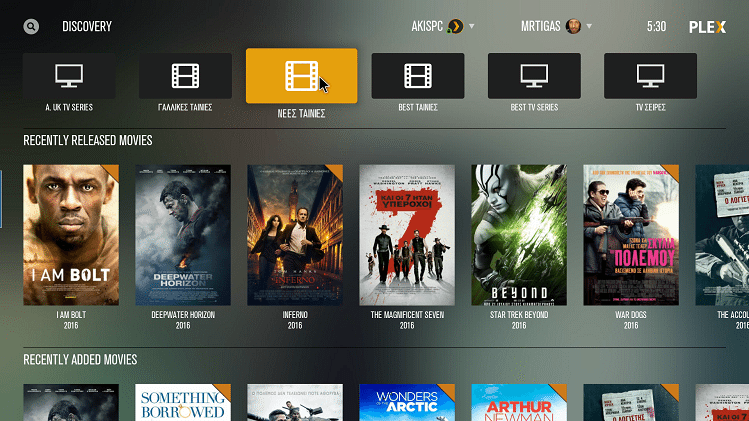
Plex media server can transform all our videos, photographs, and music that we have on our PC, by changing this image...
... to the following, entirely different screen.
There is no doubt that Kodi is the ultimate media center for online movies, and summatively, the best for our home entertainment. The only feature it was missing was the automated management of all the videos that we have stored on our PC or external hard drives.
With Plex, the online movies and our multimedia will get an excellent new company.
Of course, we are referring to all the movies and personal videos that we have on our computer. Everything will appear automatically on Kodi, sporting the beautiful look that we see in the following picture.

Automated display of all our personal collections
The addition of Plex to Kodi took place recently, at the end of 2016. The great thing is that we don't have to do anything at all if we have already installed and used Plex media server on our PC in the past.
All our Kodi Libraries
With Plex, all our collections of movies, series, and videos that we have on our PC will be ready for view, along with their covers, subtitles, and information.
Also, the Plex server on our Kodi gives us the opportunity to see all the newest information on the leading actors, the cast, and the crew. Naturally, Kodi offers many of these features, as we saw with the addition of our collections and multimedia.

It is particularly encouraging that the paid Plex pass, which is still a little costly, is no longer required. It used to be necessary, but we could cancel our subscription at any time before the end of the month.
So, since we are crazy about our multimedia organization, first, we have to create an account here to add the now free Plex TV to Kodi.
Then, we will have to install Plex, unless we already use it.
How to add Plex
To add Plex to Kodi, we have to use 'search.' We search for "Plex" in the add-ons search bar.
Then, we select ''Script-Plex," which we can see below, to install it.

Once the download is complete, and we open it, the 'sign in' window will emerge...
...where a four-digit code will be given to us to enter in the browser, on the following address.
https://plex.tv/link
Once this is complete, we will get the relevant indication that we see below. From then on, we will not need any other settings, because we have adjusted all of them on Plex media server.
Furthermore, thanks to the cooperation with Kodi, subtitles will appear automatically. For even better results, we can activate the subtitle downloading to save them in the same folder with the movie file.
How to make Kodi portable
By turning Kodi into a portable application, we can carry the media center, its add-ons, and our favorites everywhere with us.
Furthermore, we will be able to run it on any other computer, ours or friends', without setup.
USB drive
All we need is a USB stick. Also, if we have a heavy build, a decent PC with good processing power and at least a 4GB memory is required.
In this case, we need to have performed the necessary format on the USB Drive.
The next step is to visit Kodi's website and download the ''Installer'' edition. Make sure not to select the version next to it from the Windows store.
Once the download is complete, we have to install the file.
Once we start the procedure, two or three emerging windows later, we will get to the one we want. There, we should select the folder where we will install the media center.
At this point, we click on ''Browse." This way, we will change the default destination folder, which is usually the drive where we run Windows.

On the next emerging window, we select the USB stick that we have connected to the computer.

Once the Kodi setup is complete on the USB stick, we should make sure not to select ''Run Kodi." We only click on ''Finish."

Kodi shortcut
From Windows, we open the USB stick.
Once we spot the Kodi application in the folder, we right click on it and select ''Create shortcut."
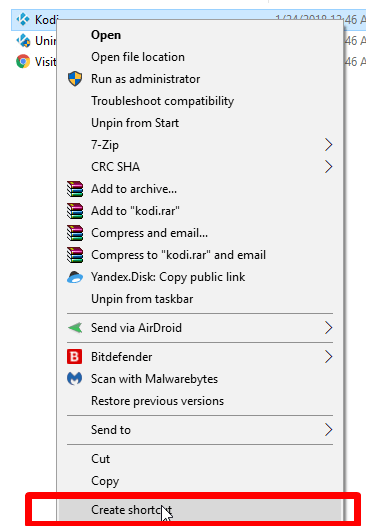
Right after that, we will see that a file with the name ''Kodi-Shortcut'' has been created.

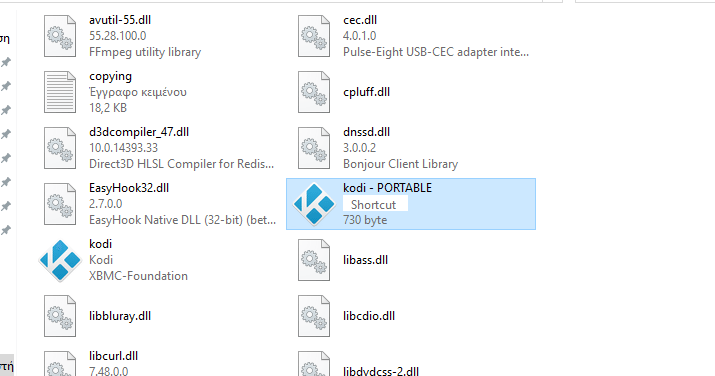
By right-clicking on the shortcut file, we can rename it to ''Kodi-Portable'' or to whatever we like.
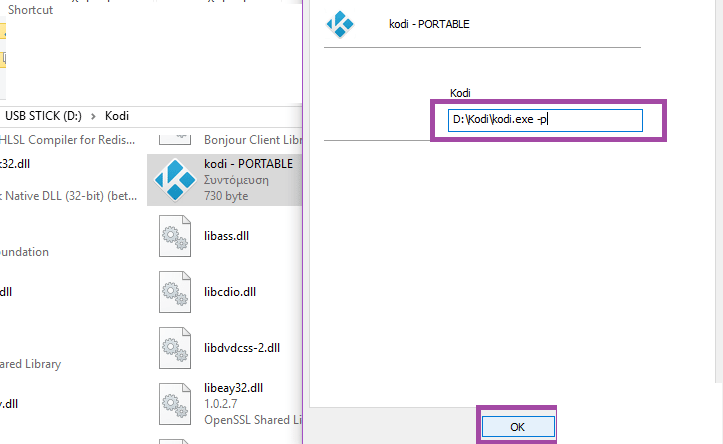
Then we right-click once more on Kodi - Portable, and then select "Properties."
We add ''-p'' to the already existing Kodi\kodi.exe that we find there, and we leave a gap after .exe. The name will have to have the following form:
D:\Kodi\kodi.exe -p
Then, we click ''OK."
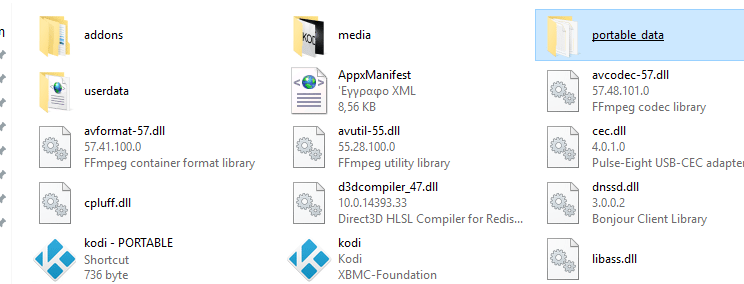
From that point on, we will see a new folder with the name, ''Portable data."
When we click on the ''Kodi - Portable'' shortcut that we have created, the media center will run through the USB or the external storage and not from the hard drive where we run Windows.
Then we can install any add-on or build we want. Everything will be inside ''Portable data." Obviously, if we disconnect the USB from the computer, Kodi will stop running.
Moving on, we can create one more file shortcut on the Desktop for even faster access to Kodi, when we connect the USB stick.
We need to remember that the speed of Kodi on the USB stick will be slower than the respective one we had on the SSD.
Do you know of any other useful Kodi settings?
By gradually learning all of Kodi's settings, we will be in a position to solve most of our problems concerning this great media center.
At the same time, we will get the satisfaction that we finally learned its tricky menu by heart, turning difficulties into a fun and educational experience.
If you have any questions or want to share your views on Kodi, let us know in the comment section below.
Support PCsteps
Do you want to support PCsteps, so we can post high quality articles throughout the week?
You can like our Facebook page, share this post with your friends, and select our affiliate links for your purchases on Amazon.com or Newegg.
If you prefer your purchases from China, we are affiliated with the largest international e-shops:

Leave a Reply