


Every web development platform offers some kind of contact form, for our readers to message us. Even though we often use these premade solutions, they are either not very configurable, or they don't provide as many options as we would like to have, and we usually have to settle for less. With Google Forms, we can create a contact form exactly the way we want, without having to write a single line of code.
Unblock any international website, browse anonymously, and download movies and Mp3 with complete safety with CyberGhost, just for $2.75 per month:

What are Google Forms?
Google Forms is a free tool that allows us to create any kind of contact form we can imagine. We can manage event registrations, polls, collect emails for newsletters, create quizzes, and more.

Furthermore, with Google Forms we can analyze our research data, and manage the forms from the mobile or browser. We don't have to download or install anything.
Google Forms' data is automatically updated, and if we want, we can turn it into graphs.

Finally, in the Forms we create, we can select one of the premade themes, or choose the colors we want. We also have the ability to use our own logo.
Why should we prefer Google Forms?
Every web development platform provides a contact form. Usually, we will find a premade page with a built-in form.
So why should we prefer Google Forms over the built-in contact forms?
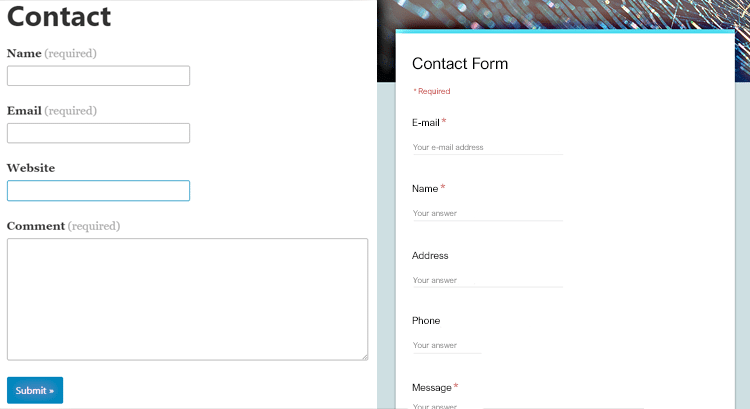
Firstly, the traditional PHP Forms use POST or SMTP to send email notifications. So, no matter which protocol we choose, we need to know how to set up a working email server.
We won't receive an email from Google Forms, but it compiles all the entries in a Google Sheet. Thus, we avoid filling our inbox with potentially unnecessary notifications.
Also, we don't have to mess around with the page source when we want to change something. We connect to Google Forms, and we edit the contact form from there.
How do we create the contact form?
Google Forms has a simple contact form template, and we are going to create our form from scratch.

First and foremost, we sign in to Google Forms and click on the red "+" button on the bottom right to create a new form.

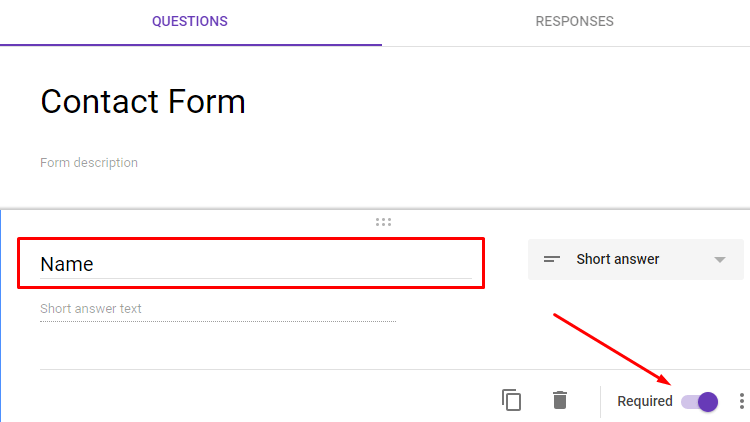
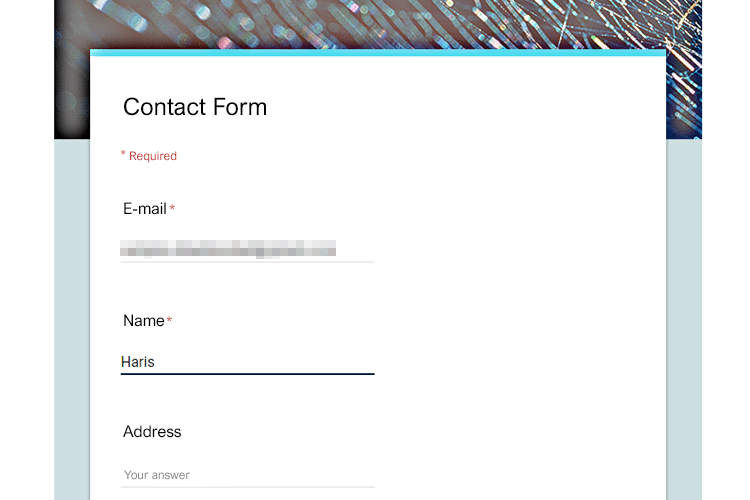
The title of our form is "Untitled form," so we click on the field and type in "Contact Form" or something relevant.

We click on the question field, click on "Multiple choice," and choose "Short answer."

We replace the "Untitled Question" with "Name," and turn the switch to make the field mandatory.
Next, we press the "+" button at the bottom left to add an additional question, and change the form to "Short answer."
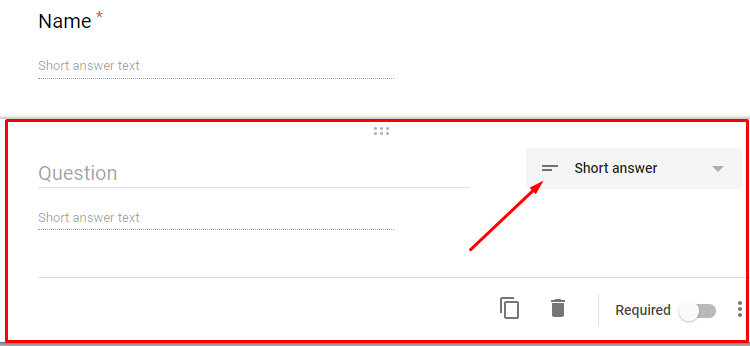
In the field that says "Question," we write "Email," or "Email Address."
Google Forms uses keyword phrases to understand what fields we create and automatically applies the relevant settings.
That's why a link will appear which suggests us to enable the email collection setting.

When we click on it, the email field moves to the top of the form, and it becomes mandatory.

Similarly, we can add as many fields as we want; images, or even videos.
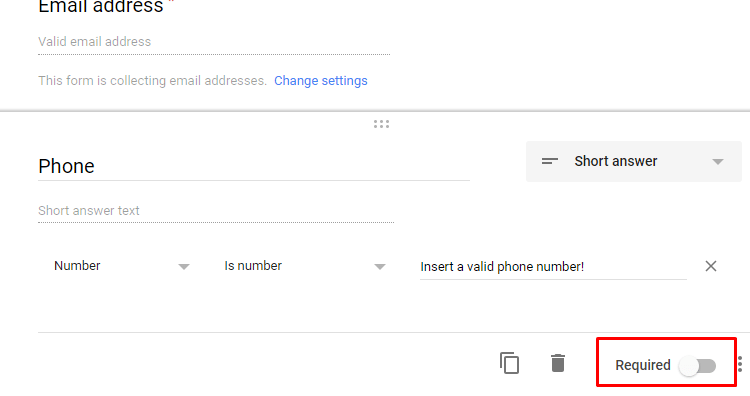
For example, to add a phone field, we define the type as "Short answer," and we tap on the three dots at the bottom right.
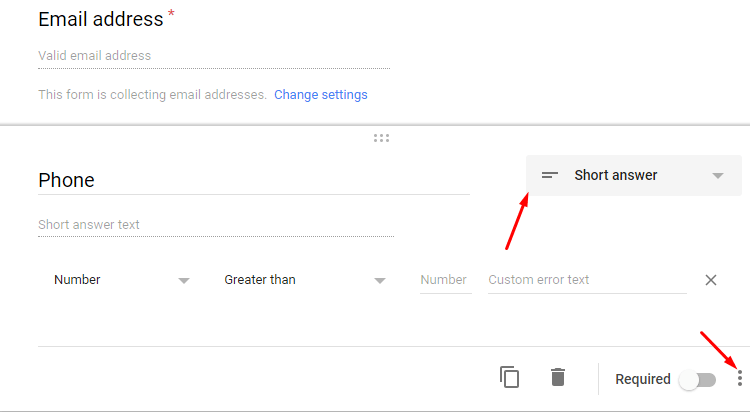
There, we will find two options. We select "Response validation."
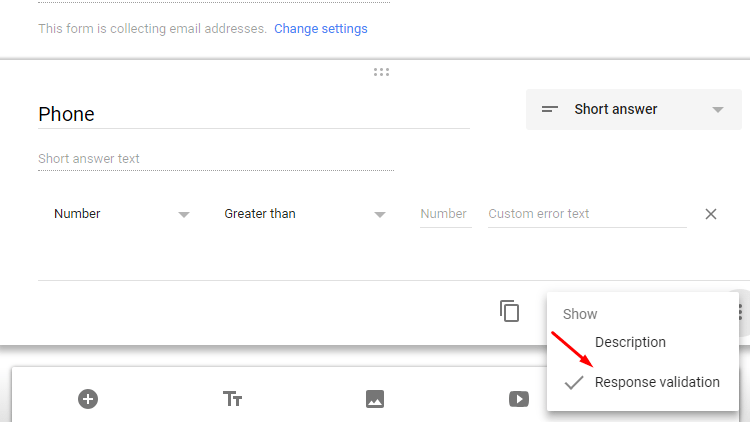
Now we can see some extra options. We define the first as a number and the second as "Is number."
Also, in the error text box, we write the message we want the user to see if they enter incorrect data.

If any of the fields aren't mandatory, then we leave the switch inactive.
All that remains to complete our contact form is a text box for comments.
We add a new question and give a proper name to the field. For example, "Comment" or "Message."
We define the field type as "Paragraph," and we make it mandatory.

We finished the contact form, and it's time to adjust its settings. What data we want to collect, how to do it, and so on.
Setting up the contact form
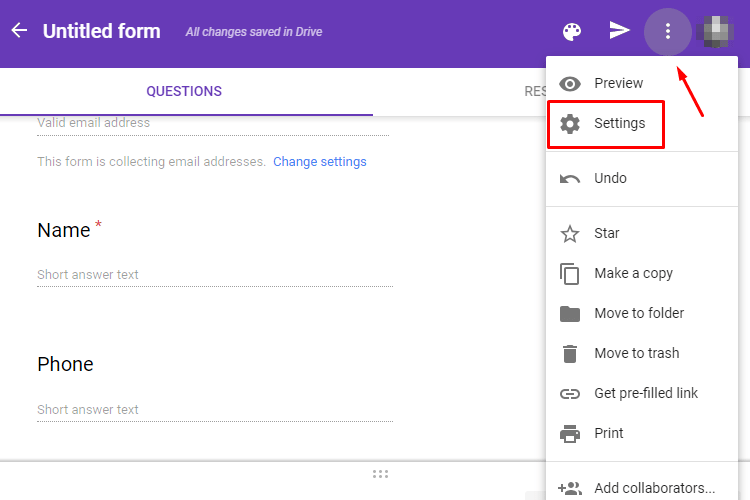
First, click on the three dots on the top right, and select "Settings."
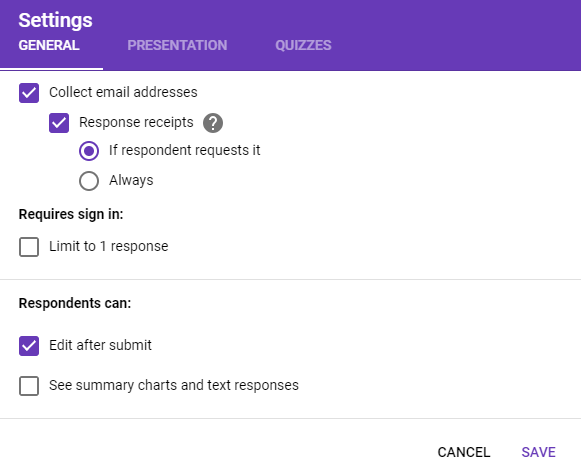
In the "GENERAL" category, we choose what the form will do when the users submit it from our site.
For example, we choose whether they will receive a copy of their answers to the email address they have registered in the contact form or not.

We may require users to link their Google accounts before they fill the contact form, and we can also allow them to edit their answers after they submit it.
On the "PRESENTATION" tab we can see other general settings, mainly for questionnaires. Nevertheless, the last field is useful for us, too, because it is about the message users will see when they submit the form.
Since all users will see this message, it should be generic, polite, and informing.
For example, we can write "Thank you for contacting us. You will receive a reply within 24 hours. "

As soon as we finish all the settings, click on "SAVE," and our contact form is ready.
Export the embed code
Since we finished our contact form, it's time to get the embed code so we can have it on our website.
We click the arrow in the top right to see the form submission options.

In the new window, we select "Embed HTML," and set the "Width" and "Height" we want the contact form to have.
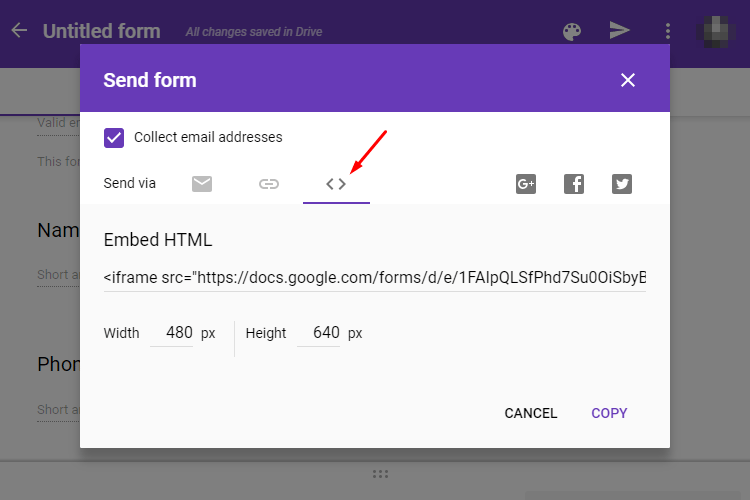
Once we are ready, we click on "COPY" to copy the form code to the clipboard.
How we integrate the contact form on our site
No matter which platform we have set up our site in, even if we have created the website from scratch, it should have a page with a contact form.
So we visit this page and enter edit mode.
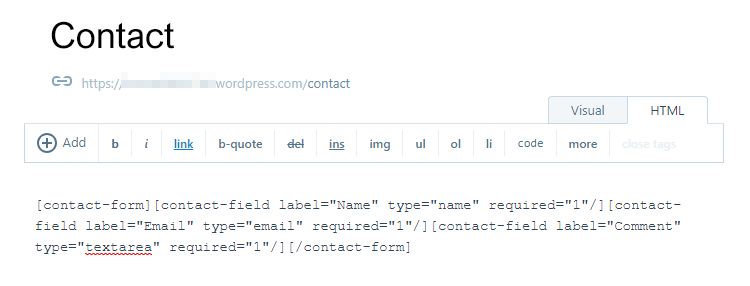
We replace the page code with the one we took from Google Forms.
We may see the code change, as in this case WordPress automatically modified the iframe code.

However, there is no reason to worry. When we preview the page, we can see whether the contact form is as it should be.
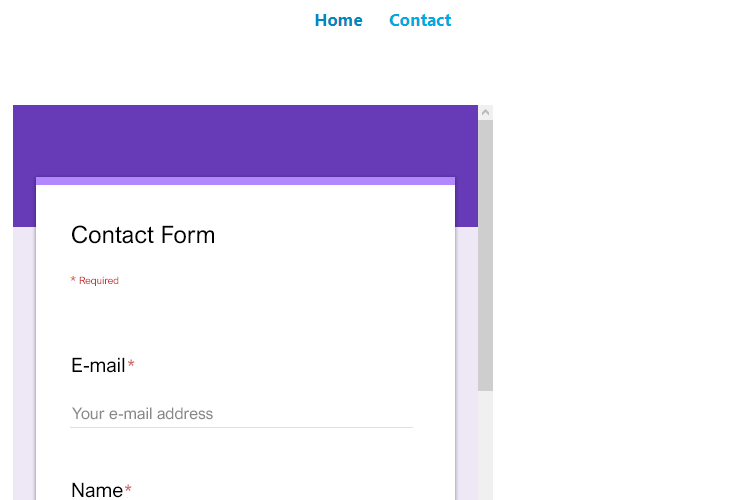
As we can see, the form is not perfect. It looks a bit weird, and it is aligned to the left.
With a few tweaks on our page and a few changes on Google Forms, we can adjust the contact form to our liking.
Modify and update the contact form
First things first, we can modify the form's dimensions at any time from the send settings.
So, click the arrow at the top right, select "Embed HTML," and set the proper dimensions.

Or we can change the width and height of the form through the code.

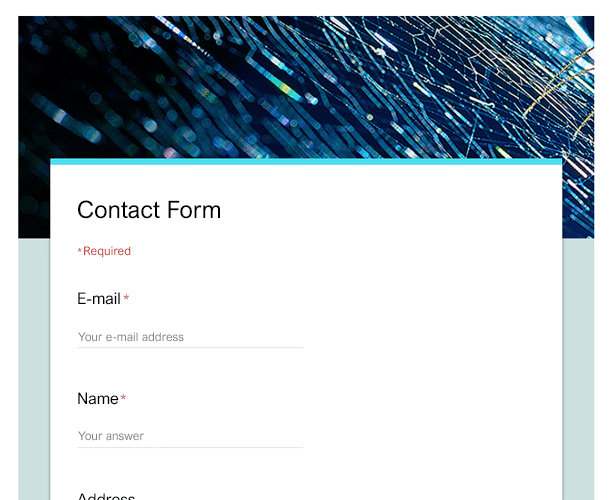
Once we are done with the dimensions, we can adjust the form's appearance.
We go to Google Forms, and with the form open we click the palette on the top right.

From here, we can choose a color, or add a photo as a background.

Any changes we make to the form when it comes to the fields, texts, and appearance are automatically applied on our site. So, we don't have to edit the code regularly.
So here is the final result of our contact form.
Testing the contact form
Testing the form is not a complicated process. We just open the contact page of our site, and we fill in the fields.
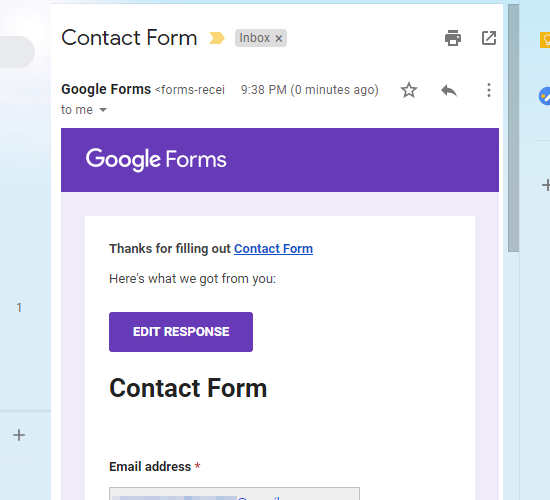
Before we click on "SUBMIT," we have the option to receive a copy of our answers. This happens because we added it as an option earlier.

Once we click on "SUBMIT," we will see the confirmation message that we set in the form's settings.
Also, if we allowed users to edit their answers, we will see the following link.

Finally, if the user chose to receive a copy of their answers, they will see an email in the inbox like this one.
Managing the answers
We can view the messages we received through the contact form from Google Forms.
We visit the page with the form we created and click on the "RESPONSES" tab.

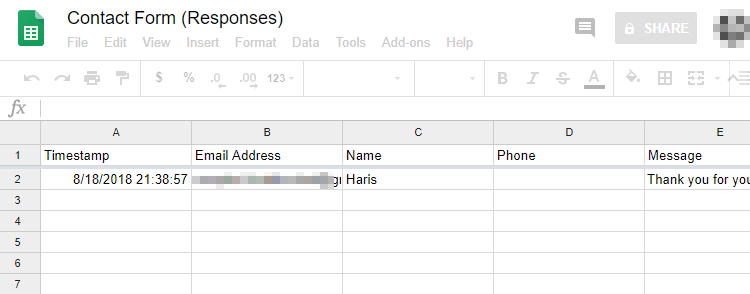
In this section, we have a few options. The first is to create a Google Sheet with all the answers.

Once we click the button, we will see a window in which we name the sheet as we want, and click "CREATE."

The sheet will open in a new tab, and everytime someone submits their answers, they will automatically be added to it.
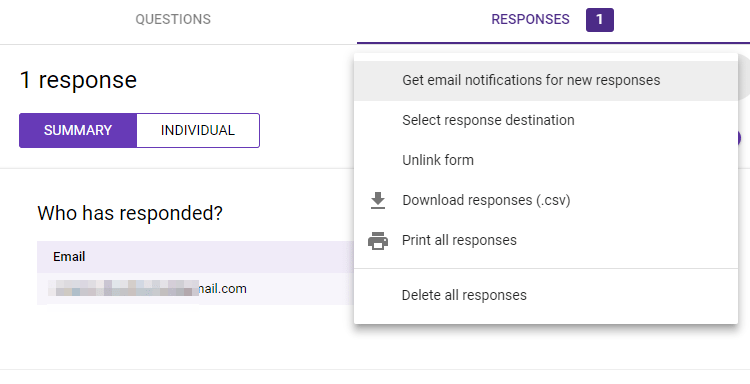
In addition, if we click on the three dots, we will find a few more options.
We can choose whether we want to receive email notifications for new responses, change in which Google Sheet it stores the answers, or unlink the form from Google Sheets.
Also, if we want, we can download the answers in .csv file format, print them, or delete them altogether.
If for some reason we want to stop receiving answers, but we do not want to delete the contact form, we just disable the relevant switch.

Finally, in the "SUMMARY" we see all the answers and their statistics.

If we click on one of the email addresses, we can manage that message.
We also have the option to delete or print the answer.

That's it. Our contact form is ready and works as it should. Besides, we did not pay anything for it, and it has all the fields we want.
Read in this article everything you need to know about Google AdSense, and how to make money with it.
We have created a remarkable contact form
As we have seen, with Google Forms we are able to create our own contact forms within a few minutes, exactly as we want them to be.
Through the various settings, we can activate/deactivate whatever we want, and our form will update automatically, without having to do anything else.
We will find all the comments in a Google Sheet that we can print anytime.
Did you know how to make a contact form with Google Forms? Do you prefer this form or premade ones from web development platforms?
Support PCsteps
Do you want to support PCsteps, so we can post high quality articles throughout the week?
You can like our Facebook page, share this post with your friends, and select our affiliate links for your purchases on Amazon.com or Newegg.
If you prefer your purchases from China, we are affiliated with the largest international e-shops:

Leave a Reply