The kernel is the brain of any operating system, the very basis of its existence. It's not an exaggeration to say that the kernel dictates the limits of the OS. On Windows, only Microsoft can deliver changes to the Windows kernel as part of a complete update. In Linux, though, it's quick and easy for anyone to do a Kernel upgrade. Let's see how to upgrade the kernel in Linux Mint or Ubuntu.
Unblock any international website, browse anonymously, and download movies and Mp3 with complete safety with CyberGhost, just for $2.75 per month:
We prepared this guide on Linux Mint 18.1 and Ubuntu 16.04.2 LTS. It might work on recent earlier and future versions, as well as on other distributions based on Ubuntu.
However, a kernel upgrade is a delicate task in any capacity, so make sure you have backed up everything beforehand.
Do I need a kernel upgrade?
If technology has taught us anything, is that the larger version numbers are better versions of any given program - most of the time.
Still, doing a kernel upgrade isn't a task to be taken lightly. It's nothing like doing a sudo apt-get upgrade, or even a sudo apt-get dist-upgrade. It's more like changing the complete engine of the operating system.

That means that even though the latest kernel is "stable," the upgrade could very well cripple our system, and have us format and reinstall our Linux distribution.
So, doing a kernel upgrade on a production PC is off-limits. And we must budget time to do a complete reinstall, should the upgrade go sideways.
A kernel upgrade is a good idea mostly for developers, who want to make sure that he future versions of their apps will be compatible with the latest kernel.
It could also be useful if we have a particular hardware problem that we can trace to the Linux kernel. Other than that, though, if it ain't broke...
How to do a kernel upgrade in Linux Mint / Ubuntu
First order of the day, before we even download the new kernel, is to make sure our system is up to date.
Linux Mint / Ubuntu full update
We open a terminal with ctrl+alt+T and type:
sudo apt-get update && sudo apt-get dist-upgrade -y

Depending on the last time we did a full update and our internet speed, this could take a couple of minutes.
When the update concludes, and provided it didn't encounter any problems and give off any error messages, we should reboot the system, with:
sudo reboot

Download the latest kernel version
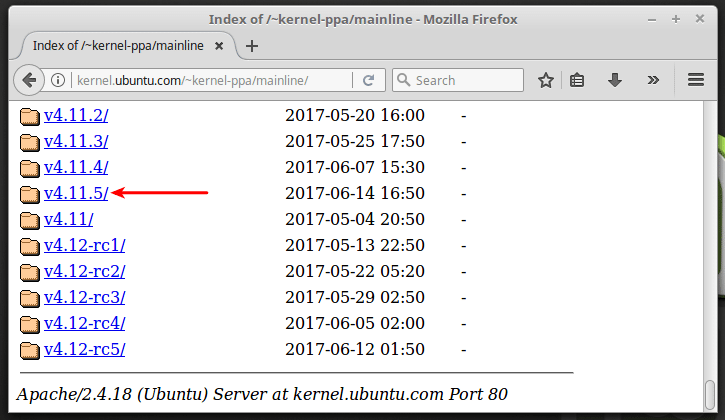
We will find the deb files for the new kernel on
http://kernel.ubuntu.com/~kernel-ppa/mainline/
The most recent kernel's folder should be near the bottom of the page. Unless you are feeling particularly adventurous, you should avoid the rc* kernels, which are release candidate versions, and thus unstable.

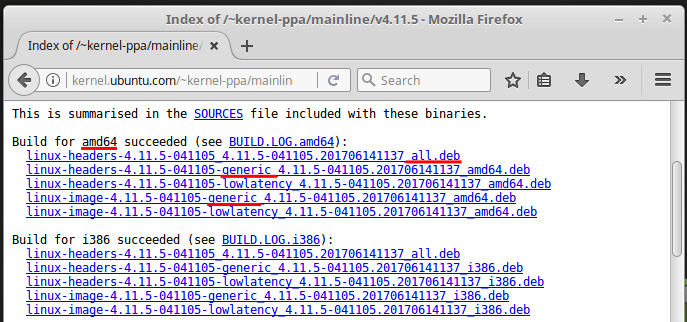
Inside the folder, we need to download three files. If we have the 64bit version of Ubuntu or Linux Mint installed, we download the _all.deb file and the generic amd64.deb files.

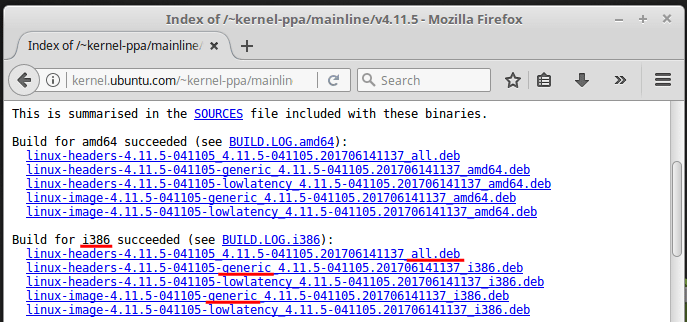
If we have the 32bit version, again we download the _all.deb, this time with the generic i386.deb files.

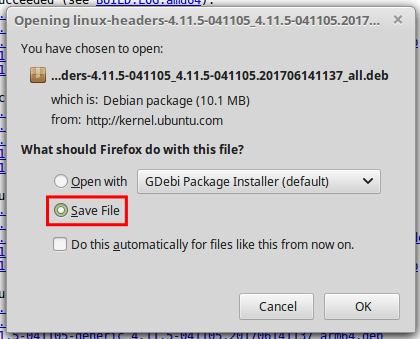
We make sure we download the files, and not run them.

After all three files download, we open a terminal and navigate to the download folder - usually ~/Downloads.
cd ~/Downloads

To do the kernel upgrade, we type:
sudo dpkg -i linux-headers-4*.deb linux-image-4*.deb

The installation will only take a few seconds. After the installation concludes without any errors, we reboot.

On the next boot, if everything went well, running the command...
uname -r
...will show the new kernel version.

That's it. The kernel upgrade was successful.
If for any reason, we need to uninstall the new kernel, we just need to run the command:
sudo apt-get remove linux-headers-4.11.5* linux-image-4.11.5* -y

As opposed to the kernel upgrade, make sure you include the full 4.11.5. If you type remove linux-headers-4*, it will also delete the distro's kernel, and the Linux installation will be brain-dead.
On the test rig, we got a couple of errors while uninstalling the kernel upgrade.

However, upon rebooting the system, everything worked as it should, without us having to do anything. We were back to the 4.5.0-53 kernel that came with the distribution.

Did you have any trouble with the kernel upgrade?
If anything on the guide didn't work as described, and you weren't able to do a kernel upgrade, leave us a comment.
Support PCsteps
Do you want to support PCsteps, so we can post high quality articles throughout the week?
You can like our Facebook page, share this post with your friends, and select our affiliate links for your purchases on Amazon.com or Newegg.
If you prefer your purchases from China, we are affiliated with the largest international e-shops:


tried all your commands. Was able to download the files but when I went into the terminal and typed cd......All I got was no such directory. I finally opened my file manager, highlighted the download directory and right clicked my mouse and told it to open in terminal. No problems after that. Changed out my kernel so now I'll see if I screwed up. Thanks for the information
I didn't have any trouble with this upgrade but I was updating the Kernel to fix my touchpad (it isn't recognized by Linux Mint 17.3). I had read that other people fixed theirs by doing a kernel update but that didn't help me. :(
upgrade mint 17.2 to 4.3.3-040303-generic with amd64 deb files, went perfect. did it to fix occasional dropping of network connection, this machine had been fine on #!, anyway we'll see, great tutorial.
You have to upgrade your GCC to 5.3 after doing this, or else your Nvidia/AMD/Any kernel drivers will never compile. Manually changing the symlink after installing them.
lrwxrwxrwx 1 root root 5 Feb 4 02:38 gcc -> gcc-5
-rwxr-xr-x 1 root root 775888 Nov 30 22:25 gcc-4.8
-rwxr-xr-x 1 root root 878384 Dec 5 18:01 gcc-5
lrwxrwxrwx 1 root root 8 Feb 4 02:38 gcc-ar -> gcc-ar-5
-rwxr-xr-x 1 root root 26968 Nov 30 22:25 gcc-ar-4.8
-rwxr-xr-x 1 root root 26976 Dec 5 18:01 gcc-ar-5
lrwxrwxrwx 1 root root 8 Feb 4 02:39 gcc-nm -> gcc-nm-5
-rwxr-xr-x 1 root root 26968 Nov 30 22:25 gcc-nm-4.8
-rwxr-xr-x 1 root root 26976 Dec 5 18:01 gcc-nm-5
lrwxrwxrwx 1 root root 12 Feb 4 02:39 gcc-ranlib -> gcc-ranlib-5
-rwxr-xr-x 1 root root 26968 Nov 30 22:25 gcc-ranlib-4.8
-rwxr-xr-x 1 root root 26976 Dec 5 18:01 gcc-ranlib-5
What you say makes sense, but unfortunately to upgrade GCC to 5.3 one has to compile it from source, and it needs a ton of prerequisites which are not normally found on most distributions. The repository ubuntu-toolchain-r/test only has up to GCC 5.2.1.
It's such a complicated matter, that people relying on proprietary Nvidia/AMD drivers are better off not upgrading the kernel, or choosing one that will work with the drivers.
Unless you know of an easiest way to upgrade GCC to 5.3, in which case it is welcome, but my research so far only points to compilining it from scratch.
Incorrect Herr Kyritis
https://launchpad.net/~ubuntu-toolchain-r/+archive/ubuntu/test
add-apt-repository ppa:ubuntu-toolchain-r/test
apt-get update
apt-get install gcc5
https://launchpad.net/~ubuntu-toolchain-r/+archive/ubuntu/test/+sourcepub/5750675/+listing-archive-extra
Published
on 2015-12-05
gcc-5 (5.3.0-3ubuntu1~14.04) trusty; urgency=medium
* Merge with Debian; remaining changes:
- Build from upstream sources.
https://launchpad.net/~ubuntu-toolchain-r/+archive/ubuntu/test/+sourcepub/5750675/+listing-archive-extra
https://launchpad.net/~ubuntu-toolchain-r/+archive/ubuntu/test/+packages
apt-add-repository ppa:ubuntu-toolchain-r/test
apt-get update
apt-get install gcc-5
cat /proc/driver/nvidia/version
NVRM version: NVIDIA UNIX x86_64 Kernel Module 352.79 Wed Jan 13 16:17:53 PST 2016
GCC version: gcc version 5.3.0 20151204 (Ubuntu 5.3.0-3ubuntu1~14.04)
Unfortunately, this doesn't work on Ubuntu 15.10.
I added the repository...
http://i.imgur.com/Q3JC5Ab.png
...and followed the proper procedure, but it won't upgrade beyond 5.2.1
http://i.imgur.com/selRnjs.png
The repository probably works up to 14.04, but not on the latest version. If you have a solution for 15.10, I'm open.
That's a bit ironic. Looks like 5.2 is the latest compiled for wily. Usually Trusty is the redheaded stepchild for new stuff.
https://launchpad.net/~ubuntu-toolchain-r/+archive/ubuntu/test/+packages?field.name_filter=&field.status_filter=published&field.series_filter=wily
https://launchpad.net/ubuntu/+source/gcc-5/5.2.1-22ubuntu2
When I did that first full upgrade step it hosed my xserver. DON'T do it- Just use update manager.
HELP - I have folloved these steps and all worked properly, but I had to uninstall the last kernel so I have tried the last command present in this page (sudo apt-get remove linux-headers-4* linux-image-4*). Now grub doesn't see Linux on its partition, so now I can't access to Linux. What is happened and what can I do?
Hi there, I tried following your steps on linuxmint and the update gave a lot of errors and didnt change anything in the end after a reboot....
I have a problem I'm trying to fix where I have 2 linux distros installed:
- lubuntu lxle (kernel 4.x)
- mint 17.3 (kernel 3.x)
lubuntu gives me almost perfect joystick (dragonrise) controls, but I can get sound to work with my VIA envy chip.....
linux mint on the other hand, I can make the sound work by forcing a bug in alsa mixer, changing the multi track internal clock while something is playing (with no sound), than it works...... but I cant get my joystick to work properly (the analogs conflict)
reproducing the alsamixer bug on lubuntu doesn't work... and I have to use this bug on mint every time I restart my pc (loggin out and in keeps sound working after forcing the bug tho)
so here I am... I can chose to play with joystick and no sound on lubuntu lxle.....
or I can play with sound, but no joystick on linux mint....
and this is driving me crazy!!