


When was the last time you cleaned your keyboard? If the answer is "more than a year," or "never," then it's certain that your keyboard is filled with dust, hair, decaying food, human and non-human DNA - if you own a pet - and so on. Below you can find all the information you'll need to clean a keyboard properly, making it as good as new.
Unblock any international website, browse anonymously, and download movies and Mp3 with complete safety with CyberGhost, just for $2.75 per month:

Why should I clean my keyboard?
Now, that's a good question. You may be the kind of person that likes it dirty - we're not judging you.

But if looking in the picture above sent shivers down your spine, you can keep reading.
People usually neglect their mouse's or keyboard's hygiene, although they are tools we use every day.
A study back in 2008 showed that keyboards we are using in an ordinary office have more harmful bacteria than a toilet seat.

Besides from poor hygiene and bad aesthetics, keyboards can become unproductive when the keys stuck due to dust, food particles, or other unidentified objects that fall under the keycaps.

To clean a keyboard thoroughly, we need to disassemble it and follow a couple of simple tips and tricks to avoid damaging it.
What am I going to need
If you want to clean a keyboard, you'll need a few tools that you can find in any household:
- screwdriver
- bowl with hot water
- cotton swabs
- isopropyl alcohol
- towel
- blower or compressed air can
- hair dryer (optional)
Disassemble a keyboard
The first thing we need to do it to disassemble our keyboard. Before we start, we can take a picture of the keyboard, so as to remember where to place each keycap when we finish.

We should note that each keyboard may have a different disassembling process than what we'll describe. You may find a disassembly guide for your particular keyboard model on YouTube. Our keyboard is mechanical, but we can apply the same steps to any keyboard.
Now it is a good time to unplug your keyboard.
After taking the picture, we can start removing the top half of the keyboard. It is easier to clean a keyboard that doesn't have an upper frame. In that case, you can just remove the keycaps. Depending on how dirty your keyboard is, or if you don't want to void your warranty, you can get away with just removing the keycaps as well.

The keyboard that we tested had an upper frame, so we wanted to show you the whole process.
Find and unscrew all the screws at the bottom of your keyboard.

Usually, there is an extra screw hidden under a sticker. Make sure to remove that as well.

Warning: If you remove this screw, you void the warranty of your product. Proceed with caution. PCsteps does not have any responsibility for any damaged keyboards.
When you have finished with the screws, you can set the front frame aside and start removing the keycaps.

Most keyboards - especially mechanical ones - include a special tool designed to remove the keycaps.

If you don't have one of those, you can buy a keycap puller...

...or use your imagination to create one. We can see some easy to make DIY solutions with zip ties and paper clips in the picture below.

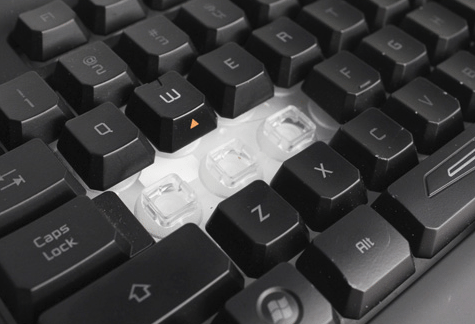
Then you can just remove all the keycaps.

Be careful with the large keycaps, because they have a metal stabilizer underneath.

The spacebar often has a couple of springs, so you have to be extra careful not to lose them. Make sure you keep them somewhere safe.

After removing all keycaps, we have access to the backplate.

In most cases, there will be some extra screws to hold the backplate on the back frame.

You can remove these too if you want to clean the frame.

How to clean your keyboard
After disassembling it, it's time to clean your keyboard. Arm yourselves with patience and start with the keycaps.
Keycaps
The keycaps are very easy to clean. All you have to do is put them in a bowl of hot water and scrub them with a soft sponge or fabric. Use only soft surfaces, or you may scratch the plastic.

You don't want the water to be too hot, because it may damage the keycaps as well. You can add a few drops of any mild liquid detergent in the water if you feel that your keycaps are very dirty, although clean hot water should do the trick.

When you finish, dry your keycaps with a towel and let them sit in a warm place to dry completely. You don't want any liquid on the keycaps when you put them back on. You can use a hair dryer to speed up the process.

Backplate
While your keycaps are sitting to dry, you can proceed with the backplate. Our backplate was not very dirty, but we've seen pretty severe cases.

In any case, take your keyboard outside, turn it upside down, and start shaking. A small blower or a compressed air duster will save you a lot of trouble.

When you finish, take some isopropyl alcohol and dip a cotton swab in the solution. Use the cotton swab to wipe off any dirt left on the backplate.

Be careful not to use too much isopropyl alcohol, cause you don't want it to drip inside the plate.
Frames
The frames are usually plastic or metal, and you can clean them with hot water. There is nothing special you should take care of. Just make sure to dry them thoroughly as well.
Membrane keyboards
If you want to clean a keyboard with rubber domes or membrane, the process is pretty much the same.
Your focus should be the switches and the backplate. Although waterproof, you shouldn't try to wash the membrane.
Laptop keyboards
Laptops can be a real pain when you want to clean their keyboards. That's because their keycaps are not as effortless to pull out and back in, and they can get damaged pretty easily.

Q-tips and isopropyl alcohol will be your best friends in this process. Oh, don't forget patience. Lot's of it.
In general, you can start by blowing the dust with a blower or compressed air can. But to clean your keyboard properly, you'll have to scrub between the keys with the cotton swabs.

It won't be easy, and it won't be fun, but it is certainly safer than if you tried to remove a laptop's keycaps. Note that you have to turn off your computer before you start cleaning your keyboard.
Reassemble
Once we have finished cleaning our keyboard, we are ready to reassemble it and put everything back in place. All we have to do is follow the disassembly guide backward.

The spacebar and the large keys are harder to put back on. If you have trouble with those, take a look at the video below.
Lastly, plug your keyboard in a USB port and check if it works correctly.
Routine maintenance to clean a keyboard
As we already mentioned, it is a good idea to clean your keyboard with the process above now and then.
However, there is an easier way that can be used more frequently, to keep your keyboard nice and clean. The method involves only a blower or a can of compressed air, along with the cotton swabs and some isopropyl alcohol or clean water.
The only difference is that we won't disassemble the whole keyboard.
To clean your keyboard, start by turning it upside down, and blowing some air inside to remove excess dust. The next step involves some rubbing with water. Again, you don't want to use too much, cause it may leak inside.
In most cases, you can use isopropyl alcohol, but the coating on some keycaps may get damaged.

It won't take more than 10 minutes to clean a keyboard this way. When you finish, allow it to sit for a few hours, just to make sure that it is completely dry.
You can use this process in a weekly or monthly routine, so as you won't have to disassemble and clean your keyboard thoroughly each time you drop a few bread crumbs on it. Or you can stop eating in front of your computer for a change.

How often do you clean your keyboard?
How dirty is your keyboard? Do you clean it on a regular basis?
Whether you liked our guide on how to clean a keyboard or not, you can leave a comment down below.
Support PCsteps
Do you want to support PCsteps, so we can post high quality articles throughout the week?
You can like our Facebook page, share this post with your friends, and select our affiliate links for your purchases on Amazon.com or Newegg.
If you prefer your purchases from China, we are affiliated with the largest international e-shops:

Leave a Reply